OWL 360/ 180 for Movie Render Queue
You can now render 360 and 180 degree video direct from Unreal Engine Movie Render Queue at ultra high resolutions (+32K) with precise color accuracy and professional compositing capabilities
Last updated About 2 months ago
Overview
The OWL 180/ 360 Render Pass for Unreal Engine Movie Render Queue is a custom render pass that lets you render a wide range of different projections at ultra-high resolutions, using the extensive features and capabilities of Movie Render Queue.
It is primarily used for rendering content such as:
Ultra high resolution domes and planetaria.
Immersive experiences for venues and attractions.
Entertainment and educational content for VR Headsets (Oculus, Vision Pro etc.)
Previsualisation for architecture and digital twins.
Backplates and driving plates for virtual production.
180 and 360 degree film making.
Basic Set-Up
Ensure that
Movie Render Queueis enabled in your Unreal project, by going toEdit>Pluginsand search Movie Render: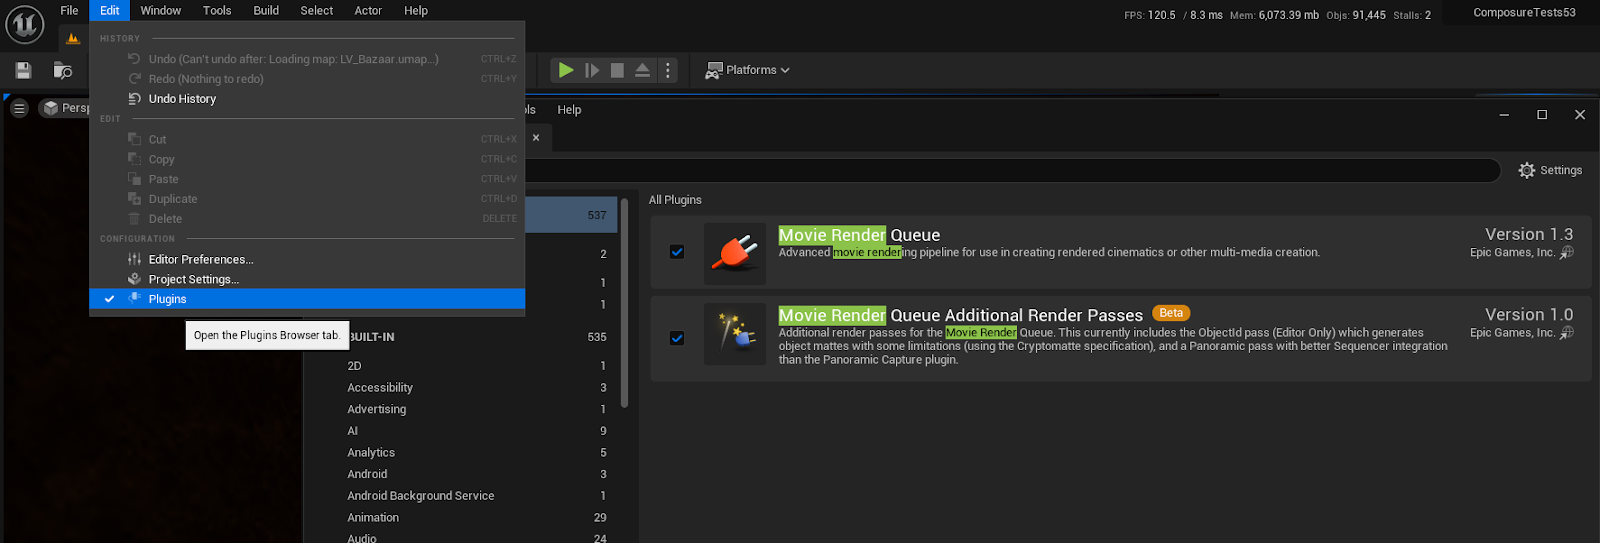
You need an
OWL 360 CameraorCapture Componentin your scene, added to asequencein UnrealSequencerand selected inCamera Cuts:
Click on the three dots next to the
Clapperboard Iconand make sureMovie Render Queueis set as the default rendering option: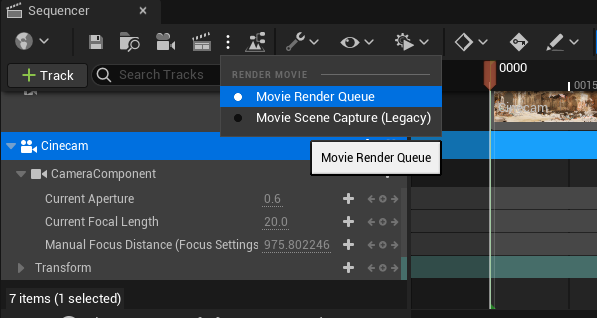
With the
Movie Render Queuewindow open, clickUnsaved Config: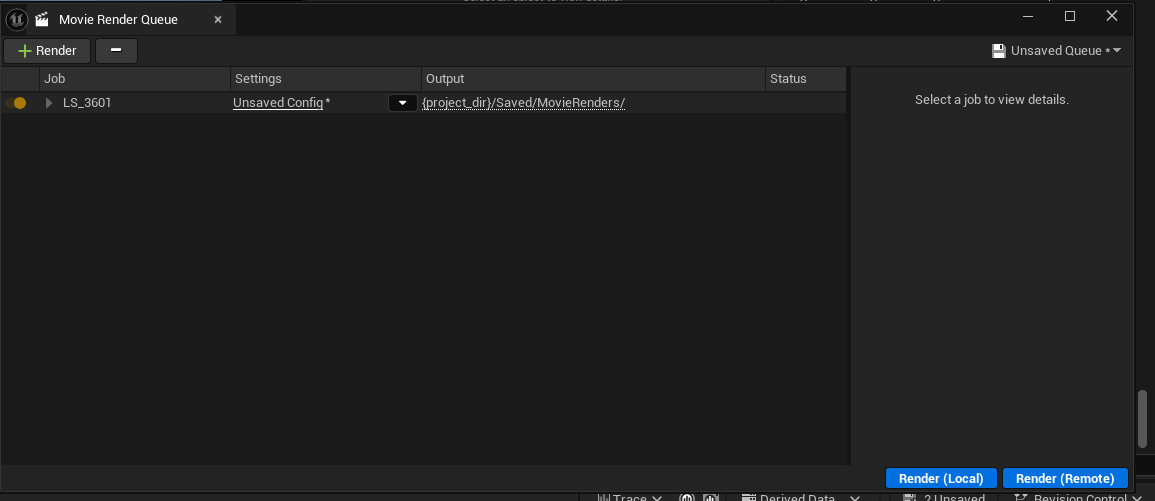
Press
+Settingand selectOWL 180/ 360 Rendering: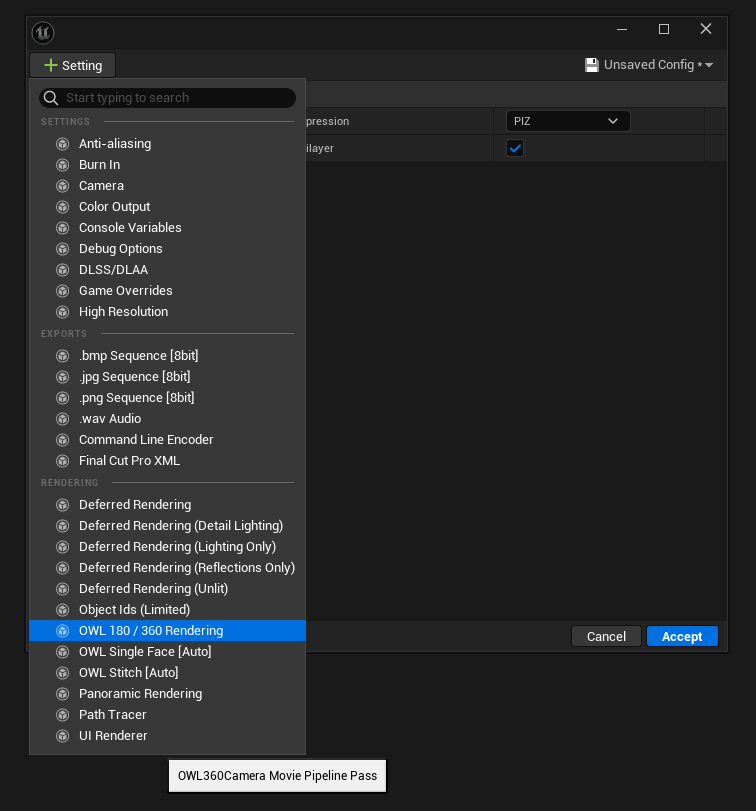
Add the settings for your render (
Deferred Renderingcan be switched off):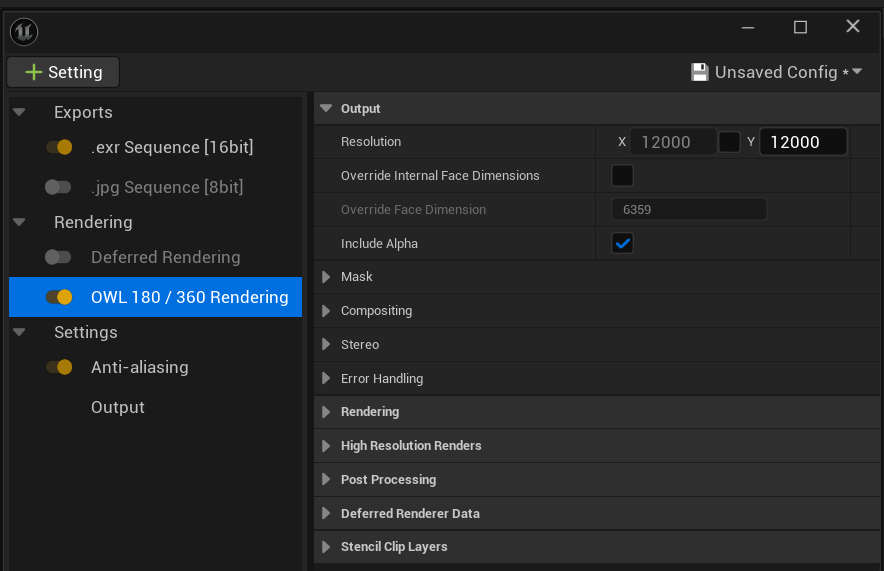
You should set the
Output Directory,Frame Rateand other details as normal in theOutputsection.
You can add other
+Settingssuch asAnti-Aliasing,Color Ouput,Export Formatsetc as you would do for a normal render.Once you have added your
Settings, clickAcceptand you can initiate your Render: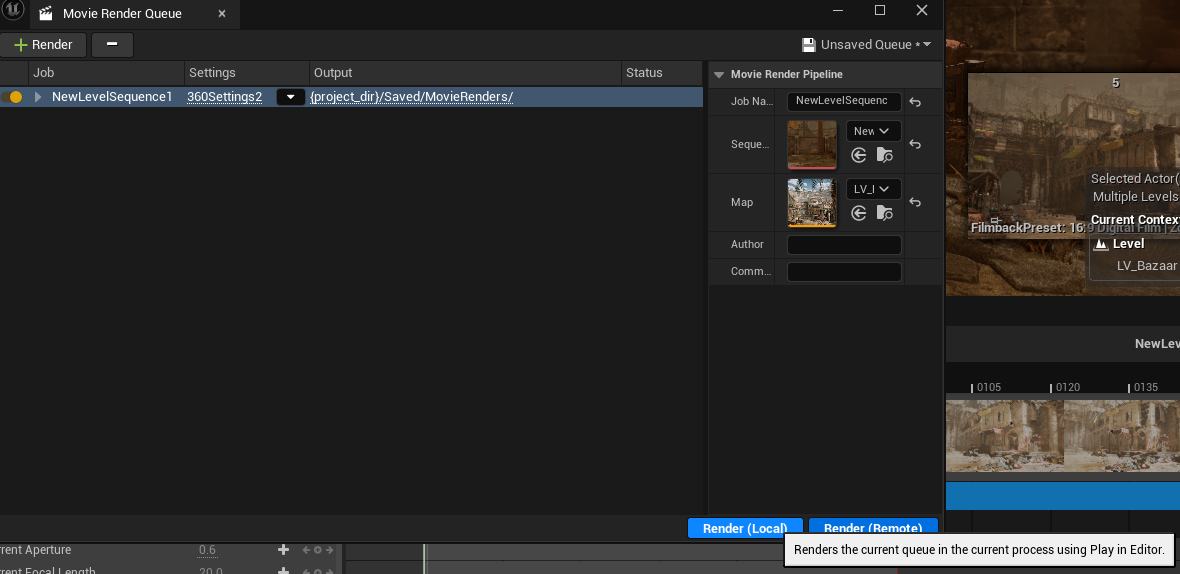
Advanced Rendering
Rendering from the Command Line
More advanced users can run an instance of Unreal Engine from the command line which enables just the render to run remotely without any instance of the Unreal Editor being opened, this can save (V)RAM and speed up renders:
You need a render job already saved in
Movie Render Queue.The
Output Directoryof the render is whatever directory you have saved inMovie Render Queue.After running the command in the Windows command shell, an instance of Unreal Engine will open, and the render queue will be executed.
How to Initiate the Render
Use a command in Windows Powershell to execute a render job:
"C:\Program Files\Epic Games\UE_5.6\Engine\Binaries\Win64\UnrealEditor-Cmd.exe" D:\UEProjects\MRQCommandLine\MRQCommandLine.uprojectMinimal_Default1 -game -MoviePipelineConfig="/Game/Cinematics/myRenderQueue" -renderoffscreen -Log -StdOut -allowStdOutLogVerbosity -UnattendedHere is a breakdown of what each part of this command means and how to customize it for a render:
path\to\your\UE5.0installation\Engine\Binaries\Win64\UnrealEditor-Cmd.exeThe first entry in the command line defines where the installation of the Unreal Engine is on the rendering computer.
Note: The reason this is in quotes (") is that Windows does not handle the space in the
Program Filespath elegantly. Any path with a space will need to be encapsulated in quotes so Windows does not interpret it as a parameter we are passing in.
\path\to\your\project\project.uproject:Next, we pass the path to the uproject to work with so it knows what to load. Notice the backslashes ("\") as I am working with Windows.
Other operating systems may need a forward slash ("/").
Map_To_Load:Defines the
Mapto load when loading the project.
Here is a list of the parameters:
-renderoffscreen:This tells the engine to initialize the GPU and render the frames as requested, but it suppresses the creation of any desktop windows.
This is the standard "headless" mode for rendering and is significantly more resource-efficient than running with a preview window.
The alternatives to this would be:
-windowedwhich sets the game to run in windowed mode.-fullscreenwhich will take over the entire display, not normally desired for remote renders.
-game:Launches the editor using uncooked content, allowing us to generate the render with the Editor's content
-log:When used as a switch (
-log), opens a separate window to display the contents of the log in real-time.When used as a setting (
LOG=filename.log), tells the engine to use the log filename of the string that immediately follows.If working in an environment where capturing the log to a file path, this is where that is defined.
-StdOut:Giving the parameter following
Logtells the command to output the log details toStdOut, a buffer that many rendering systems consume and capture details of the job.This helps customize job validation in the render manager of your choice.
-allowStdOutLogVerbosity:This parameter enables the
StdOut logto be verbose and give more details.
-Unattended:This informs Unreal Engine that it is being run from the command line and there is no active user.
It is possible to hook into this mode with your blueprints using the
isUnattendednode.
-MoviePipelineConfig="/Game/path/to/the/myRenderQueue":The
MoviePipelineConfigparameter informs the rendering system to operate on the specificMovie Pipeline Queue, saved from theMovie Render Queue.This path points to the name of the
Movie Render Queue; in the example below, it is/Game/Cinematics/myRenderQueue.
Deadline and Remote Rendering
If you are using our tiling solution for ultra-high resolution renders, we recommend to allocate the rendering of the tiles and the stitch job for a certain number of frames to a single machine in order to limit issues that can arise from read/write of sending very high resolution files between different disks.
The
OWL 180/ 360 Render PassforMovie Render Queuegenerates standard render jobs in Unreal.These can be allocated to different machines using remote rendering solutions like Deadline.
Rendering Hooks
This is a PRO feature which allows you to use
Hooksto gain low-level access to sections of the OWL rendering pipeline.You can also use this feature to add a
burn-into your renders (see below)
C++ Header File
See the full C++ header file OWLMRQ360Hooks.h in the Source/OWLMRQPipeline/Public/OWL360Camera folder
Blueprints
While this class is blueprintable, only a subset of the methods are available in blueprints because of the Unreal restrictions that blueprints only be executed on the game thread:
Setup_GameThread- called while the pipeline is being initialised.This is useful for setting up any objects or variables required in your class later.
TearDown_GameThread- called when the movie pipeline is being destroyed.For cleaning up variables / data.
PreRenderCamera_GameThread- Called on the game thread for each camera found.Be aware that cameras are sometimes not rendered (e.g. when
Fadeis0) and so it's important to check thebSkipRenderingflags.Also note that when using
OWL Compositingoutputs, this hook will be called for every camera, however thePostComposite_TaskThreadhook will only be called once for the composited output.You can check the setting OWLPass→
Settings.Output.bCompositeCamerasfor this.
ModifyTilePostProcess_GameThread- called for each file of each face on each camera.This exposes mutable
Post Process Settingsstruct which can be modified, like for example by adding a customBlend Materialwith face or tile-specific material parameters.
C++
C++ can call all of the above methods by overriding the above methods with the _Implementation suffix. Additionally there are the following methods:
PostStitch_TaskThread- this is run concurrently on different task threads and enables modification of the raw pixel data.PostComposite_TaskThread- run concurrently on different task threads after stitching and any compositing or adjustment due to Fade values.PostTileRender_RenderThread- this is executed on the render thread after each tile / face is rendered with anFTextureRHIRefTile that can be used in custom C++ shaders etc.This happens before the surface is read
Adding passes / Submitting extra layers to output
It is trivial to add extra passes to the render. These passes are pure C++ and can perform calculations or append layers.
To submit a pass call one of the three
AddRenderPass_...methods below from inside your class:AddRenderPass_8BitAddRenderPass_16BitAddRenderPass_32Bit
All 3 methods take the
PassIdentifierwhich is an unreal struct forEXR/ output file labelling and a callback with the following typing:
bool YourCallback32Bit( const FMoviePipelineRenderPassMetrics& SampleState, const FIntPoint& OutputResolution, TArray64<FLinearColor>& OutData) { return true};Rendering from Packaged Projects
You need a 360 Camera Machine license on the machine running the app for this to render without a watermark.
Once you have a set up a 360 Render in Unreal Engine you can trigger the render from inside packages projects/ games.
You need to call the
Movie Pipeline Queue Engine Subsystemwith atriggersuch as akey press.The
Allocate Jobnode is where you select theSequenceyou would like to render (this can be hard-coded or you can create an option to choose).The
Set Configurationnode is where you select theSettingsyou have saved inMovie Render Queue.The
Render Jobnode will initiate your render.
FFMPEG
You must install FFMPEG to use it in the command line.
FFmpeg is a leading free, open-source multimedia framework designed to decode, encode, transcode, mux, demux, stream, filter, and play nearly any audio or video format.
For example, below shows how to encode your saved stills to video using a wider range of formats and color spaces than h.264.
Navigate to the render output folder and type
CMDto bring up the Windows Terminal in the File Directory where you have saved your rendered files.
Paste the below command into the terminal and press enter.
It can help to redraft and save the command in notepad, changing any parameters that are unique to your own PC or render (marked with italics).
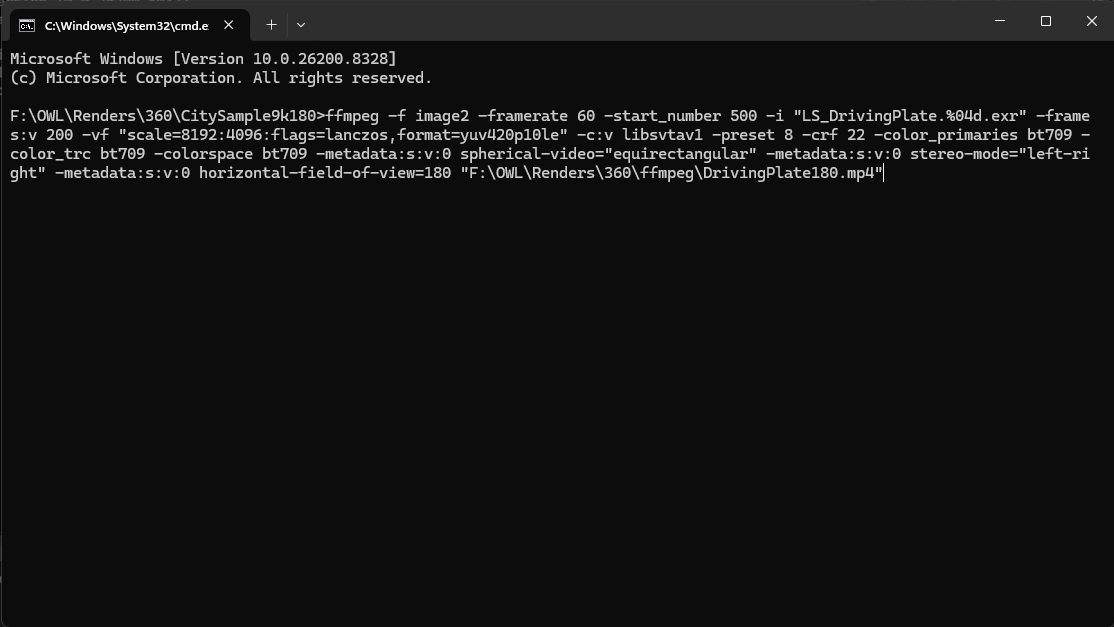
ffmpeg -f image2 -framerate 60 -start_number 500 -i "LS_DrivingPlate.%04d.exr" -frames:v 200 -vf "scale=8192:4096:flags=lanczos,format=yuv420p10le" -c:v libsvtav1 -preset 8 -crf 22 -color_primaries bt709 -color_trc bt709 -colorspace bt709 -metadata:s:v:0 spherical-video="equirectangular" -metadata:s:v:0 stereo-mode="left-right" -metadata:s:v:0 horizontal-field-of-view=180 "F:\OWL\Renders\360\ffmpeg\DrivingPlate180.mp4"Explanation:
ffmpeg -f image2: Initiates ffmpeg-framerate: Sets the Final output framerate of the video file. -start_number 500: a custom start frame number, ignoring any prior frames from the output.-i "LS_DrivingPlate.%04d.exr": Finds any files with the name LS_DrivingPlate.exr and with four integers to label the frame number.-frames:v 200: Amount of frames to render-vf: Video Filters"scale=8192:4096:flags=lanczos,format=yuv420p10le": Downsample the 8k video to 4k with a Bilinear sampling downscale algorithm.-c:v libsvtav1: The container for the video (AV1)- a high quality compressed video format.-preset 8: The encoding quality, the lower number being higher quality with slower encoding and decoding.-crf 22: (Constant rate factor) 0 being lossless quality, 51 being the highest, CRF allocates more data to complex, high movement frames, while reserving data where little motion is present. -color_primaries bt709 -color_trc bt709 -colorspace bt709: Setting the color space to Rec 709 -metadata:s:v:0 spherical-video="equirectangular" -metadata:s:v:0 stereo-mode="left-right" -metadata:s:v:0 horizontal-field-of-view=180: Injecting 360 metadata to enable programs to recognise the video as 180 equirectangular with a left/right orientation."F:\OWL\Renders\360\ffmpeg\DrivingPlate180.mp4" - The final output directory for the video file.
Previsualisation
You can use the
OWL 360 Camera/ Componentto pre-vis your renders because it color-matches yourMovie Render Queueoutput, while also rendering in real-time.So instead of waiting for hours/ days to see what your render will look like, you can preview it in real-time on a screen or headset to get your shots perfectly as you want them before initiating your final pixel high-resolution output.
This is particularly useful for thinking about audience details like the proximity of objects to the camera, scale of your scene to the viewer and the pace of the camera through your levels.
Once you have previewed your sequences, you can then render short frame ranges at your target resolution to:
Gauge how the final encoding settings, color pipeline settings and frame rates feel in the final output format.
Get an idea of how long the full render will take by multiplying the custom range’s render time up to the full frame range amount.
Establish your pipeline with any post-processing software like Premier Pro, or Davinci considering
Bitrate,Frame RateandColor Conversionso you know all your required settings before initialy your full render in Unreal.
Previewing in a VR Headset
You can live-stream the
Render Targetof the camera through ourSpout/ NDI Sendersto either a headset or venue previsualisation software.If you are outputting VR content then you can use the VR.NDIUntethered app in Oculus to receive a live NDI feed direct to the headset (with
stereoscopicsupport).With DLSS enabled, it should be possible to have
4Kresolution live output at20-30FPSwhich is very effective for previs.
Venue Digital Twin
If you are making content for a Dome/ immersive venue, you can use the
DomeViewer softwareboth in Oculus or Windows to preview your content in a digital twin of your venue (either birds-eye or as an audience member):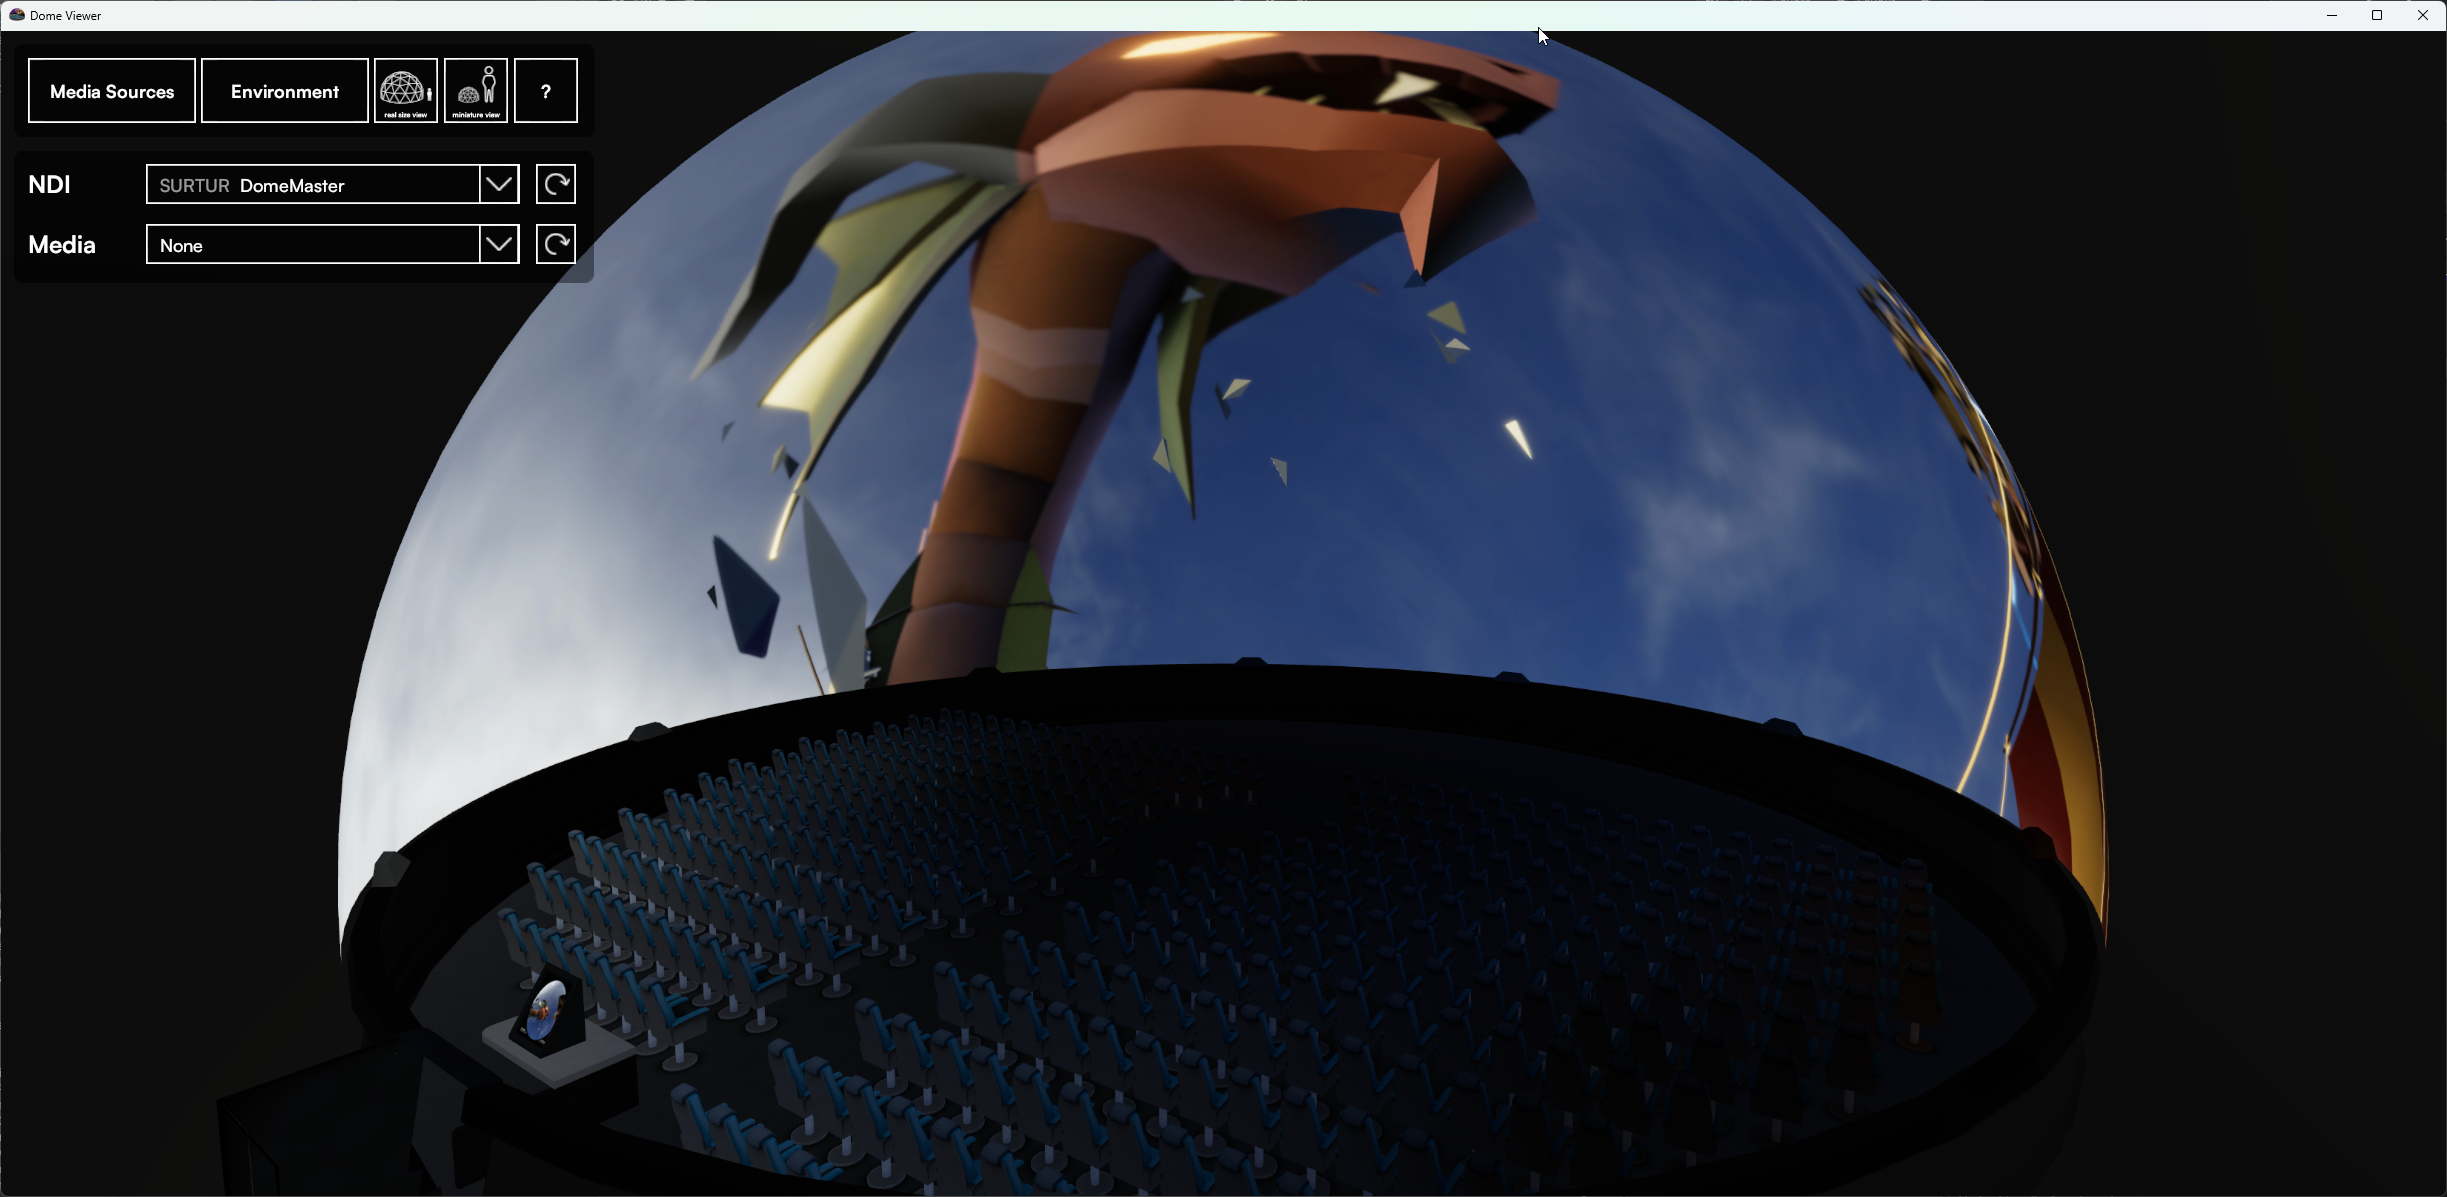
You can also build a digital twin of your venue in Unreal and use the
Media Input Wizardto set up anUnreal Media Platewith the correctMeshof your venue’s screen.You can then stream the
360 Camera/ Componentoutput into your digital twin via theOWL Spout/ NDI Sendersand it will play with perfect color accuracy in your virtual venue.
Performance
Resolution
Unreal has a ceiling of about
8Kx8K, depending on your GPU, before you are likely to getVRAMcrashes.For higher resolutions
12k,16k,32ketc., you will need to use ourHigh-Resolution Renderstiling solution (see section below).If you are using
Post Process MaterialsorStencil Clip Layers, each additional output counts as another render that needs to be held in memory so can have a largeVRAMimpact.For maximum capacity, close all resouces that are using VRAM (
Viewport,Render Targets) and then close and re-open Unreal.This will flush your VRAM and significantly increase your render speed and resolution capacity.
Disable Parallel Rendering(PRO license only, seeFeaturesbelow) renders each frame sequentially reducing the amount of data that needs to be held in memory, so can increase the maximum resolution possible on a single machine (at the cost of slower rendering).If you are using
Lumen, you can useupsamplingalgorithms (TSR/DLSS) to render at a higher resolutions but these can cause visual artefacts.You can also optimise your level using the guide here.
Speed
The
OWL 180/ 360 Renderingpass is very fast and should provide at least the same speed, if not better, than Unreal’spanoramic rendererwith much higher quality visual results.Render speed is highly proportional to your VRAM capacity so you should follow the tips in the section above to flush your VRAM by closing pixel rendering assets and the reopening Unreal before initiating your renders.
You can achieve similar performance using
headlessrendering via the command lineas explained in theAdvanced Renderingsection above.High resolution renderingusingtilingisn’t necessarily slower than rendering to a single texture due to the lower VRAM usage in rendering eachtile.If you have a more powerful CPU than GPU then
tilingmay be faster due to the CPU efficiency in stitching thetilesand the GPU headroom from eachtilerequiring less VRAM to render.In
Lumenrenders, optimising speed is getting the right balance of level optimisaton (to reduce VRAM usage),anti-aliasing samplesand upscaling/ downscaling.Adding unnecessary anti-aliasing samples can massively bloat render times, see our guide on how to avoid this.
In
path-tracedrenders, optimising speed is about balancing yourlight samplesand yourdenoiser, trying to get the lowest number ofsamplesthat thedenoisercan clear up to get the final image quality you need. See our guide on how to manage this.In additon, certain
path-tracedlighting systems likeReference Atmospherecan have a strong visual impact but a massive impact on render times so need to be chose carefully.Having more VRAM can give you more capacity but won’t necessarily increase your speed. For example, a 5090 will normally render faster than an RTX 6000 due to other GPU optimisations for games content.
A suggested local machine would be: 5090 NVIDIA GPU, 9950X3D AMD CPU, 96GB DDR5 AMD EXPO compatible RAM >5600Mhz (2 DIMM sticks) plus other components with comparable performance.
Image Quality
You can achieve an exceptional image quality with the
OWL 360 CameraandMovie Render Queuewithout needing much configuration.By default your colors should match your
Viewport, although you will need to check your Bloom setting as by default this is set to0on the360 Camerato avoid seams.Otherwise, the methods to achieve cinematic quality imagery are similar to normal unreal renders.
For the best visual output, you will likely need to modify
anti-aliasingsettings and follow our guidance onpost-process effects(seeTrouble-Shootingbelow or our full guides).You can try
DLAAin place ofTSR, particularly for optimising motion blur.Supersampling (
TSRplusr.screenpercentageconsole variable) is a very effective way of increasing detail and clarity in your renders.Lumenrenders can sometimes have seams, due to differences in light between the cube-faces of the camera, but almost all cases, these can be managed using the tips inTrouble-Shootingbelow.
Lumen vs. Path-Tracing
The
OWL 360 Degree Camerasupports bothLumenandPath-Tracingrender pipelines.Lumenis the defaultGlobal Illuminationmethod for Unreal Engine and is highly recommended.It renders significantly faster (
>10x/frame) thanPath-Tracingand can be combined withUpsamplingto increase this even further.Path-Tracingdoesn’t offer any advantages over other CPU-based renderers like Arnold, V-Ray or Corona, but can be very useful in renders where lighting, reflections, refractions or shadows are very important (particuarly architectural stills).
Output Formats
For professional content creation and color grading we always recommend
.exrfile format with at least16bitcolor bit depth andDisable Tone Curveticked in theColor OutputMovie Render Queuesettings.For quick renders, or if you are very limited on file size
jpg,mp4orpng(if you needalpha channel) can be fine, but these are limited to8bitcolor space.ProRescan offer a better video preview format, since it has10bitcolor,alpha channelsupport and offers instant playback capabilities without needing to be encoded into video and can be encoded to higher resolutions thanh.264, which is limited to4096×4096.
Features
Resolution
Select the
Resolutionyou need for your render here and always use this box to make any changes.Do not use not the main
Movie Render QueueOutputsection resolution setting, which will be updated automatically.Rendering at resolutions over 4096×8192 requires a PRO 360 Camera license.
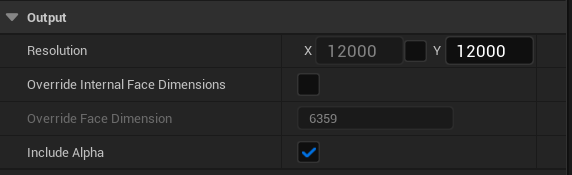
Override Internal Face Dimensions
This setting lets you increase the pixel density of the individual cube faces that make up your render so that you can render at a fixed resolution but get a level of detail that would otherwise only come with a higher resolution.
For moving images, it’s generally not recommended to increase the default value much because you will create an ‘over-sampling’ of pixels per frame that lack temporal information and so will create jitter.
In general, it’s much better to use supersampling via
TSRand ther.screenpercentageconsole variablethan to change this value (because that method usestemporal samples).
Alpha Channel Output
N.B. With the Show Only method on the 360 Camera/ Component , Unreal Engine will not render any pixels (bloom, particles etc) around the selected Mesh.
If you want correct colors then you should use Stencil Layers (below) with .exr output rather than Alpha Settings.
Ensure you have
Alpha Settingsconfigured in yourOWL 360 Camera/ Component(using theShow Onlylist). Both alpha andinverted alphacan be rendered.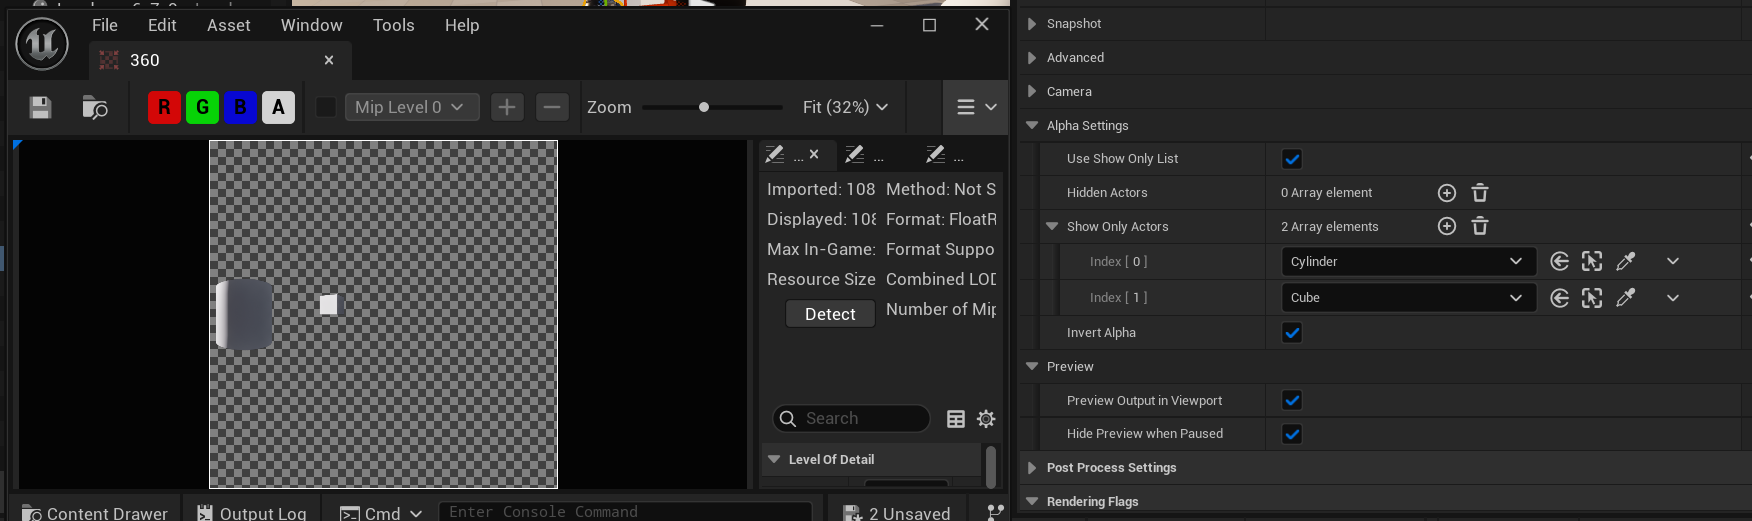
Tick the
Include Alphabox in theOWL 180/ 360 Renderingsettings: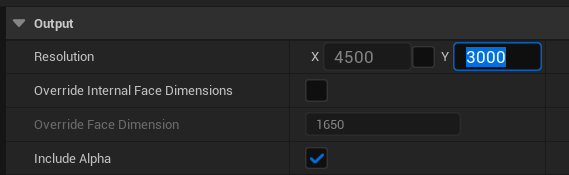
We recommend to use
PNGoutput fromMovie Render QueuewithWrite Alphaticked: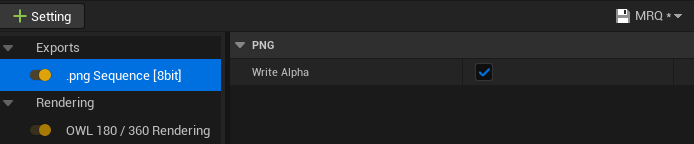
Mask
If you have have set up a custom projection to an output mask in the
360 Camera/ Capture Componentyou need to add the .png file here again here to render it.
There is an option for
AbsoluteandRelativefile paths, so, for example if you are sharing the file across a team, you may need to set a relative file path so that theMaskfile is picked up correctly.
Compositing
N.B. All cameras must have the same projection type for Compositing to work.
It is not possible to render multiple cameras to EXR layers while compositing is active, all cameras outputs are merged.
There is no cap on the number of 360 Cameras/ Components you can composite in Movie Render Queue but adding more with have an impact on V/RAM.
Compositinglets you composite between differentOWL 360 CamerasorComponentsin Unreal for effects like cross-fading.Please see the section guide in the
OWL 360 Camera/ Componentdocs for how to use this capability.If you are using the
OWL Compositing TrackinSequencerthen you need to tickComposite Camerashere to render it correctly.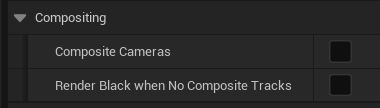
Stereo
If you tick this option you must ensure that all dynamic elements such as particles or ultra-dynamic sky are sequencer rather than random, otherwise they will be different in each of the two eyes.
If you want to
Render Only One Eyeof yourStereoscopicprojection at a time, you can tick this option.This can be used if you will use an external compositing/ stitching solution to create your final pixel output or alternatively if you want to encode each eye separately for playback, which is a way to achieve higher resolution playback on desktop connected VR headsets:

Error Handling
This allows you to chose to exit from the render if one of the frames is corrupt.

Path-Tracing
Tick this option if you have selected
Path-Tracingin yourMovie Render Queue+SettingsYou will need to change the
Anti-Aliasingsettings inMovie Render Queueas well.See guide here for how to set up
Path-Tracingsucessfully in your renders.
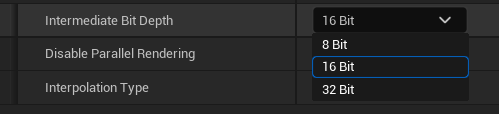
Intermediate Bit Depth
This is the
Color Formatof your render.Basic licenses are limited to
8bitbut Pro licenses can use16/ 32 bit. See guide hereA higher bit depth will create a significantly richer color range in your renders.
Disable Parallel Rendering
This is a PRO feature which lets you render frames in sequence rather than in parallel.
This is useful in heavy renders where parallel rendering can lead to a VRAM crash.
Interpolation Type
To form each projection, a cubemap of different faces is projected onto another shape (sphere, hemisphere etc). This requires sampling from the cubemap.
Bilinear Samplingis recommended to get a higher quality image with less jaggedness although it can result in slightly longer render times.
This setting can be used in combination with the
Override Internal Face Dimensionssetting if you are trying to increase the detail or sharpness of an image while not increasing your outputResolution.
Burn-Ins
You can use the Rendering Hooks section to add a blueprint to make a Burn-In/ HUD on your 360 renders:
This only works when using the
Stitch PassinHigh Resolution Rendering.You should use this instead of the
UI RenderinMovie Render Queue, which gets distorted by the 360 output.You can select the size of the
burn-in(max8192x8192) and it's position on your render using the tools below.By default the
burn-inisn’t full screen, but if your render is less than8192×8192then you can position it full-screen to make a 180/360 DegreeHUD.
Adding the Burn-In to your Render
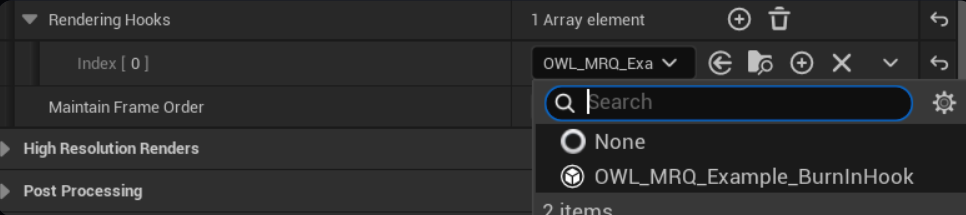
In
Rendering Hooksadd anArray elementand select aBurninHookblueprint (an example is there by default):You can add more than one if you need.
Modifying the OWL Burn-In Blueprint
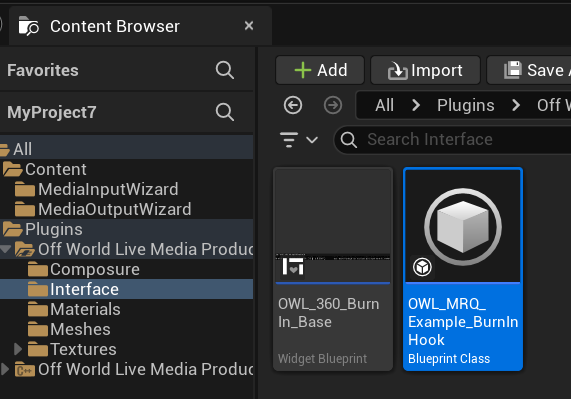
Click the
File Explorericon to find theOWL_MRQ_Example_BurninHookBlueprint Classin yourContent Browserand then double click it: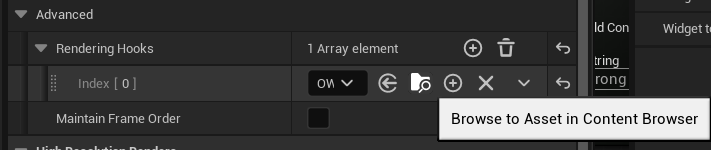
Click on
Class Defaultsto open theDetailspanel on the right: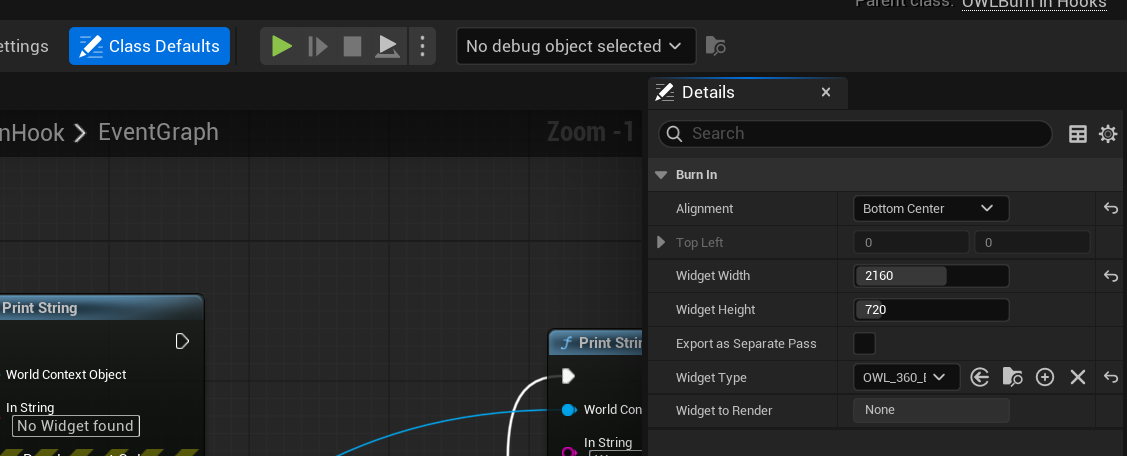
In the
Detailspanel that emerges you can configure:Alignment:lets you choose where on the rendered frame theburn-inis rendered.Width and Height:Of theburn-inis in pixels and is max dimensions8192x8192.Export as Separate Pass:Tick this if you want theburn-inas a separateEXRlayer (uncomposited with transparency) instead of composited on top of the rendered frame.Widget Type:Use this to select theWidget Blueprintthat you want to be rendered as theBurn-In(normally we recommend to just modify theOWL_360_Burn_In_Basewhich is selected here (see below).
Updating Widget Data
In order to update the data on the widget, your
Blueprint Classmust have a public method on it with a parameter for the data.In our example
Widget Blueprint, this method is calledSet Data: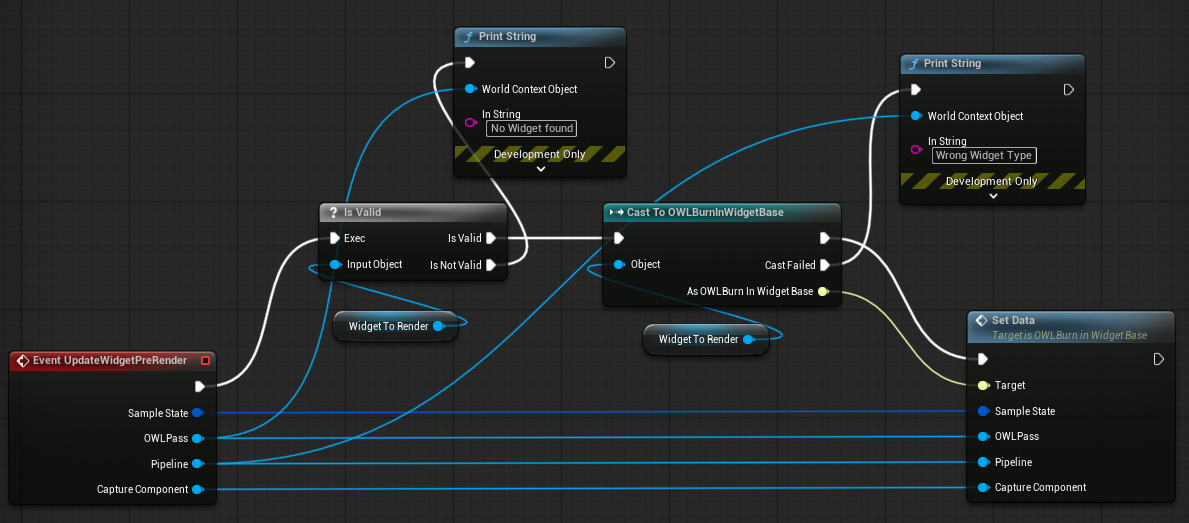
At runtime the
Widget Typeselected above is instantiated to theWidget To Render.In your blueprint, ensure that this is valid, the cast it to your
Widget Blueprint Classand then call any relevant public methods on your blueprint class.You can copy and customise the
OWL_360_BurnIn_BaseWidget Blueprintas you need:Each element of data is a public variable.
Explore the
Graphsection of theWidget Blueprint, navigating to theSet Datapublic method.There you will see the list of available data and how it has been connected to the variables on the UI.
Creating your Own Burn-In Blueprint
You can either modify the existing OWL_360_BurnIn_Base Widget Blueprint or create a copy to modify separately.
Select the
OWL_360_BurnIn_BaseWidget BlueprintinContent Browserand double click to open: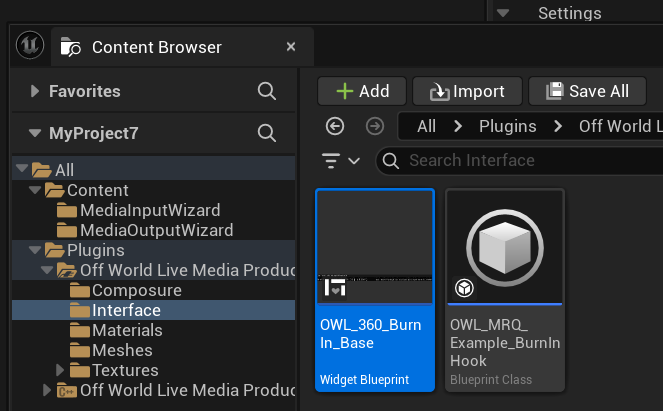
In the
Widget BlueprintDesignerinterface make any changes you need. (Thensave/ compile):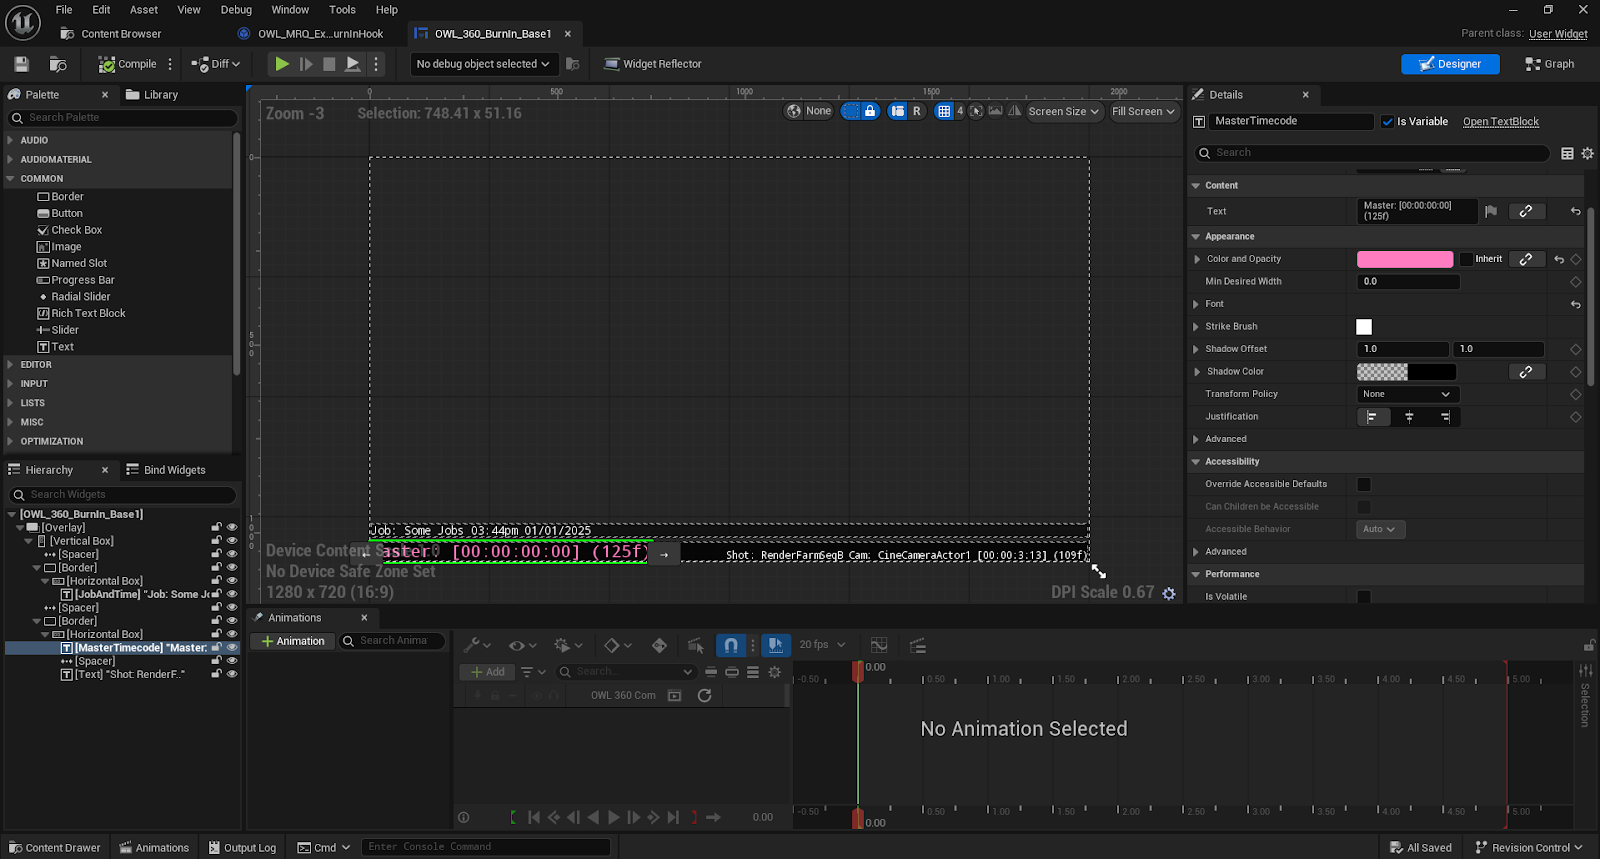
If you have only modified the existing
OWL_360_BurnIn_BaseWidget Blueprintthen it will work automatically.If you have created a new Widget Blueprint (by copying the original) you need to open the
OWL_MRQ_Example_BurninHookBlueprint Classand in theDetailschange theWidget Typeto the name of you new one: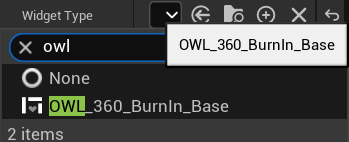
Maintain Frame Order
N.B. In order to correctly sequence frames, completed frame data is stored in memory until previous frames have been rendered. This will increase memory usage.
This is a PRO feature relating to
Tiling/ High Resolution Rendering.If you are using custom outputs like, for example, the FFmpeg output and require frame order synchronisation, then check this box.
Otherwise, by default the
OWL Stitch Passruns in parallel and exports frames to disk as soon as they ready (so it is possible that some frames arrive out of sequence).
High-Resolution Renders
If you are using Tiling, then all dynamic content (particles etc) must be cached or sequenced and share the same random seed. Otherwise when you stitch the tiles together there will be differences between them.
This is a PRO feature which allows you to split your render into smaller Tiles and then use a Stitch pass to stitch them back together.
This permits rendering a huge resolutions 12K, 16K, 24K, 32K etc.
GPU vs CPU Usage
Tiling will typically use less VRAM and GPU capacity because you are rendering smaller resolution jobs.
However, the
stitchingoftilesis all done on the CPU so benefits from the most Logical Processors/ Cores possible.The
Stitch Passcan be initated on a CPU only machine with a-nullRHIflagvia the command line.So if you have a less powerful GPU than CPU,
tilingmay well render more quickly.In general,
tilingdoesn’t take much longer than normal rendering.
Important
Ensure that all your
Output Settings(Frame Rate,File Directory,all360 Rendersettings) for your render are all set because eachTilewill be generated as a separaterender jobwhich will inheirit these settings when you clickGenerate Jobsin this section.
Select High-Resolution Render Settings
This section lets you define the settings for the
Tilesas well as the finalStitch Pass.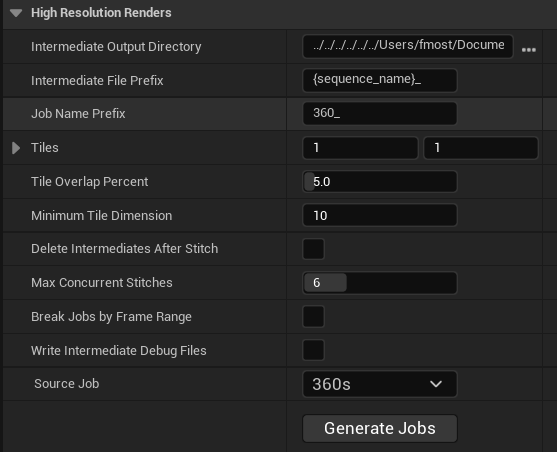
Intermediate Output Directory:This is the file location where you will store all the tiles you render.Intermediate File Prefix:This is automatically generated but can be modified. This is important because if a file renders incorrectly, you can re-start your render from a specific tile so you need to be able to pinpoint the exact tile for rendering efficiently.Job Name Prefix:This is combined with the Intermediate File Prefix above to give a final name to each of the tiles that you render.Tiles:Here you select the number of tiles you want create.Your output will be formed by a certain number of cube-faces depending on your
Projection Type(you can useFace ControlorDebug Face Colorsin theOWL 360 Camera/ Componentto see this).The value you set in
Tileswill split each of these cube faces horizontally and vertically.If you select
1-1and you have a standardCubeMaporEquirerectangular360 projection then you will output sixTiles, once for each of the cube faces.If you select
2-2then you will split each of the cube faces into two horizontal and two verticalTiles, so you will output four tiles for each of the six cube faces, 24 total tile jobs (plus the stitching job to join them together).
Depending on the complexity of your scene, you will need a different number of tiles for different resolutions.
The best way to estimate this is to look at
Override Internal Face Dimensionabove to see the resolution you have set for each of the cube faces.Your
Tileswill split that resolution.A resolution for each tile of
3Kx3Kshould be very comfortable (unless you have a very intense scene.)
Tile Overlap Percent:This creates a blend between each of the tiles to ensure that post-process effects don’t create seams.Minimum Tile Dimension:In certain projections, such asDomemaster, you will have a large central cube-face and smaller faces on the edges.If you tile those smaller faces, then it can create tiles that are too small in dimension to include all your post-process effects.
Increase this value if you see this issue.
Delete Intermediates After Stitch:If you are rendering at a high resolution, theTileswill consume a lot of disk space.Unless you need the
Tiles, you should tick this option as it will delete them after you have stitched your final frame so that they don’t clog up your disk.The
Tileswill only be deleted if your frame has been stitched successfully.
Max Concurrent Stitches:Stitching is done on the CPU so this value can be set as high as the total number of Logical Processors your CPU has.For example, if you have 16 cores and 32 logical processors, you can set this value to 32, to stitch 32 frames simultaneously.
Break Jobs by Frame Range:This lets you set the number ofTilesthat are rendered before you stitch them together.It is better to set a lower value, such as
200 Frames, so that you stitch your final frames and delete the intermediate tile files, otherwise you can run out of disk space.It is also best practice in remote rendering to distribute sets of
200 Framesor so tiles plus aStitch Passto each rendering machine as this is the optimum way to render your final frames.
Write Intermediate Debug Files:If you want to check the individualTilesfor debugging purposes, then you can tick this option to output the tiles as.exrs.Source Job:This needs to select theMovie Render Queuejob that references theSequenceyou want to render.It should pick that up automatically but if it doesn’t you can select it here.
Generate your Render Jobs
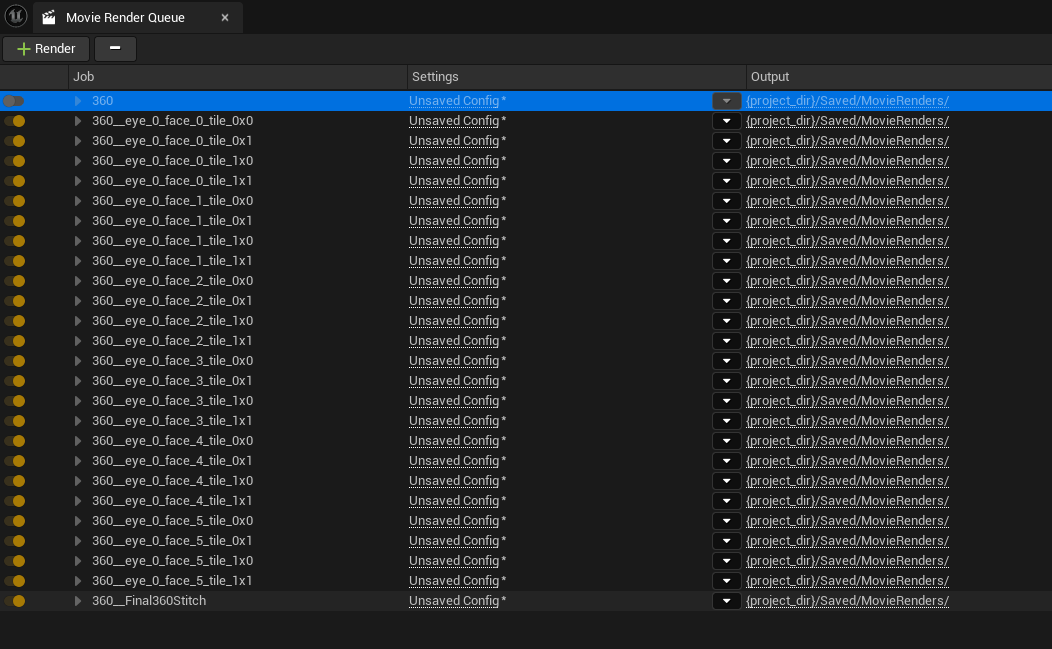
Once you have input all the settings you need in this section (and in the other Movie Render Queue sections):
Click Generate Jobs this the individual
tilerenders and thestitch jobswill be generated in yourMovie Render Queuejobs list:The original
renderis disabled (because that would be too high resolution to do as a single pass).Each of the
jobsrepresents the rendering of an individualtile.The job
FinalStitchis the stitch phase which join thetilestogether into your final frames.If you have set
Break Jobs by Frame Rangethen you will see multiple sets oftile rendersandstitch passesin yourrender joblist.
Save your Render Jobs
You should save the
Render Queueas anAssetin yourContent Browserlike this, so you can redo the render without having toGenerate Jobsagain: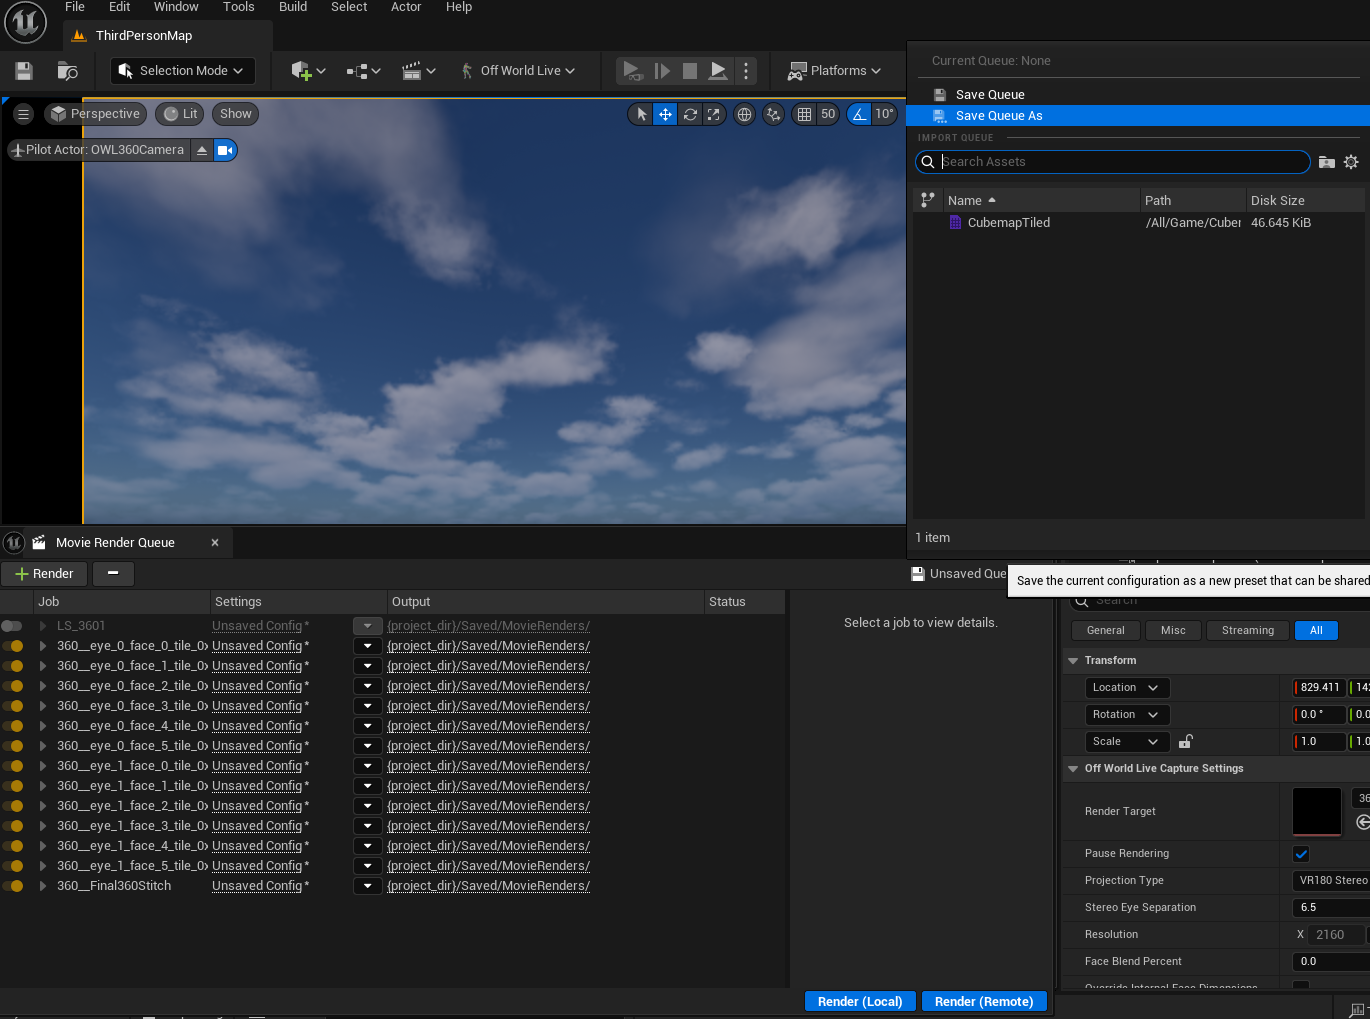
Re-Rendering Tiles
You can initiate a render from any specific
frameandtilein aRender Queuethat you have saved andfinal stitchwill automatically pick up the re-rendered files.For example, if you have
200 frameswithtilesthat you are rendering before astitch passand you have an issue atframe 150, then you can just re-render fromframe/tile 150-199and thestitch passwill be able to stitch all200 frames.Tileswill not be deleted unless thestitch passfor that range offrames/ tileshas been fully completed.
Re-Starting a Render from a Specific Tile
To re-render frames/ tiles:
Go to your
intermediate file folder(this is the repository you selected to store yourtiles)The
file namefor eachtileis formatted as follows:LS_02_SU_020_E_c_000.fm_000002.sv_00.e_0.f_0.t_0-0LS (
Level Sequence): This is the sequence you are renderingc (
camera): This is the360 Camera/ Componentbeing rendered.fm (
frame): This is theframe number.sv (
Scene view): This relates to anypost-process passesorstencil layersselected.e (
eye): There will be two forstereoscopicrenders.f (
Face): There will normally be4-6cube faces depending on yourProjection Type.t (
Tile): Thetilesare numbered sequentially for each cube face.
Use the format details above to find the
tilethat you want re-render. Open thetilein your savedRender Queueand set theframesyou want to render for that tile inCustom Start/ End Frame.ClickAcceptand to yourRender Queue: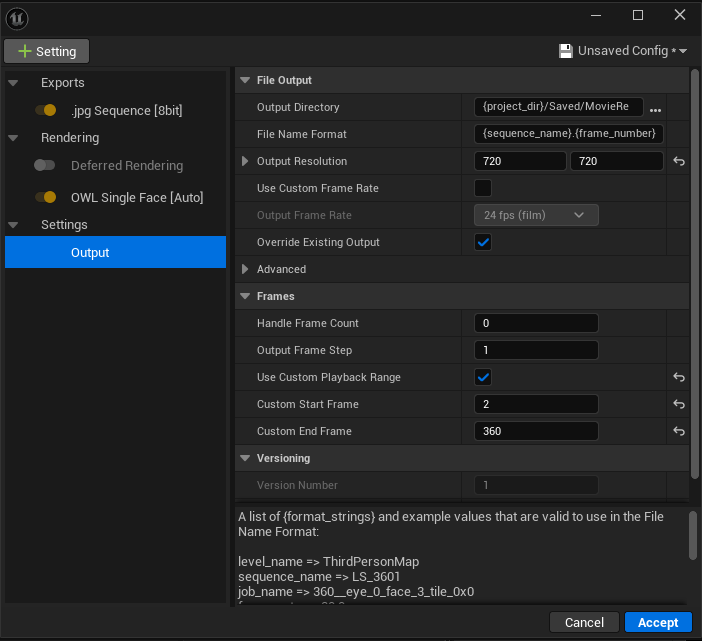
In your saved
Render Queue, you can deselect anyrender jobsfor tiles that are not needed using theyellow switchto the left of eachjob.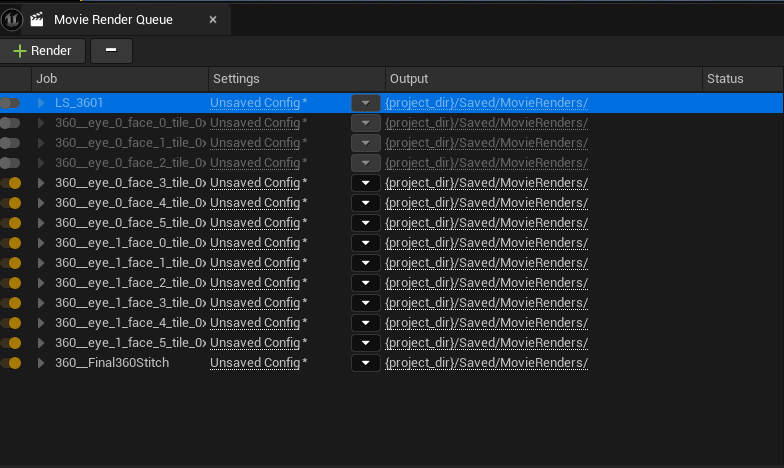
Re-Rendering a Set of Tiles/ Frames for an Existing Stitch Job
If you want to render all your
tilesagain from a certainframenumber then you will need to:Go back to your original
render job(before you generated thetiles) and reset theframe-rangeyou need in yourOutputsettings.Click
Generate Jobsto create a new set ofrender jobswith the newframe range.If you have existing
tilesyou have already rendered (for example forframes 0-149of a200 frame job) and you just want to re-renderframes 150-199, then you can keep your existingStitch Jobbut move it to the bottom of all yourrender jobs(so it will happen after your newtileshave been rendered).
Disable Multisample Effects
This setting switches off a wide variety of post-process effects that sample from a wide range of pixels and therefore can cause seams.

These include effects like Depth of Field, Temporal Anti-Aliasing, Motion Blur and Chromatic Aberration.
This can normally be easily mitigated by a
Face Blend Percentagewhich is recommended rather than having this setting ticked.However, if you want to switch off all these settings at once, tick this option but beware that it will have a significant impact on your visual output.
Post-Process Materials
N.B. There is a performance impact to adding multiple Post Process Materials so you may need to create multiple renders, each of which with different passes.
If you do so, all dynamic content (particles etc) must be cached or sequenced and share the same random seed.
You need to convert some Material settings of Post Process Materials to remove seams and ensure responsiveness to depth-of-field (see Trouble-Shooting).
With our integrated EXR output you can add Post Process Materials as layers within a single EXR file of your OWL 360 Degree render to be used with color grading workflows.
This makes it possible to do advanced compositing in Post Production software like Davinci, After Effects, Natron or Nuke.
In your
Movie Render Queue Settingsadd anEXR Sequence, select aCompression Typeand make sureMultilayeris ticked: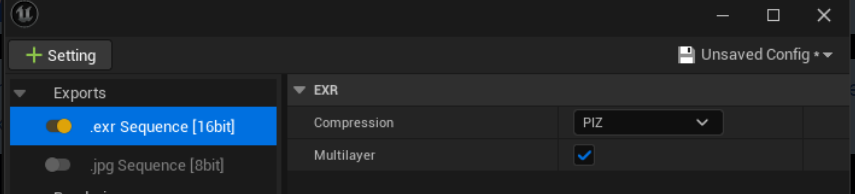
In
OWL 180/ 360 Rendering, scroll down toDeferred Renderer Data: Additional Post Process Materials: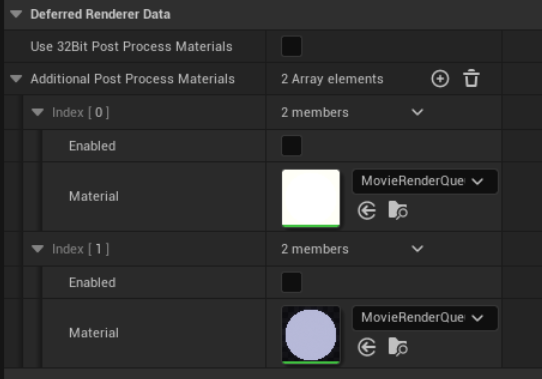
Add each
Additional Post Process Materialas anArray element.The defaults are
World DepthandMotion Vectors: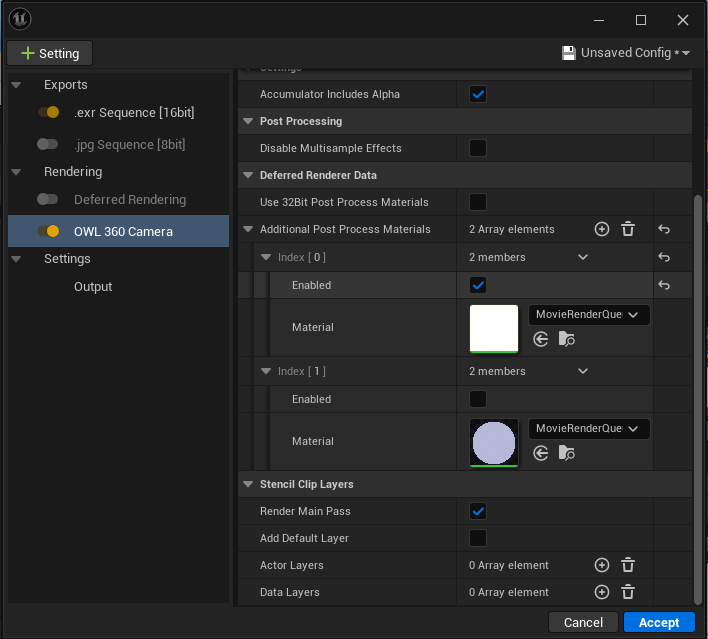
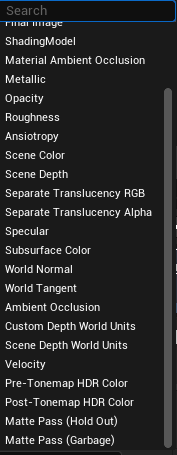
To add another
Post Process Material, in theMaterialsection, search in theBrowsebox (see options below):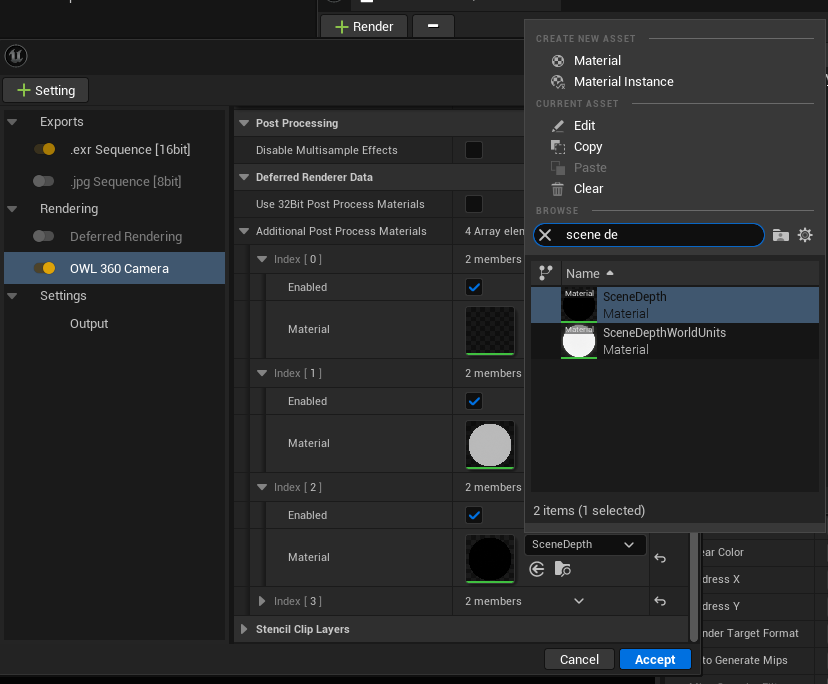
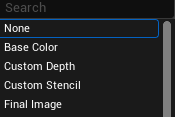
You can also add the following options:
Once you have rendered your
EXR, in a viewer such as DJV you can navigate toFile>Layersto preview thesePost Process Materials: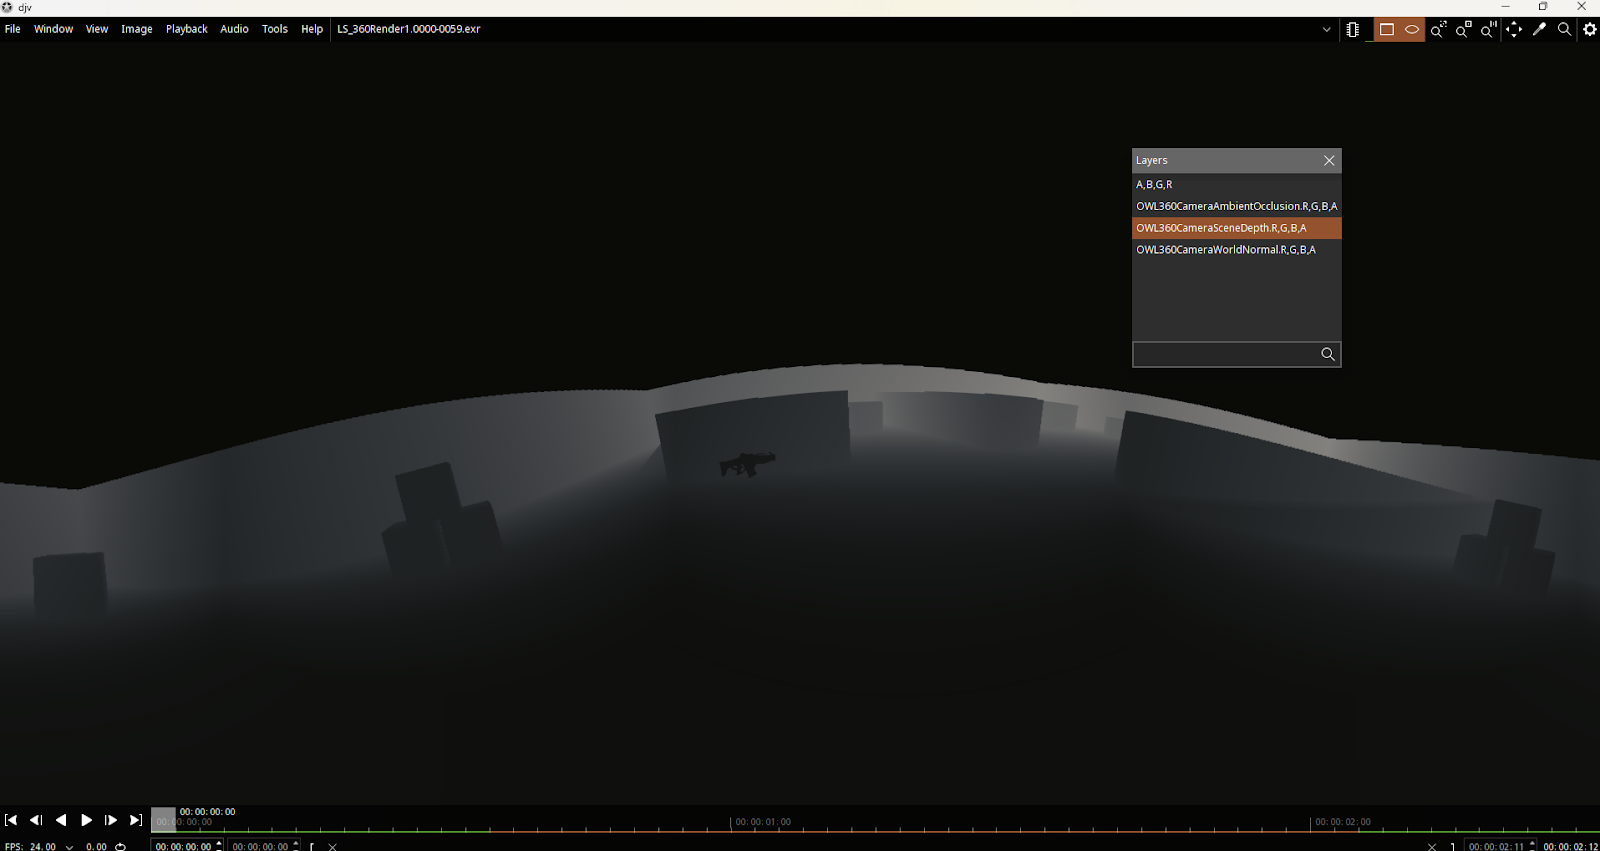
Cryptomatte
Unreal’s native Cryptomatte pass isn’t currently supported for 360 Rendering but you can achieve the same functionality using a custom Post Process Material as follows:
In
Project Settingsensure (you will need to save and restart your project for these to take effect):Alphais ticked: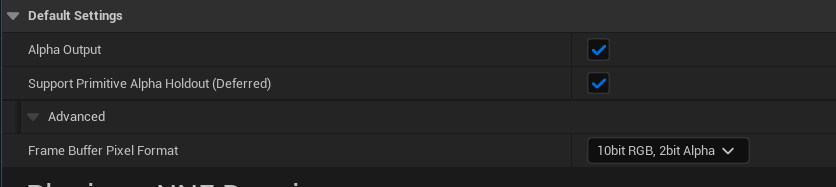
Custom Depth-Stencil Passis set toEnabled with Stencil: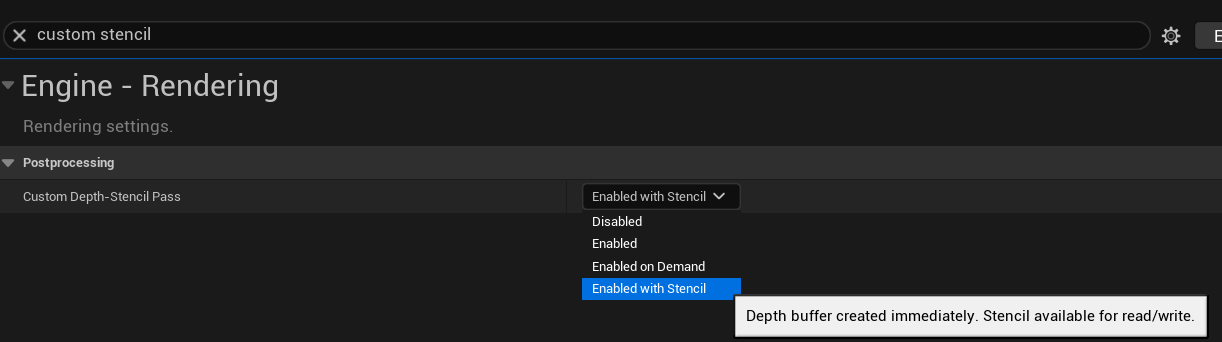
Open the
Content Browserand search forCustom Stencilin theEnginefolder,Duplicateit (so you don’t modify the originalmaterial) and name it as you need: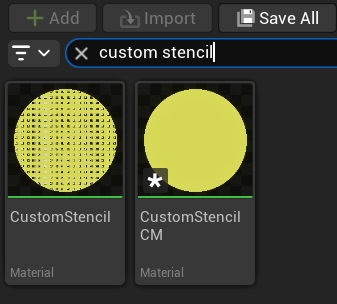
Open it to edit its
Material Graph: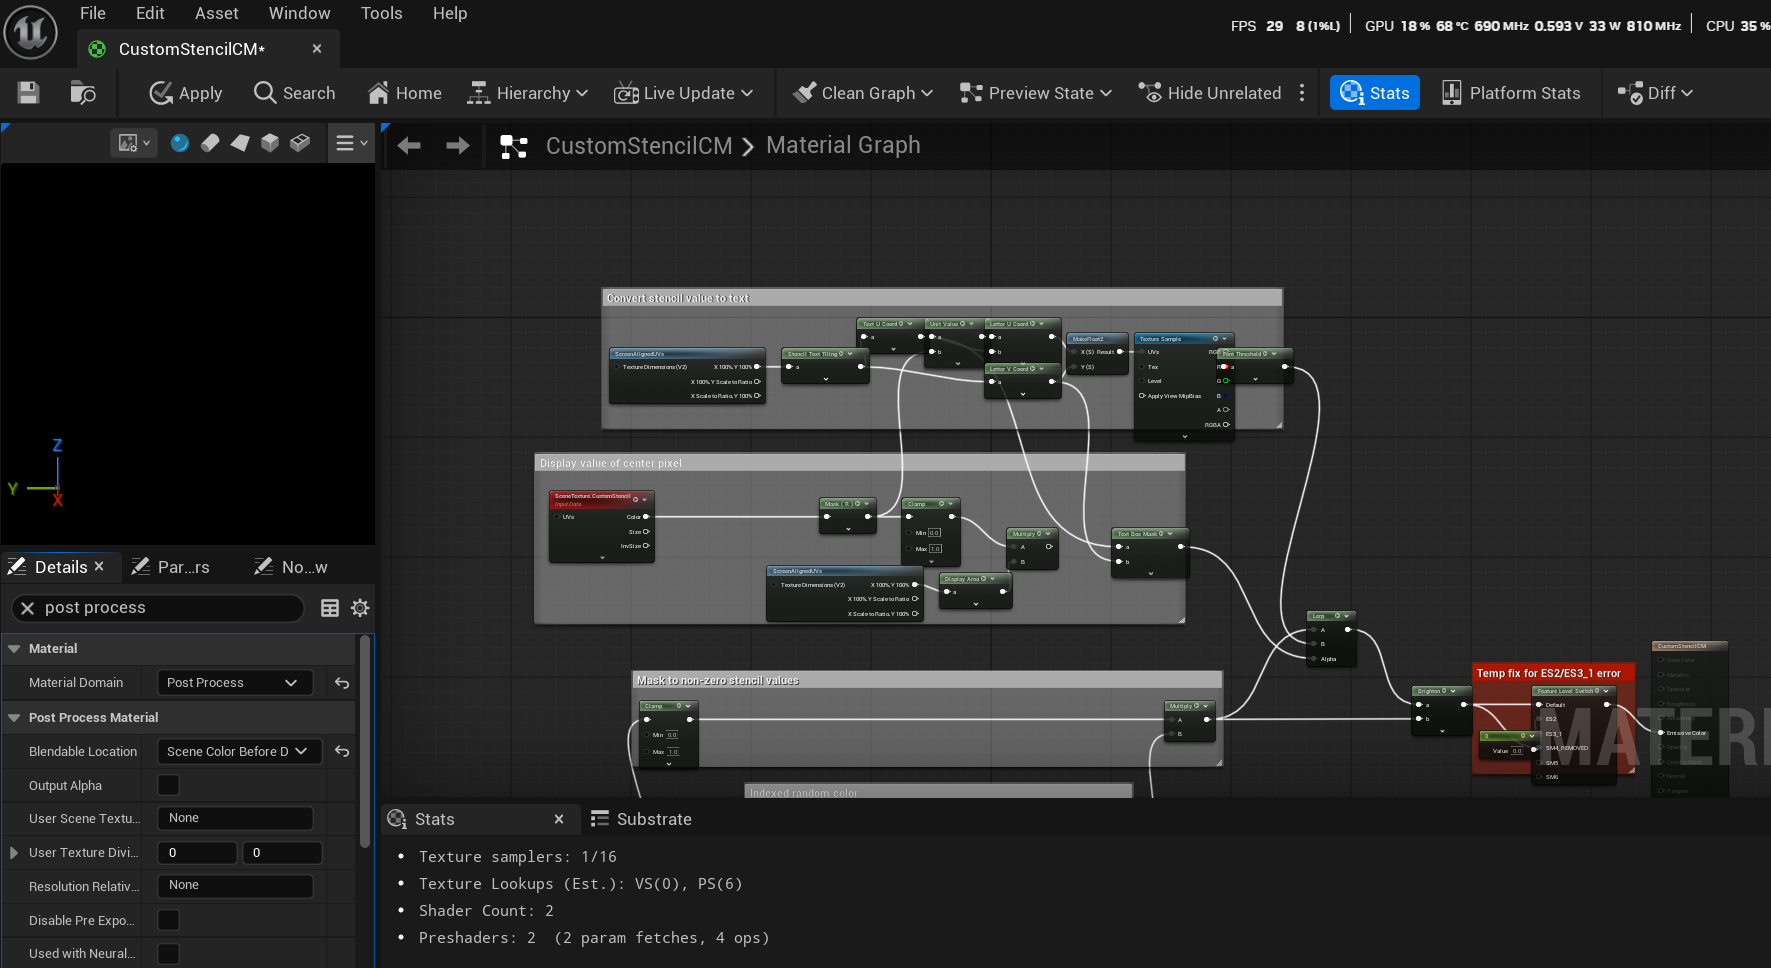
Remove the section which applies a number to the
Custom Stencil Selectionby removing allnodesrelating to theLerp: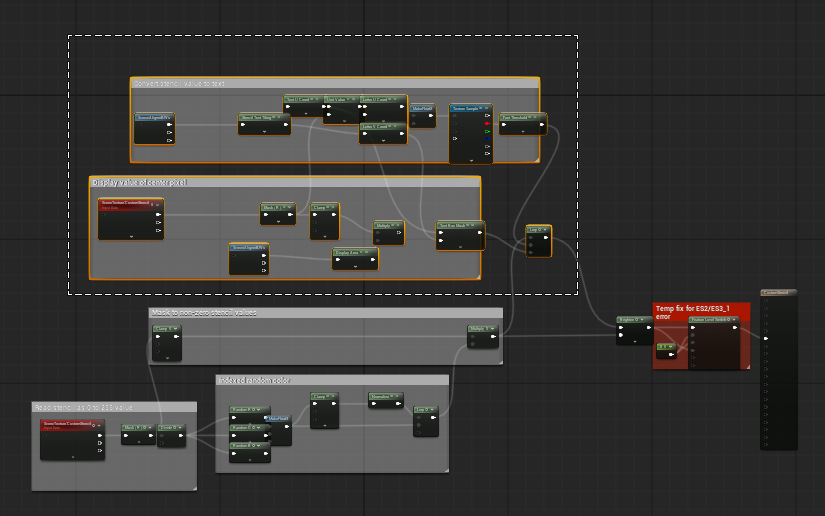
Connect the
Multiplynodein to both inputs of theBrightennode: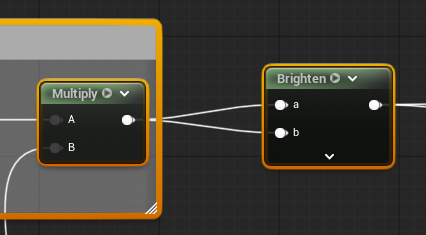
In the
Blendable Locationin thePost Process Materialsection in theMaterialDetailspanel selectScene Colour Before DOF.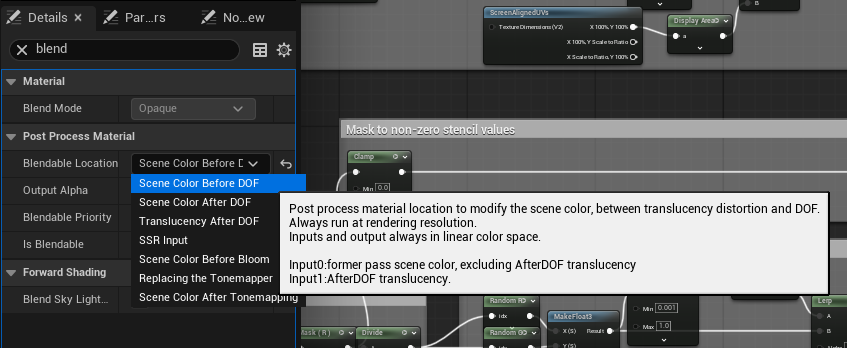
Now in your
OWL 360 Camera/ Component/sorPost Process Volumego to theDetails> Post Process Materialsand add the modifiedCustom StencilMaterialas anArray. This show thematerialin yourViewportorRender Target: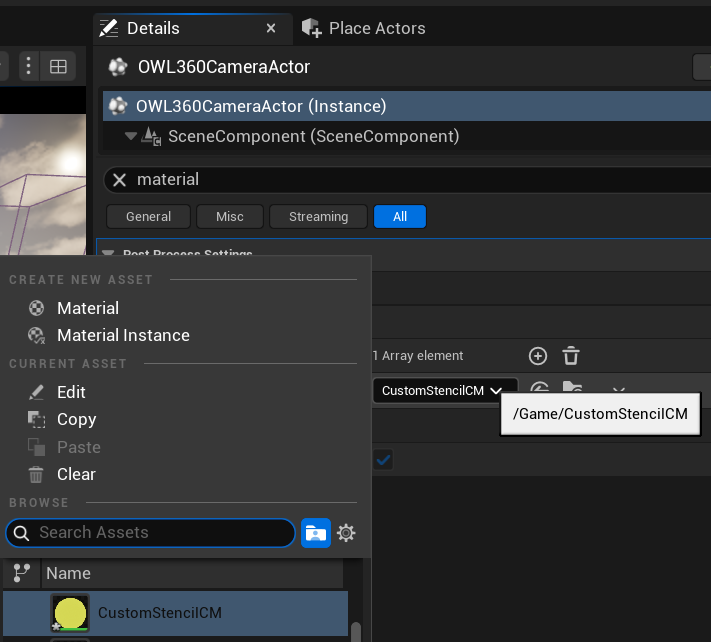
In
Outlinerto select all themeshesthat you need in theCryptomatte: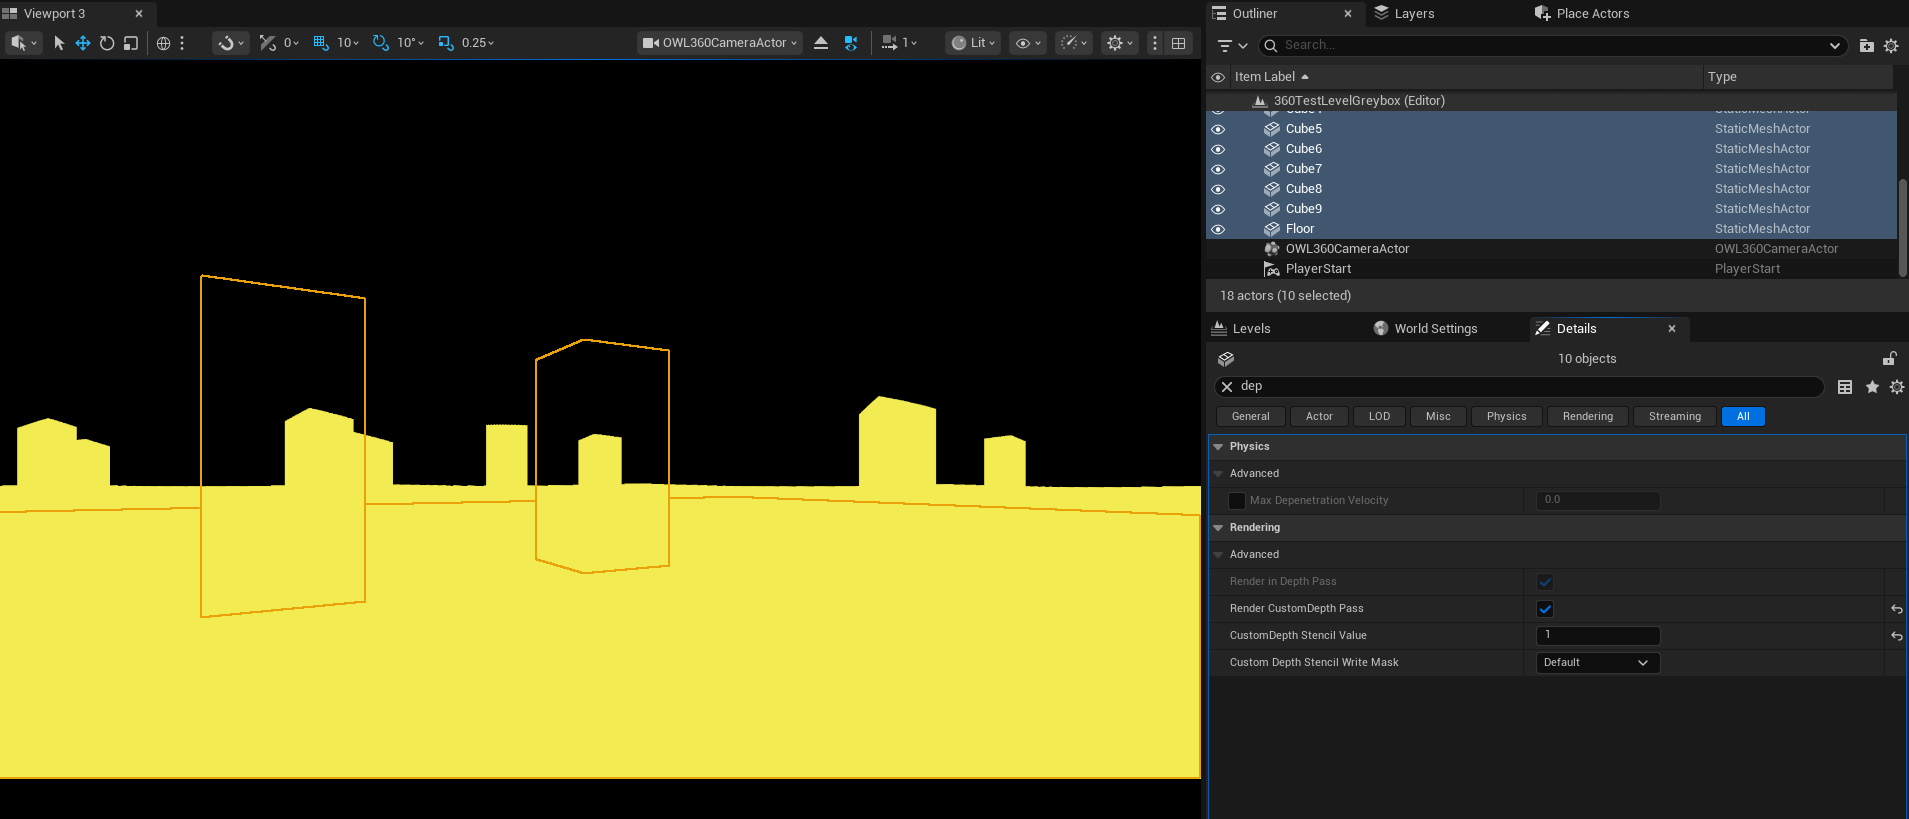
Go to
Details, search forDepthand: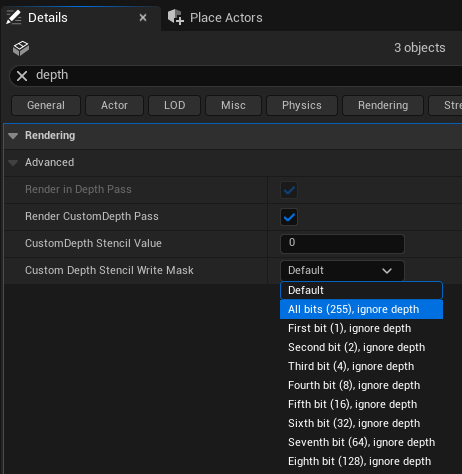
Tick
Render Custom Depth Pass.Use the
Custom Depth Stencil WriteMaskoption instead of theValueoption because this usesignore depthand so will capturemesheseven if they are behind objects in certain shots.Select
All bits (255), ignore depthif you want all your meshes to be assigned the same color channelAssign different
meshesto differentbitsby using thefirsttoeighthoptions (there are8possible channels because the mask is8bit.)
Now, in
Movie Render Queue>OWL 180/ 360 Rendering>Additional Post Process Materialsyou can add the modifiedCustom Stencilmaterialas a newArray elementto include as an.exrlayer or it’s own.pngoutput.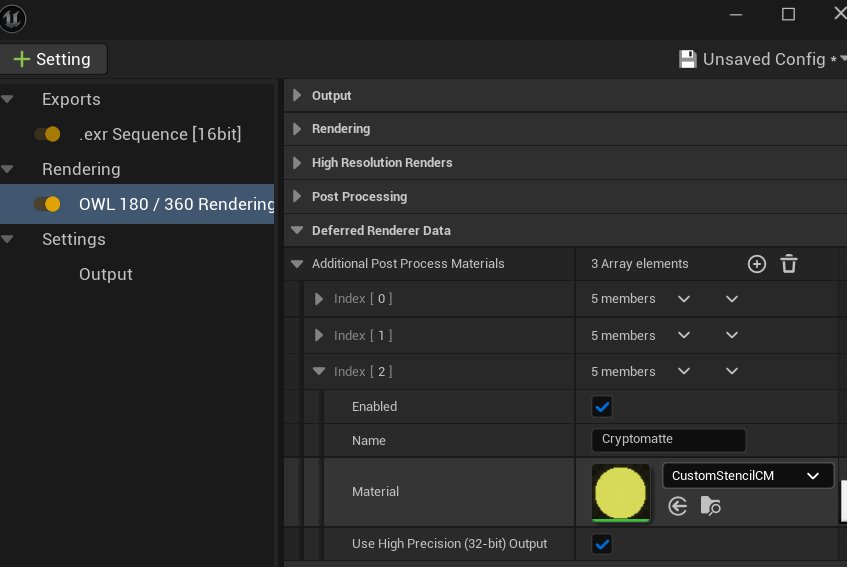
Stencil Clip Layers
N.B. There is a performance impact to adding multiple Stencil Layers so you may need to create multiple renders, each of which with different passes.
If you do so, all dynamic content (particles etc) must be cached or sequenced and share the same random seed.Stencil Layers are recommended to use rather than Alpha Settings because they include the correct colors and full post-process effects.
With our integrated EXR output you can add different render passes as Stencil Clip Layers within a single EXR file of your OWL 360 Degree render to be used with color grading workflows.
In your
Movie Render Queue Settingsadd anEXR Sequence, select aCompression Typeand make sureMultilayeris ticked:In
OWL 180/ 360 Rendering, scroll down toStencil Clip Layers: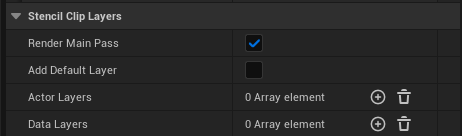
Render Main Pass:Renders theMain Passas well as theStencil Clip Layers.This can be turned off if you’re only doing a
Stencil Layerbased render and don't need the main non-stencil image.
Add Default Layer:Renders an additionalStencil Layerwhich contains all objects which do not belong to selectedActororData Layers.This is useful to wanting to isolate one or two layers but still have everything else to composite them over without having to remember to add all objects to a default layer.
Actor Layers:Select theLayersto render as part of the composite output.Data Layers:If you are using aWorld Partition MapuseData Layersto specify the compositeLayers.
If you have already set up your
Layersin Unreal (see below), click the+button to create anArray elementfor each one and they will render out separately in yourEXR.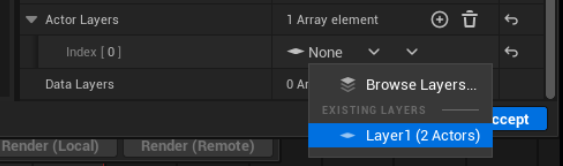
If you need to create an
Actor Layer:Go to
Windowand ensure thatLayersis ticked. Click it to view theLayers Panel: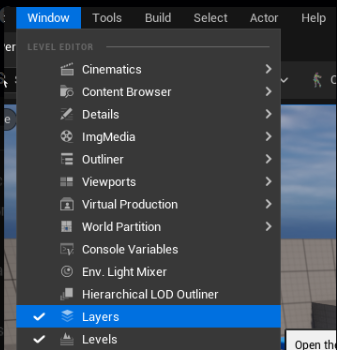
Select one or more
Actor/sin your scene then right click in theLayers Paneland selectAssign Actor to New Layer.If you have an existingLayerthen you can also add theActorto it: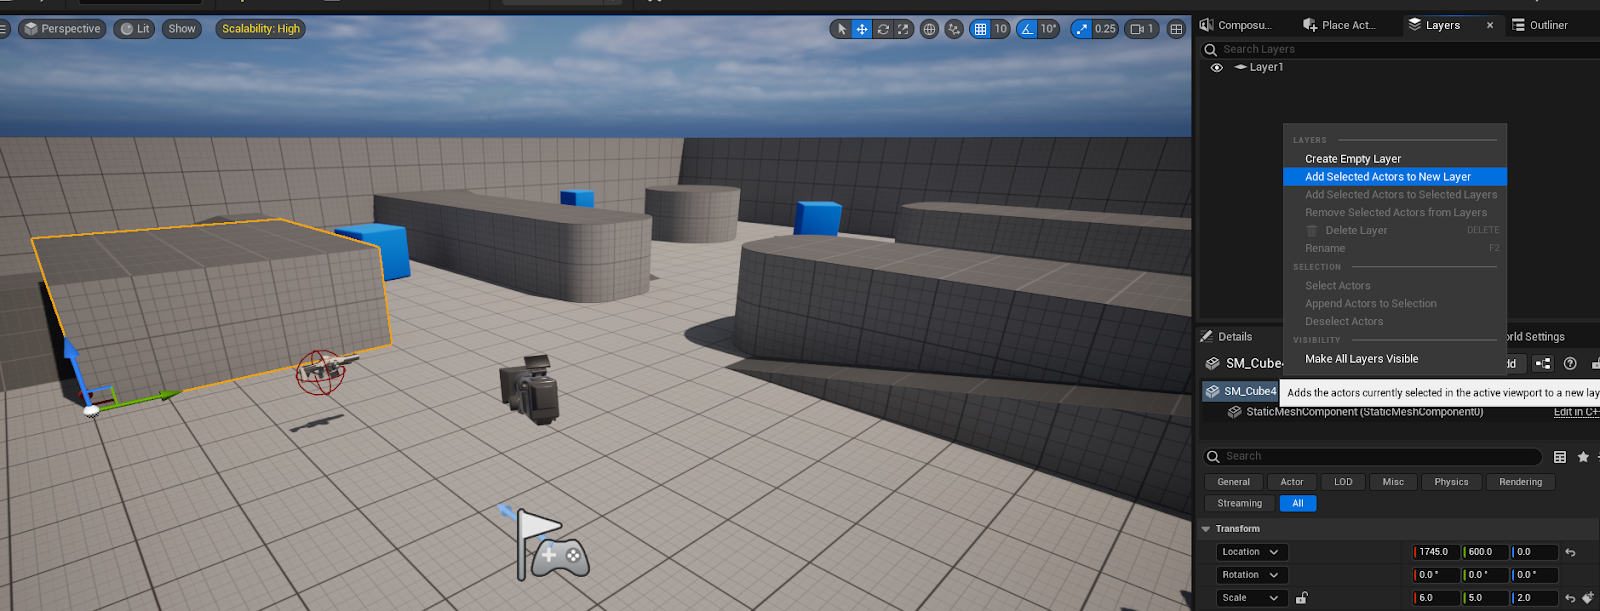
Now you can select the Layer you have created in Movie Render Queue as a Stencil Layer and whatever Actors are inside will render separately.
If you want to create a
Data Layerfollow the documentation here (it’s a more sophisticated process).
Trouble-Shooting
Exposure
When you drop the 360 Camera into your scene it can be over or under exposed compared to your Viewport.
Exposureis set toManualby default to avoid seams and artefacts caused byAuto Exposure.The
360CameraActorautomatically sets anExposure Compensationof10when brought in to a level.This can be too high or low for some scenes.
Adjust this setting in the
Post Process Settingsusing theExposure Compensationslider: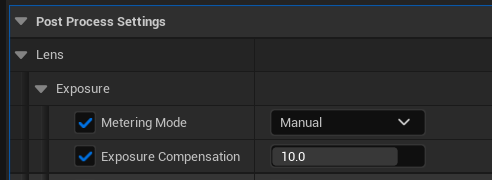
VRAM Management
For maximum capacity, close all resouces that are using VRAM/ rendering and then close and re-open Unreal before starting your render:
Close your Unreal
Viewport(don’t pause, fully close it).
Pause the Render Target of your
OWL 360 Camera/ Component.Save your project, close and re-open Unreal (this will clean your VRAM usage).
Open
Movie Render Queueand initiate your render.
Color Accuracy
If your
Exposuresettings are correct, yourViewport,OWL 360 Camera/ ComponentandMovie Render Queuerenders should all have identical colors.For the most reliable color accuracy we recommend to use
OCIO, which works with the360 Camerafor previs as well as with your final renders.You can see a set up guide for color grading with the
360 Camerahere.
Seams (Lumen)
When you are using
LumenforGlobal Illumination, seams can appear at the edges of the cubemap which renders the raw pixels of the360 Camera. These steps should solve them:Face Blend Percent: Try this value at2.5%and then increase as required. It will eliminate most seams.Hardware Ray-Tracing: Change this setting in your Project Settings. This can reduce seams because Lumen relies less on screen space effects to generate lighting:Cube Face Rotation: Using the Cube Face Rotation settings can prevent seams by ensuring that elements that affect screen-space effects are always positioned inside a face (see above).Local Exposure:Add a theConsole Variable r.LocalExposuretoMovie Render Queuewith value0.Turn off
Screen Traces: This fixes a lot of interior seams caused by bounce lighting.Find the
Post Process Volumein your scene, search forScreen Traces, then untick the checkbox.You may notice some
Global Illuminationis lost by doing this and your image will have a more stark contrast.
Remove
Meshes(that cause seams due toIndirect Lighting) fromLumenusing theMesh Detailspanel to disable one of the following:For
Software Ray Tracing, uncheckAffect Distance Field Lighting.For
Hardware Ray Tracing, uncheckVisible in Ray Tracing.You can also separate complex objects in your modeling software to ensure that Unreal Engine can shade them more accurately, which can improve Lumen reflections and reduce seams.
Add
Temporal Anti-Aliasing Samplesto fast-moving imagery to remove seams and improve shadows and reflections.
Seams (Post-Processing)
Post processingandVFX effectslike Bloom, Particles, Volumetric Fog, God-Rays, Water, Dirt Masks can cause seams for a variety of reasons and may need workarounds to get perfect content.You can see a comprehensive guide for how to use these effects here.
Post Process Materials
Post Process Materialsthat useScene Depthas an input often depend onScreen Space Calculationsthat can cause seams, so these need to be changed toWorld Space calculations.See our 360 VFX guide (
Depth Based Post Process Effects) on this, or just replace the thescene depthnodewith thenodesin thismaterial: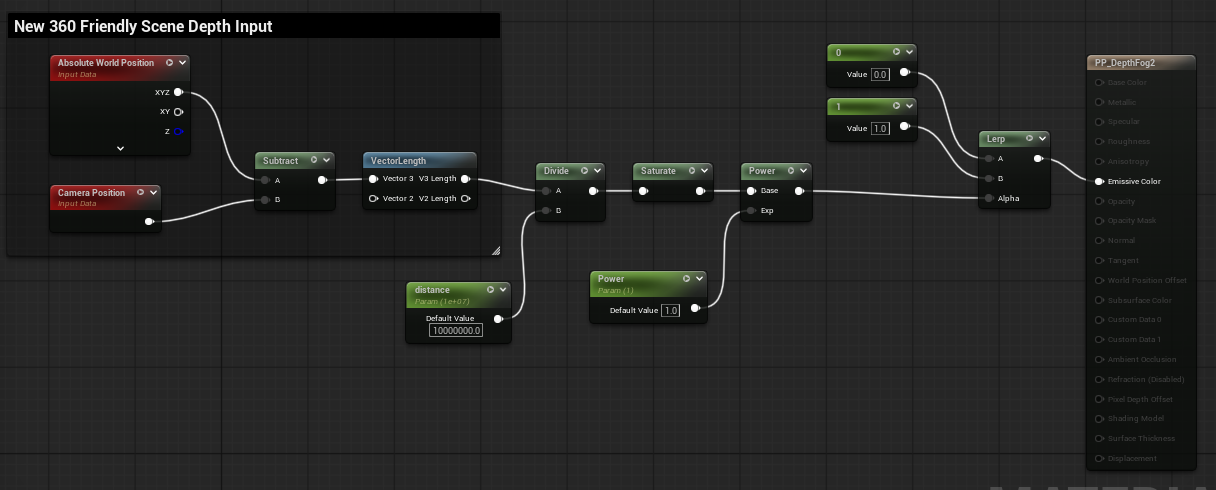
Visualisation Bufferssuch asCustom Stencil,Scene Depth,OpacityandAmbient Occlusionneed amaterialmodification to work in 360.Select
Scene Colour Before DOFin theBlendable Locationin thePost Process Materialsection in theMaterialDetailspanel: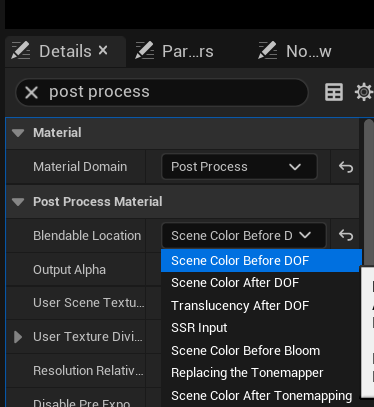
This ensures they are affected by
Anti Aliasing,Depth of Fieldand other parts of therender pipeline.
Anti-Aliasing (Lumen)
Anti-aliasingis massively important for creating high quality renders and is controlled via it’s own section in theMovie Render Queuesettings.In moving shots, you need to use your
Camera Cutto add excessframesin yourSequencerbefore yourrenderstarts and selectUse Camera Cut for Warm Upin youranti-aliasingsettings. This ensures that you havetemporal samplesfrom your camera for movement, particles and physics effects.You should start with
Temporal Super Resolution (TSR)either in yourProject Settingsor inMovie Render Queuebecause that is the default setting forLumen.Alternatively, if you have installed
DLSSyou can useDLAAwhich can be very effective (NVIDIA GPUs only)For more information see our full guide.
High Resolution Renders
It’s worth implementing all the
Performancerecommendations above to maximise your render times:You may find you can double your render speed (or more) if you manage
VRAMproperly.Implementing these steps can also reduce the total number of
tilesyou need which can reduce render times.
Use the
Face ControlandHorizontal/ Vertical FOVsettings to only render the exact pixels you need as this can increase render times by>20%.Ideally run a
stitch passevery200 framesor so, to reduce any risk of disk space overload from storing too manyintermediate files.Due to the large size of each
frame, read-write disk capacity can be a bottleneck, especially if you are using a shared disk to write final renders to.The
stitch passdoesn’t need the GPU so can be run on a high powered CPU with~nullRHIcommand which can be a useful hardward optimisation in your studio.The more logical processors you have on your CPU, the more stitches you can run simultaneously.
You may encounter issues with
Volumetric Fog Pixels, particularly in light shafts.To reduce their visibility change the
r.VolumetricFog.GridPixelSizeandr.VolumetricFog.GridSizeconsole variables.This will have an effect on GPU overhead.
See
High Resolution Fogin the360 VFX docfor a step by step guide.
If you are using Ultra Dynamic Sky, select the Project Mode
Cinematic/Offlinein itsDetailspanel to avoid seams.
Path-Tracing
Path-tracing requires a lot of configuration and iteration to get a perfect output.
It’s only recommended if you want the realistic translucency, refraction that it can offer vs. Lumen because it takes so much longer to render and is much harder to get a perfect final image.
Your settings will be very different depending on if you are rendering static or moving shots and also depending on exactly what you are shooting (glass, sunrise/ set etc.)
Check our full guide for comprehensive tips.
Console Variables
Remove all
Console Variableoverrides unless you have a specific reason you are including them.If you see any large low-frequency noise, that's from
Denoisers. You have to find the rightDenoiser(Ambient Occlusion,Global Illumination,Reflections, etc.) and shut it off.If you disable all the options in the
Game Overridessection, aside fromFlush Grass Streaming, that will get you as close as possible to what you are seeing in the EditorViewport(assuming you don’t have anyCVar overridesinMovie Render Queue).The geometry
LOD settingshere will not override anythingNanite. They are only for non-nanite actors.