OWL Media Output Encoder
Encode any Unreal Engine Render Target and audio Submix to a wide range of different streaming and recording protocols with multiple simultaneous outputs, GPU-encoding and professional Timecode synchronisation.
Last updated 3 months ago
Overview
The OWL Media Output Encoder is an Unreal Engine Actor that can ingest any Render Target and audio feed and encode it to a wide range of different media formats.
It utilises GPU-encoding, (NVIDIA NVENC only), to bypass the CPU, meaning that it shouldn’t decrease the FPS of your project or game to stream or record during runtime.
This makes it a much more effective streaming solution than NDI, which is CPU encoded and therefore limited in the
ResolutionandFrame Rateit can manage.Each
Encoderthat you add to your scene will let you encode a singleRender Targetand audio feed (Viewportaudio orAudio Submix) to multiple simultaneous different media formats (streaming and recording).You can also use multiple
Encodersto encode multiple outputs from differentRender Targets.
Basic Set-Up
There are two ways you can add the Media Output Encoder to your project:
Media Output ActorMedia Output Wizard
Media Output Actor
Drag and drop the
OWL Media Output EncoderActorinto your scene from thePlace Actorssection: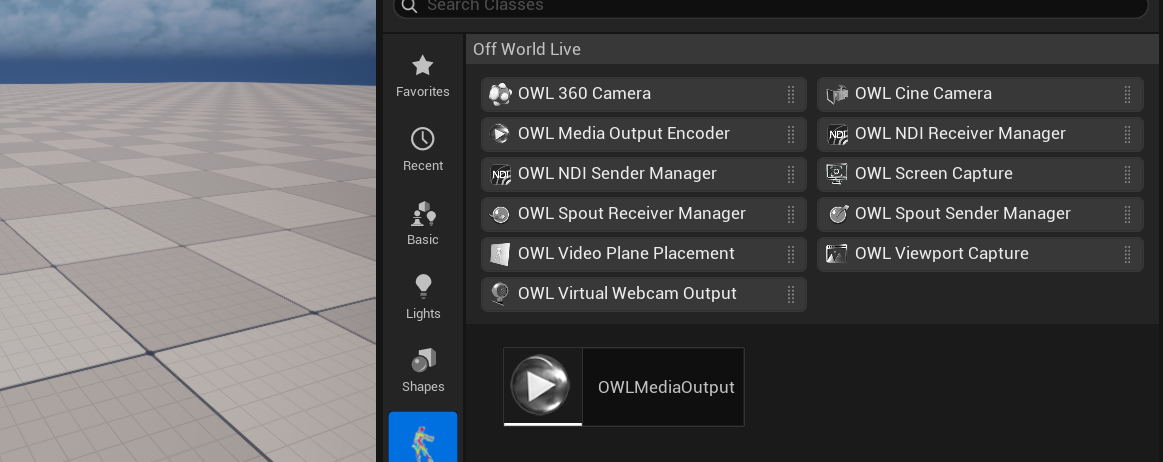
In the
Detailspanel of theActor, select theRender Targetyou want to encode:
Select the features you need from the
Output Settingssection of theMedia Output Actor(see below) and then pressStartto encode (or set up your Blueprints to stream within your game/ app).
Media Output Wizard
Select the
OWL Capture Typeyou want to output from and then selectMedia Outputas yourOutput Typeoption: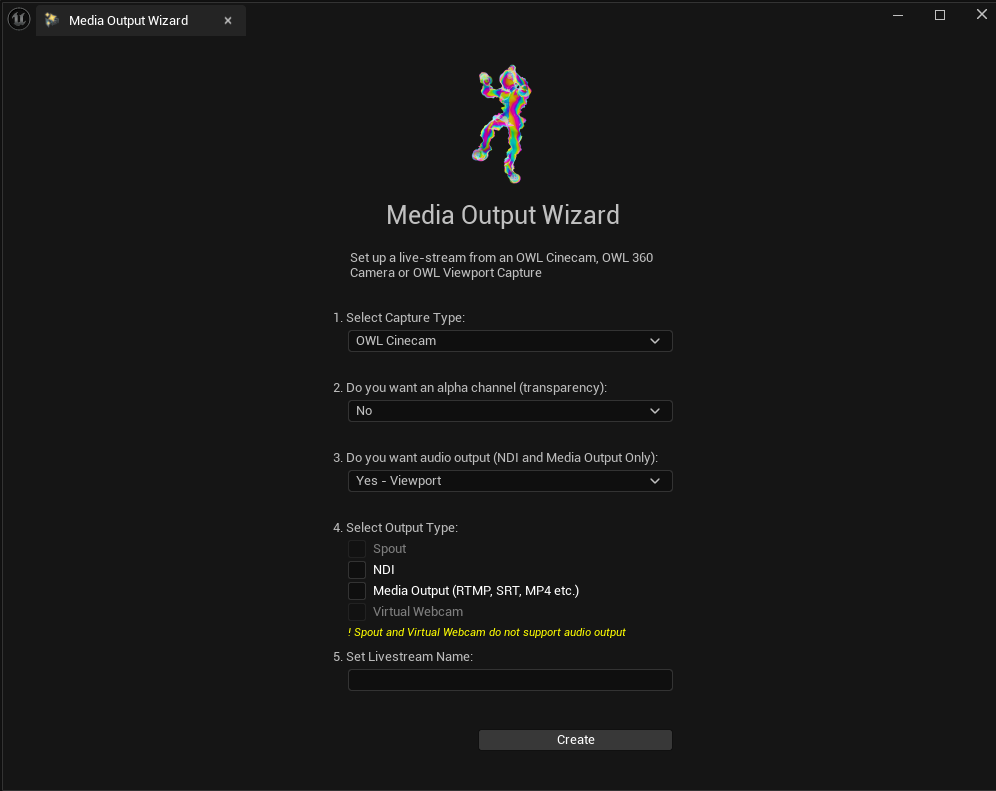
Click
Createand theCapture TypeandMedia Outputwill automatically be added to your level.Select the features you need from the
Output Settingssection of theMedia Output Actor(see below) and then pressStartto encode (or set up your Blueprints to stream within your game/ app).
Blueprints
Performance
If you select a Frame Rate in your Video Encoder settings you need to ensure your project can run at that FPS (and has headroom to do so).
If not, you will see stuttering and a bitrate loss due to the stream destination not receiving the frames it requires.
GPU Power
The encoder uses a dedicated part of your GPU (NVENC), meaning that it won’t compromise your game performance except under extreme GPU utilisation:
However, if your GPU is at 100% utilisation you are likely to struggle to encode the media perfectly (due to memory bandwidth or GPU Bus usage).
High FPS Output
If you want to encode at a very high frame rate (+60FPS), we would recommend:
Capping the FPS and setting it at a multiple of your intended output, for example, set your game to
180FPSand your stream to30or60FPS.Using
DLSSto spread the workload between your CUDA and Tensor GPU cores thereby reducing the likelihood of a backlog in memory bandwidth.Ensuring that you have a single Camera output and no other resources using up VRAM or GPU capacity.
Maximum Output
The maximum output you can encode will be determined by your selected Frame Rate , Resolution and your GPU.
The
Resolutionwill determine the maximumFrame Rateyou are able to achieve in your Unreal project. The more advanced your GPU, the higher this value.Your GPU will also determine the maximum
ResolutionandFrame Rateyou can encode at, as well as whatVideo Codecsare supported, depending on the number of NVENC cores you have (see guide here).More advanced GPUs have more NVENC cores (5090 has 3 for example) which work together to encode the content.
However, even the most advanced GPU is limited if you want to output extremely high
Resolutions(8K) at a very highFrame Rates(+120FPS).A 5090 GPU will likely only be able to encode a single output with those settings, and only with
h.265codec enabled (capped at8096×8096).
Multi-Encoding
The
OWL Media Output Encoderenables multi-output encoding for a singleRender Targetso you can stream to multiple different protocols and record to different file types at the same time.You can also add more than one
Encoderif you want to encode more than oneRender Targetat the same time.NVIDIA sets the maximum simultaneous outputs most GPUs can encode at
12, but the practical number you can achieve depends on theFrame RatesandResolutionsof your output/s:If you are encoding a single
Render Targetyou will likely be able to encode more outputs because the only bottleneck is the capacity of your NVENC chip/s.If you are encoding a multiple
Render Targetoutputs then you need to account for both the rendering and the encoding capacity of your GPU.The higher the
ResolutionandFrame Rateof your output/s the less simultaneous encodes you will be able do.
If you want to stream to multiple destinations at the same time, you also need to check your bandwidth/ internet speed because each stream will stack on top of each other.
4 x
1080pstreams at5Mbpswill required20Mbpsinternet speed plus a recommended headroom of another20Mbpsto ensure stability (40Mbpstotal).4Kstreams typically require30-50mbpseach.
Visual Quality
Unreal rendered scenes can see major spikes in visual complexity deriving from particle effects, explosions etc.
This will be compounded by a high
frame rateoutput (since theencoderneeds to capture more frames=detail per second).You should accomodate these spikes differently depending on if you are streaming or recording, to ensure a high quality of content combined with effective performance:
When recording, you can use a
Variable Bitratealong with a highMax/ Video Bitrate,and a lowQMinto give the encoder the maximum ability to increase bitrate to accomodate fast-moving scenes with a lot of visual complexity.When streaming, you have to set a
Constant Bitrate(required by your receiving software), the size of which should depend on your available bandwidth (your internet connection).Typically for a
1080pstream withh.264encoding, a Video Bitrate of5,000kbps(5Mbps) is normal.If you have a fast internet connection and a complex visual scene you can try to increase this value if your stream output has artefacts that you don’t see in your
Unreal Viewport/ Camera Capture.
You can also change your codec to increase visual quality:
h.264codec requires less compute power thanh.265but can have perceptible visual artefacts.h.265is generally considered to have visually imperceptible compression (vs. the source video) but requires more compute power and can be more susceptible to drop frames (because it takes longer to encode each frame).
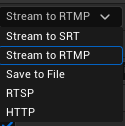
Output Type
You currently have the option of five outputs:
All the streaming options available are designed for point-to-point transmission rather than streaming to large numbers of end users.
To stream to a larger audience you can either use a platform like YouTube, which will manage this for you, or set up a transcoding solution like Mux or AWS Elemental.
RTMP
This is the most common media format used for streaming over the internet to websites like YouTube, Twitch, TikTok, Instagram etc.
It is an old format and so isn’t as stable as more recent streaming protocols like
SRTand it is only compatible withh.264encoding.To stream to
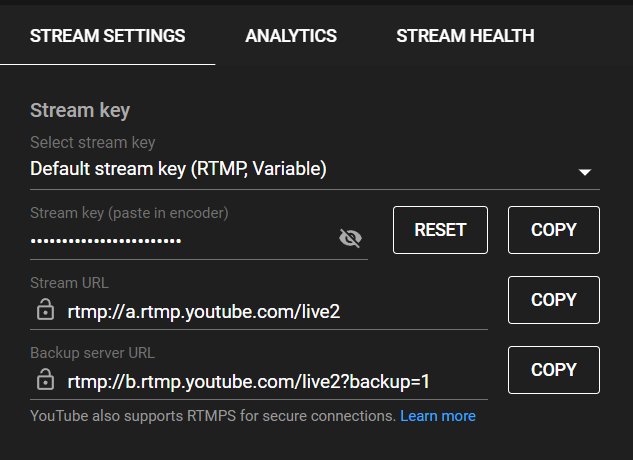
RTMPyou normally need aStream URLandStream Key, such as in the example below from YouTube: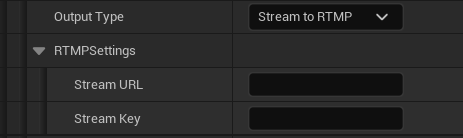
If you want to test
RTMPon your local machine, you will need to run a server with theStream URL:rtmp://127.0.0.1:1935/live(nostream keyrequired).You can receive this stream in OBS Studio or VLC Player using the same
Stream URL.
SRT
This is a newer streaming protocol than
RTMPandRTSPwhich we would recommend to use if it is an available option for you, since it is more reliable, especially over unstable internet connections.You can stream
SRTto transcoders like Mux or AWS Elemental.SRTis compatible withh.264andh.265encoding (depending on what your transcoder will receive).SRThas aStream URL,Stream ID(like aStream KeyinRTMP) andPassphrase(an additional security code shared between the encoder and it’s stream destination) andPub Key Len(this defines the length of the encryption key sent between the encoder and the receiver):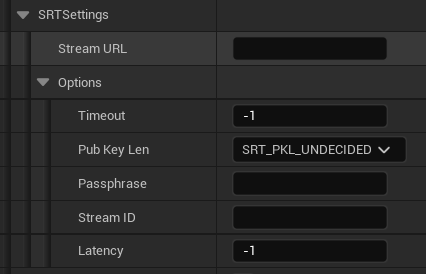
Timeoutdefines the amount of time theSRTsender will wait to create a connection before it closes the stream.You should define a value here that allows your stream to connect but doesn’t leave the stream hanging. It is measured in microseconds.
Latencydefines the maximum time a receiver will wait for a lost packet to be retransmitted.This can be longer if you allow a larger latency buffer for your stream, but if you are streaming low or ultra-low-latency then this value needs to be small.
It is measured in microseconds.
If you want to test on the same machine (for example with OBS Studio) then use the address:
srt://127.0.0.1:4700?mode=caller(4700is just a port on your machine so you can change it if you need) and in the receiver input the address:srt://127.0.0.1:4700?mode=listenerIf you want to stream
over the networkthen use the address:srt://192.168.xxx.xxx:4700?mode=callerand replace thexxxwith your IP address which you can find like this
RTSP
RTSPis a very low latency streaming protocol which is used in technical applications like drones, IP cameras, CCTV etc.It is compatible with
h.264andh.265encoding.RTSPjust has a singleStream URLinto which you add a string containing both the stream destination and any password you need.
If you would like to test with a local server we recommend you use this free server with the URL:
rtsp://localhost:8554/mystreamYou can receive this stream in OBS Studio or VLC Player using the same
Stream URL.
HTTP
HTTPoutput is a way of sending anMP4,MOVorFLVfile over-the-internet so that it plays live and also can be stored at its destination.It’s not a conventional streaming format and needs a large buffer to playback the file without interruption.
It is compatible with
h.264andh.265encoding.HTTPstreaming follows the folder structure of your web server or the specific requirements of the streaming protocol for theStream URLthat you use: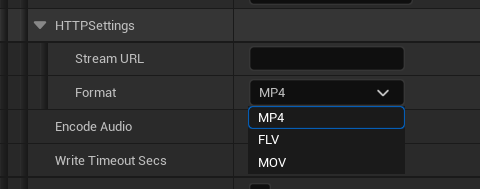
Save to File
Save to Fileallows you to write video and audio to disk in a variety of different file formats.Generally
MP4is recommended unless you need a technical function offered by one of the other formats.It is compatible with
h.264andh.265encoding.If you select
Save to Filethen you need to set theDestination Format(MP4,MOVetc), where to save the file (Output Directory) and what name to give it (Output File):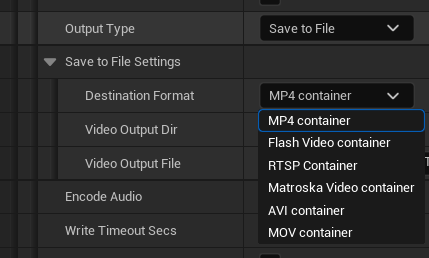
Output Settings
Render Target
Each
Media Output Actorwill encode from a singleRender Targetwhich can be found at the top of the Details panel: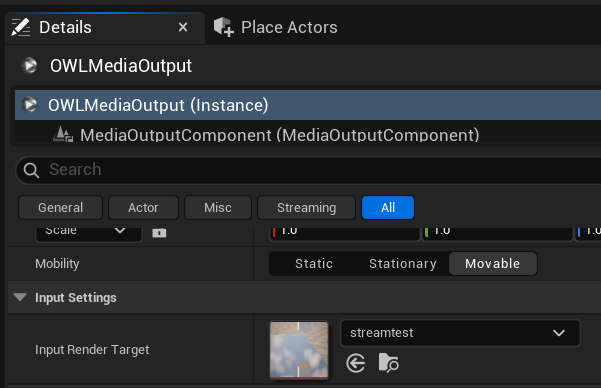
You can use Blueprints to switch between
Render Targetsat runtime but you must ensure that they are the same resolution and aspect ratio.Alternatively, you can use additional
Media Output Actorsto stream additionalRender Targets.
Controls
In the
Detailspanel of the stream you will find a very simpleStart/ Stopcontrol: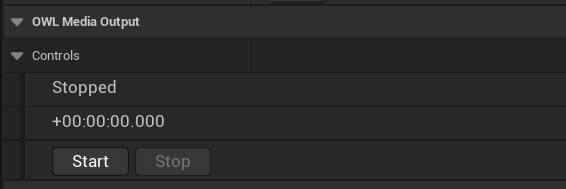
For more sophisticated control you can use Blueprints.
Destinations
You can set multiple outputs within each
Encoder, which will encode theRender Targetand audio to different formats simultaneously:
You do so by clicking the plus button to the right of
Destinationswhich will create an additional array with output information you can configure.For example, if you want to stream to
RTMPbut record your stream toMP4, you can add two output settings like this:
The Settings in each array are explained below:
Enabled
This tickbox allows you to control which outputs you have active when you start a stream/ recording.
If
Enabledis unticked then you will not output to the destination in that array when you pressStart.For example, you could configure an output to
RTMP,SRTandRTSPbut then programatically select onto to stream to one of those destinations as you require.
Encode Audio
Tick this option if you want to include audio in your output.
You can modify audio settings (including your Audio Submix) in the
Audio Encoder Configurationsection below.
Write Timeout Seconds
This defines a time period (in seconds) after which a packet will be dropped rather than attempted to be included in your stream/ recording.
It’s not necessary to change this value unless you have a specific technical requirement to do so.
Don't Drop Frames
This determines whether the frames from the beginning of your stream are retained or dropped while the connection with your streaming destination is resolving.
If you are streaming in ultra-low-latency the untick this value otherwise it can clog your streaming pipeline when you begin.
If your stream needs to begin from an exact frame, keep this setting ticked and select low or normal latency so that your stream destination can buffer the frames before starting.
Fragment File
This enables playback of files before the full recording or stream is complete (because the file is fragmented so you can playback the frames that have already been logged).
You should select this if you want this available in
HTTPorSave to Fileoutputs.It is not relevant for other streaming protocols so should be unticked if you are using them.
Timecode (Time Sync Mode)
The stream/ recording will automatically output a
Timecodeas metadata.You can select between multiple options as may be useful for your output:
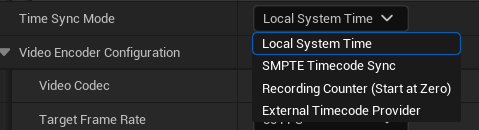
Local System Time:This uses the clock on the machine running the output taking the time at which the output begins.SMPTE Timecode Sync:This uses the SMPTE Timecode from Unreal’sTimecodeprovider when it is available/ configured in Unreal.Recording Counter (Start at Zero):This just starts a clock at00:00:00:00and increases until your stream/ recording is finished.External Timecode Provider:This detects an external Timecode from Unreal’sTimecodesettings:
Video Encoder Settings
You can configure a wide range of settings for how to encode your video:
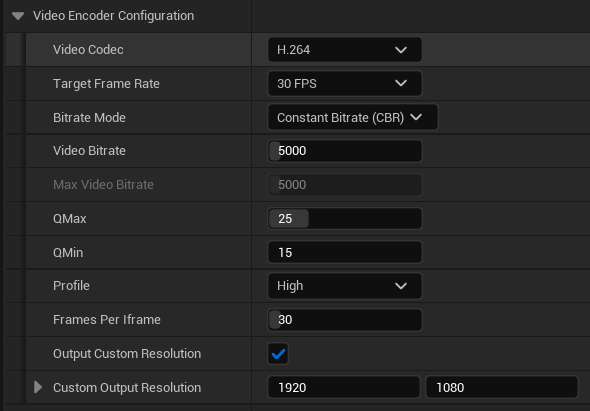
Video Codec
The video codec is the means by which the pixels in your Unreal output are compressed and encoded to be streamed or recorded.
There are different pros and cons to the different compression methodologies. You can currently select between
h.264andh.265:
h.264This is an older compression algorithm which is much less efficient than
h.265but consequently it requires less GPU power to encode/ decode.Even if you have a powerful machine to encode your stream/ recording, if your audience might have less powerful machines, it could be advisible to use h.264 because you can guarantee they will be able to watch your content.
The ‘cost’ of this is that you will require a higher
Bitratebecause of the less efficient compression (so the file size will be bigger).h.264is also limited to4096×4096output resolution.h.264is therefore recommended for:1080p streaming to large-scale audiences. (For example if you are using
RTMP, onlyh.264is compatible anyway).High FPS encoding (the lower compute power requirement means you can process frames faster than
h.265).
h.265This offers a number of improvements (vs.
h.264) including:50% more efficient compression (means a smaller file size).
No compression artefacts.
Up to
8192×8192resolution.A lower required
Bitratefor the same output resoution (for example, for a 1080p stream you need2-3Mbpsvs5Mbpsforh.264)
The pay-off for this is that you need more CPU/ GPU power to encode because the encoder is doing more work per frame.
h.265 is therefore recommended for
Target Frame Rate
If you select a Frame Rate in your Video Encoder you need to ensure your project can run at that FPS (and has headroom to do so).
If not, you will see stuttering and a bitrate loss due to the stream destination not receiving the frames it requires.
This is the strict
Frame Rateat which your output will be encoded and the frames are quantised, so that each frame is delivered at the correct interval within the second.For example, if you are encoding
30FPSthen you will deliver a frame every33.33 miliseconds.You can select any
Frame Rateto encode, provided you have the headroom in the number of frames being rendered by Unreal: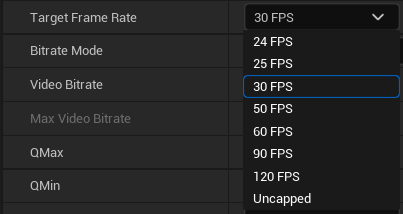
If you are streaming, is recommended to set a fixed
Frame Rate(normally30FPS) along withConstant Bitrate(below), because the receiving software normally will require one.If you are recording, although you could select
Uncapped, it’s likely better to select a fixed FPS (even if it’s very high) along withVariable Bitrate(below), as it will make your encoder work better.If you want to have animation stability, we recommend that you change your Unreal
Project Settingsto have the sameFrame Rateas selected in your encoder, so that you encode exactly the same frames as are being rendered.In general, we recommend that your encoder
Frame Rateis a divisor of yourProject SettingsFrame Ratesince this ensures a stable output.For example, a
120FPSUnreal project/ game can be encoded successfully at any of120/60/30/24FPS, but90/50/25FPSwill result in an unstable output.
Bitrate Mode
This defines whether you are outputting a fixed (
Constant Bitrate) or whether you allow the bitrate to ‘float’ (Variable Bitrate):
The actual bitrate of your content will change depending on the complexity of the pixels in your output.
If you are streaming, you will need to set
Constant Bitratealong with a fixed Frame Rate (normally30FPS) so that your stream receiver is able to decode your frames reliably.You set the bitrate value in the Video Bitrate box below.
5,000kbps(5Mbps) is the standard value recommended for a 1080p stream.
If you are streaming at higher resolutions you should increase this value.
If you are recording, you should normally use a
Variable Bitratebecause this will result in lower file sizes (since there is no filler).You can also set a
Max Video Bitratewhich will cap the bitrate if you are afraid of your file sizes getting too big (this will limit quality if the actual bitrate of your output is higher).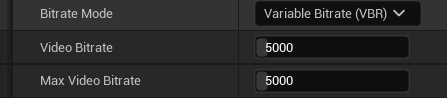
QMin and QMax
These two values set the floor and ceiling for the amount of compression the encoder is allowed to use, which affects the quality of your visual output.
The default settings reflect levels which we have found to produce a high quality image but you can potentially reduce the
QMinto10and increase theQMaxto35or40.
If you set a
Constant Bitrate:QMinstops your encoder from wasting resources when your actual bitrate is lower than theVideo Bitrate(it delivers the pixels you need and then just pads the rest).QMaxstops your encoder from compressing the image too much when your actual bitrate is higher than theVideo Bitrate(it stops rather than trying to compress the image too much.
If you set a
Variable Bitratewith a highMax/ Video Bitrate:QMinstops your encoder from wasting resources, optimising your file sizes when the actual bitrate is low (by not adding any padding).QMaxallows the encoder to work harder if the scene is complex, increasing the bitrate of the frame/s (up to theMax/ Video Bitrate:) so that the encoded image contains less/ no visual artefacts .
Profile
This setting tells the
encoderwhat processes (compression features, pixel prediction etc.) it is allowed to undertake to produce each frame.We don’t recommend changing this from
Highunless you have a specific technical reason to do so (for example you want to record very high quality color content usingHigh 444).The different options are:
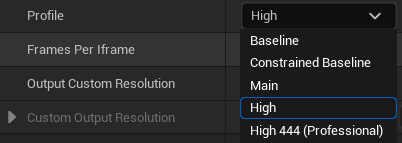
BaselineandConstrained Baseline:These options switch off more advanced processes in the encoder such as motion prediction. Only use this if you are recording or streaming to extremely old hardware which may struggle to decode using modern methods.Main:This is an older profile developed for SDTV which has been replaced by High.High:This allows for 8-bit color depth and more efficient prediction techniques that significantly improve sharpness and reduce "banding" in gradients.High 444 (Professional):This keeps all color data for every single pixel.This will result in much larger file sizes and requires a much higher bitrate (~
15,000kbpsfor 1080p).It can only be used for recording as it’s not compatible with web browsers/ players.
Frames per Iframe
An ‘
Iframe’ encodes all the pixel data in a frame, rather than using compression algorithms to guess some of its content.This setting determines the number of frames that are encoded in between each of these ‘full’ frames which affects your file size, bitrate usage, stream quality and precision with which you can jump to different points in your video.
For streaming to YouTube/ Twitch etc. it is recommended to have a
Iframeevery 2 seconds, so if you are streaming at30FPSyou should set this value to60.If you are streaming highly complex visuals, you can lower the
Iframeamount so the compression algorithms don’t have to work so hard to guess what the pixels are doing.
For recording, you have more flexibility:
If you want a super smooth file for editing which less prone to image degradation over time, you could set the value to
1so every frame is anIframe.Your file size will be very large (you should pair this with
High 444Profileand a very highBitrate~50Mbps)
For content with less professional requirements an
Iframeevery second should be more than enough, for example for a30FPSoutput set the value to30.
Output Custom Resolution
This setting allows you to encode an output resolution different to that of your
Render Target.You can input the resolution you need into the value boxes, but if you select an aspect ratio (16:9, 4:3 etc.) which is different from your input
Render Targetthen your output wil be distorted: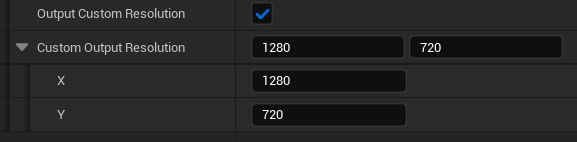
If you set a higher resolution, then the encoder will ‘upscale’ the frames, which will result in some blurring/ smearing as the pixels are spread across the image.
In general this isn’t recommended (you should just set a higher resolution for your actual output).
If you set a lower resolution, then the encoder will ‘downscale’ the frames using bilinear sampling.
This should result in a decent image quality although it can sometimes cause visual artefacts.
Audio Encoder Settings
Audio Bitrate
This is the
bitrateallocated to encode your audio which makes a big difference to your content due to the sensitivity of the human ear to distortion.
For live-streaming to YouTube/ Twitch, a value of
160kbps–192kbpsis recommended as this keeps your file size low but provides high audio quality.You can increase this to up to
320 kbps(the max permitted on streaming platforms) if you are streaming high quality music and want the maximum possible quality.
For recording, a value of
256kbps–320kbpsshould provide a high quality output that prevents artefacts arising from any post-processing (noise removal etc.) you might do.Your
Audio Bitrateis added on top of yourVideo Bitrate(192kbps+5,000kbps= total5,192kbps) so if you set a large value it will increase your file size (for streaming make sure you have enough bandwidth to handle it.
Submix
By default if you have the
Encode Audiosetting above ticked, the encode will select your Unreal ‘Viewport’ audio (the main audio of your project/ game) which is the Master Default Submix.If you want to select a different
Submixthen you can add it here which will replace the Master Default Submix: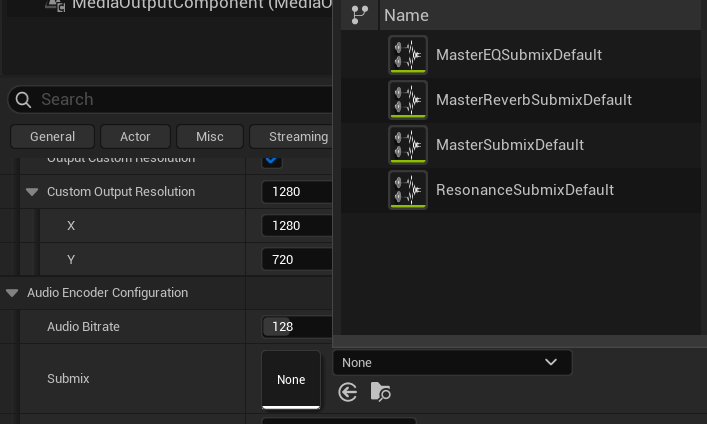
Multi-channel audio output encoding is not yet supported.
Audio Channel Layout
You can use this to select whatever audio channels you want your audio output to have.
For general streaming and recording, we recommend you stick to
Stereowhich requires a lowerAudio Bitrateand is what most listeners will be able to decode.For VR streaming or recording (or if you want to create a more immersive audio experience)
Stereo Downmixis recommended because it tries to replicate a Surround Sound audio set up in a stereo output.More immersive audio layouts require a much higher
Audio Bitrateto capture all the separate channels of audio.The different options match those that are possible to output in Unreal:
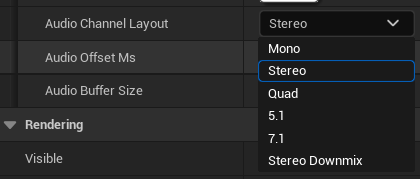
Mono:This is a single audio output and so unless you are recording sound emitting from a specific point, it will feel flat to listeners.Stereo:This is two-channel output which matches most headphone and speaker systems. The left and right values can be used to create a spatial effect for listeners giving a feeling of immersion.Quad:This outputs four audio channels (Front Left, Front Right, Rear Left, Rear Right) and so requires four speakers to work correctly. You need to increase yourAudio Bitrateif you are using this option to at least256 – 320 kbps.5.1:This outputs six audio channels (Front L/R, Center, Rear L/R, and a LFE/Subwoofer) and so requires six speakers of that type to work correctly. This is a set up found in cinematic surround sound. You need to increase yourAudio Bitrateif you are using this option to at least384 – 512 kbps.7.1:This outputs eight audio channels (Front L/R, Center, Side L/R, Rear L/R, and a LFE/Subwoofer) and so requires eight speakers of that type to work correctly. This is the most precise spatial immersion available in standard formats. You need to increase yourAudio Bitrateif you are using this option to at least512 – 640 kbps.Stereo Downmix:This outputs two channels but takes the audio data from a Surround (5.1 or 7.1) signal creating a more immersive listening sensation. This only requires a standard stereo bitrate of160kbps–192kbps.
Audio Offset
This setting allows you to
Offsetyour audio by a number of miliseconds to make it play either before or after your video frame:
You shouldn’t need to use this unless your Transcoder or playback system needs it because in general the audio and video should be perfectly synced together by the encoder.
A positive value such as
10will delay the audio so it is10 milisecondsbehind the video frame.A negative value such as
-10will accelerate the audio so it is10 milisecondsin front of the video frame.
Audio Buffer Size
This setting defines the number of
Samplesthat you keep in memory in case the GPU isn’t able to process a frame (due to overload from rendering the game).If you are streaming, you should make this value quite large, such as
1024so that you have enough samples available that you don’t get a drop in audio.However, if this value is too large then it can desync the audio from the video so you either need to set an
Audio Offsetor reduce this value.
Live-Streaming to Other Platforms
You can live-stream to multiple platforms at the same time from Editor or your game/ app.
Just add a new
DestinationArray elementin theDetailspanel of theMedia Output Encoder:
YouTube
YouTube likes to have audio and video streams. Ensure that encode audio is ticked in the Media Output Encoder otherwise you could have stream stability issues.
You can live-stream both standard and 360 video to YouTube at up to
4Kresolution with anultra-low-latencyoption of~3 seconds.For a
1080pstream at30FPSwe recommend to select aConstant Bitrateof5,000kbpsand anaudio bitrateof256kbps.For a 360 degree video stream at
4Kand30FPSwe we recommend to select aConstant Bitrateof20,000-40,000kbpsand anaudio bitrateof256kbps.
Go to https://studio.youtube.com/ and in the top right hand corner, click
Create> Go Live: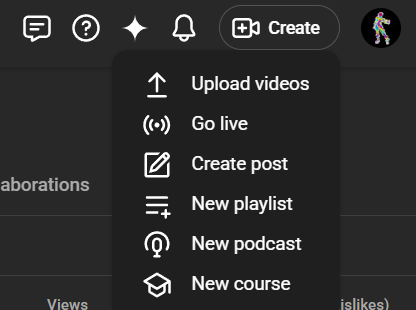
You will be streaming via
RTMPin theOutput Typesection of theMedia Output Encoderwhich requires aStream Keyand aStream URL: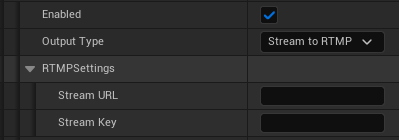
You can get the stream key from the top of the youtube window, either
Create new stream keyor select an existing one, then click theCopyicon and paste this key into theMedia Output EncoderDetailspanel: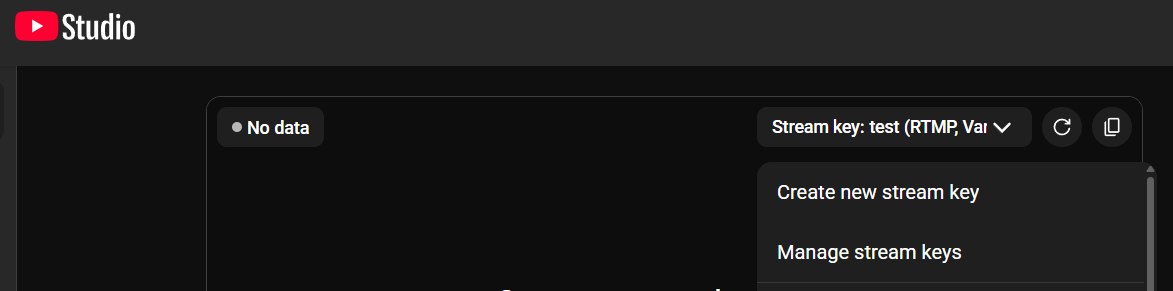
The
Stream URLis listed at the bottom of the youtube window in theStream settingssection.Copyit and paste it into theMedia Output EncoderDetailspanel: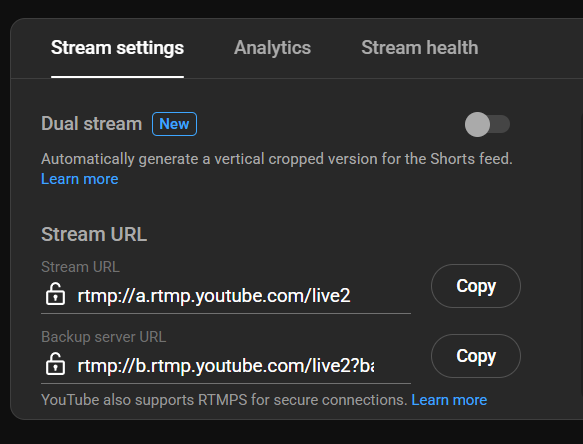
Scroll down in
Stream Settingsto set yourLatencyandcamera projection: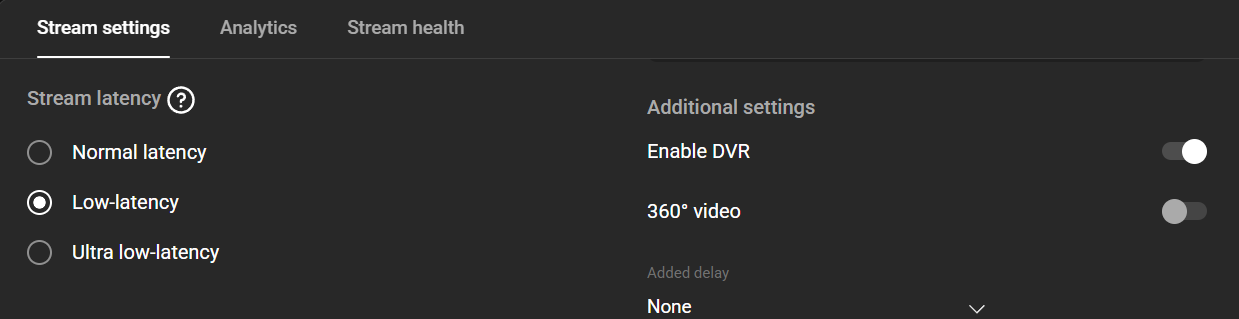
Stream latency:Normal latencyis around30 secondsbut guarantees stream stability and has higher quality video. You normally need this for streaming>1080p.Low latencyis around15 secondsand ensures stability while also permitting some interaction.Ultra low-latency:This tries for3 secondsof latency and should be used if you have an interactive stream with audience messaging and feedback. You need a good internet connection otherwise your stream may be interupted.
360 Video:If you are streaming from the OWL 360 Camera you need to enabled this.Enable DVR:You should normally have this ticked as it lets your viewers pause, rewind, and play back the stream while you are still live.
Press
Startin yourMedia Output Encoderand you will see your stream appear in YouTube Studio: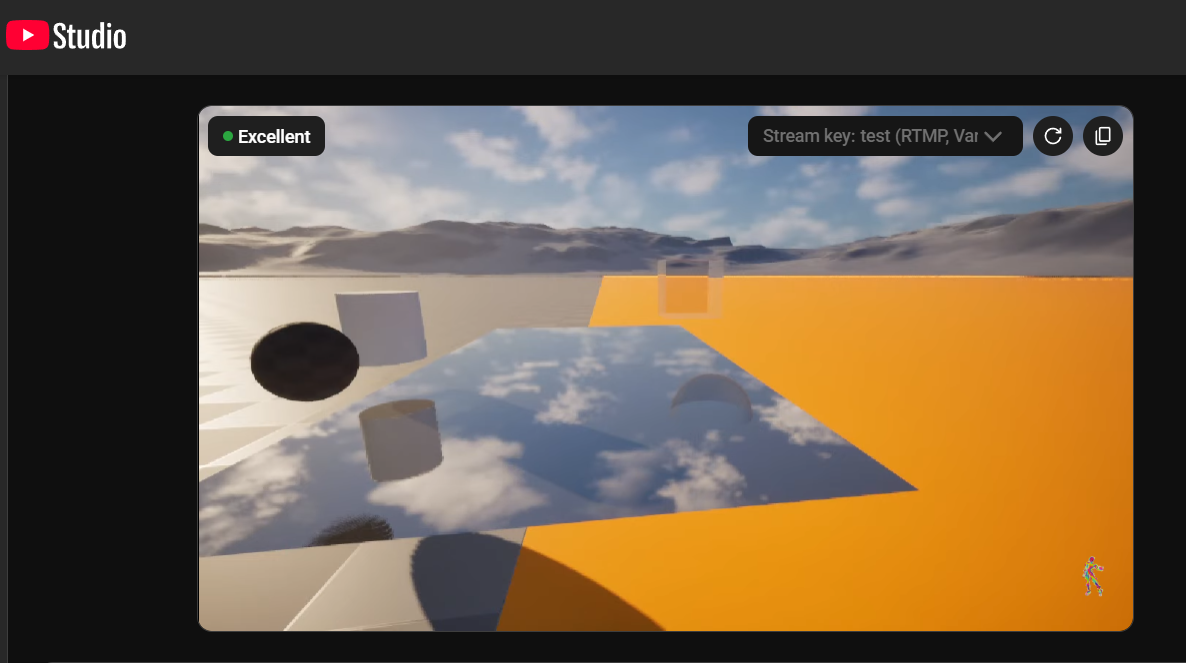
Twitch
You can only live-stream 2d video to Twitch but it has an ultra-low-latency option ~3 seconds for interactivity.
Twitch allows up to
1080presolution and60FPSfor which you should use aConstant Bitrateof6,000–8,000 kbpsand an audio bitrate of256 kbps(for lower FPS the bitrate can be lower).
Go to your Twitch
Creator Dashboard> Settings> Stream: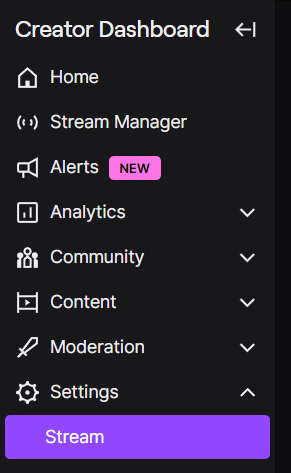
You will be streaming via
RTMPin theOutput Typesection of theMedia Output Encoderwhich requires aStream Keyand aStream URL:The basic stream URL is
rtmp://live.twitch.tv/app/, there are also regional URLs you can find only if you want to try to decrease your latency.You can find your stream key at the top of the
Streamsection of theCreator Dashboard. Copy and paste this into Unreal: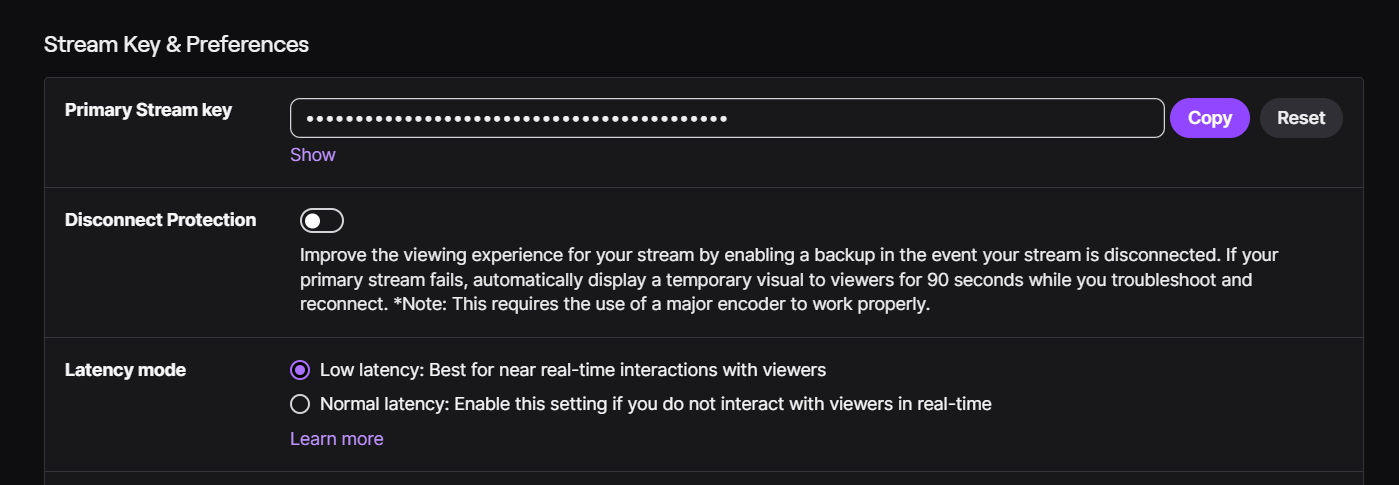
You can also select between
Normal(~20 seconds) andLow latency(~3 seconds).Press
Startin yourMedia Output Encoderand you will see your stream appear in Twitch Creator Dashboard.
Kick
You can live-stream 2d video to Kick with low latency.
Kick allows up to
1080presolution and60FPSfor which you should use aConstant Bitrateof6,000–8,000 kbpsand an audio bitrate of256 kbps(for lowerFPSthebitratecan be lower).
In your Kick profile to to
Settings> Stream URL and Key: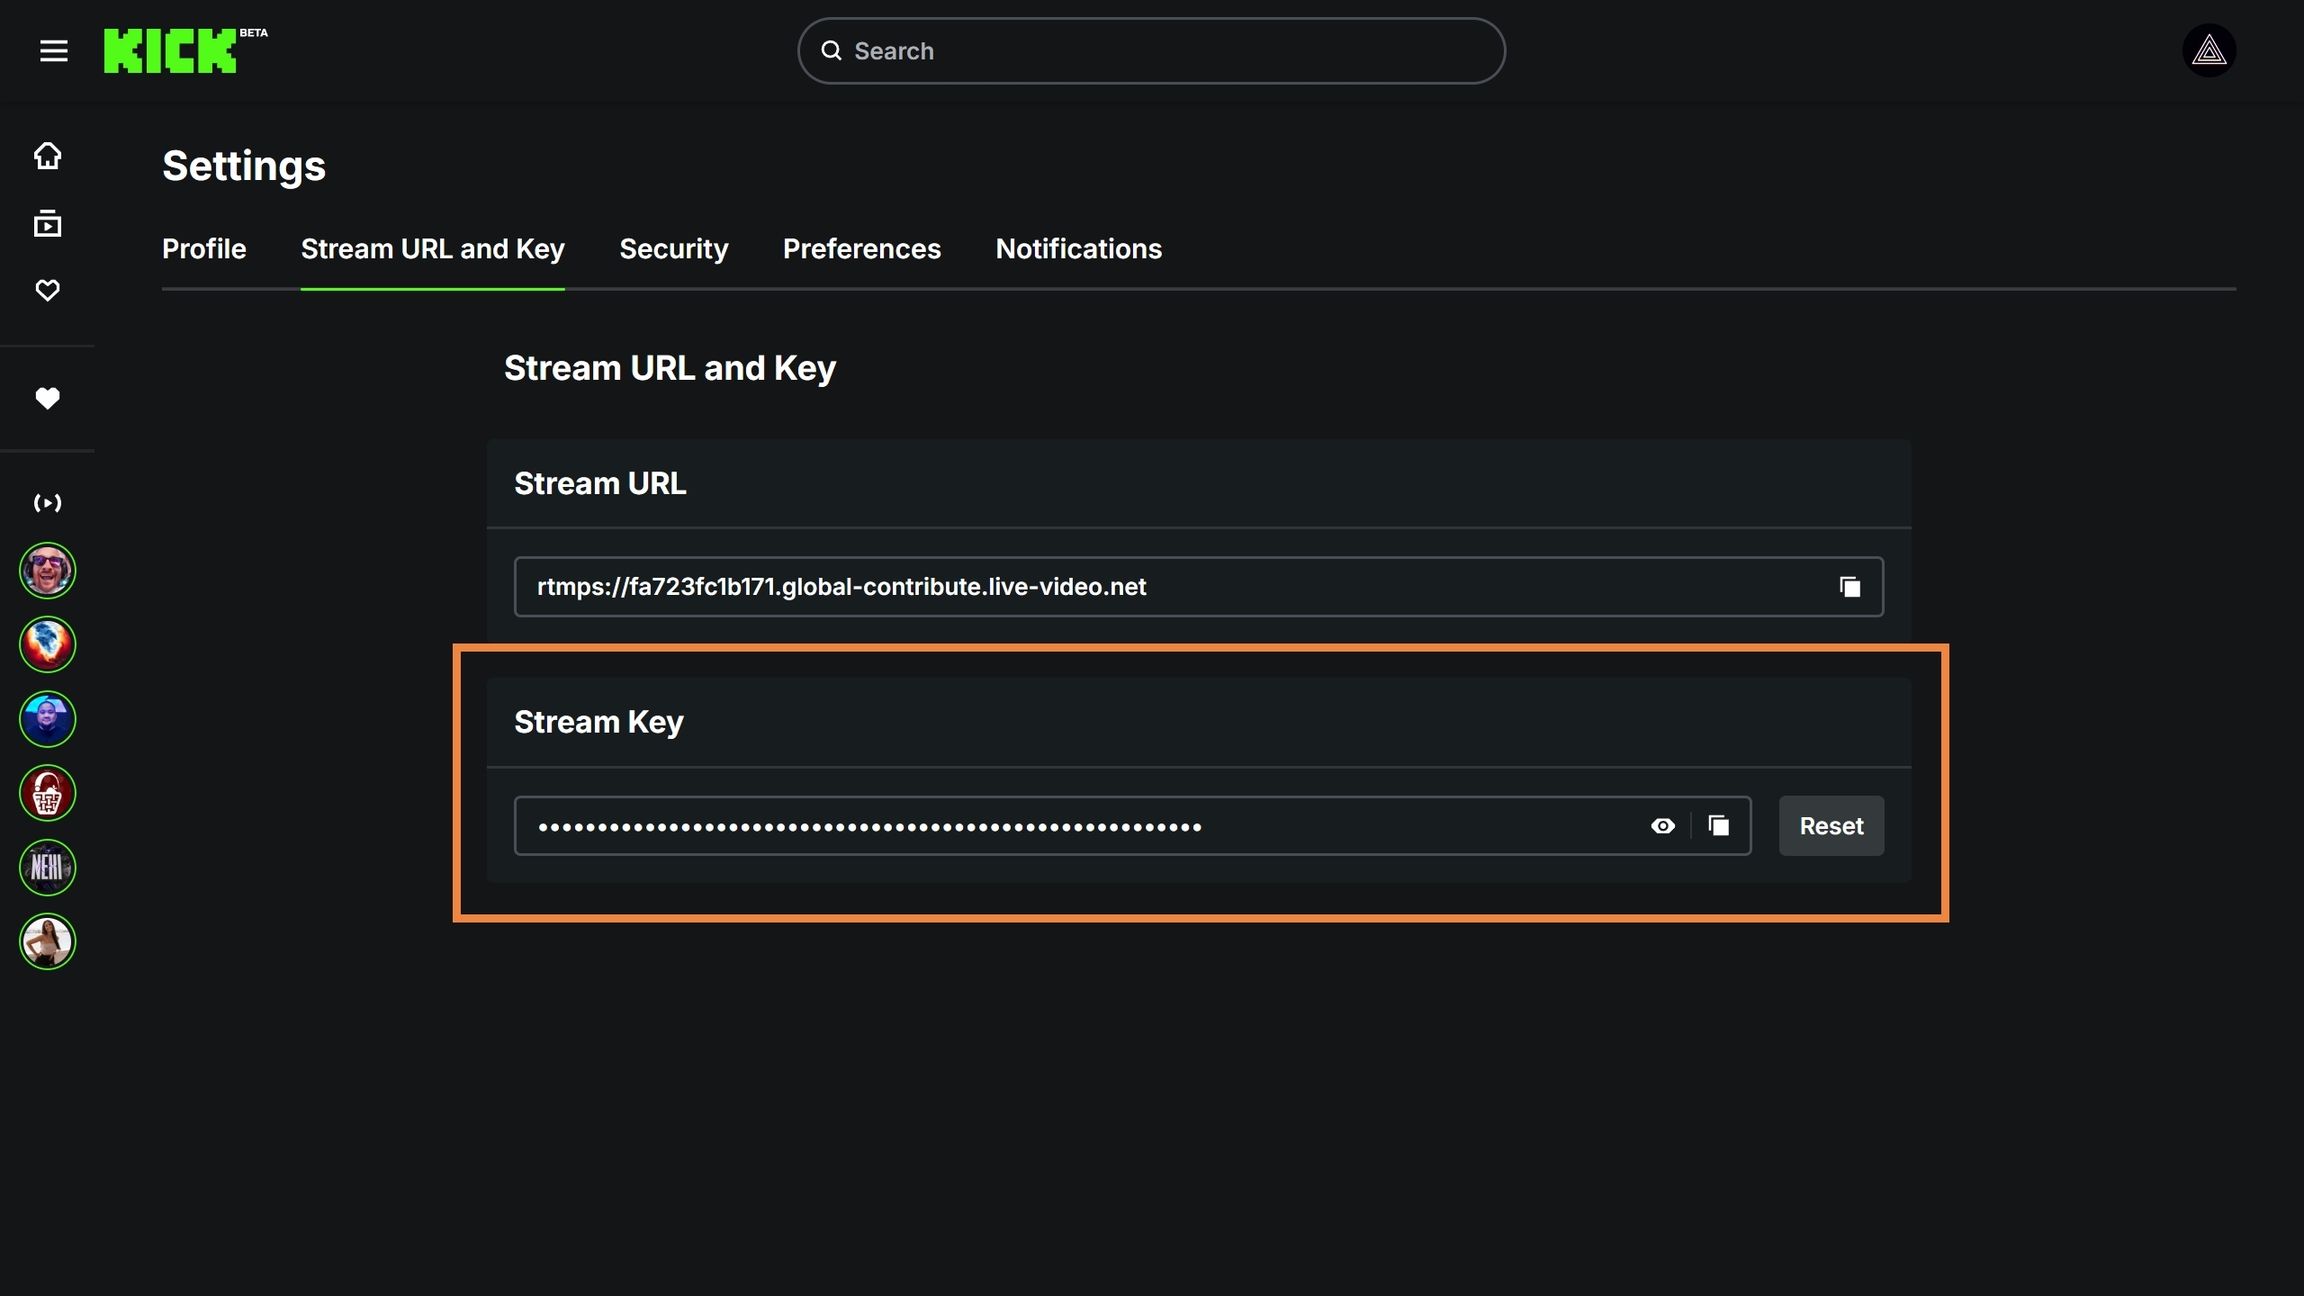
Input these into the
Output Typesection of theMedia Output Encoder:Click
Startor initiate your blueprint in Unreal and you will be streaming to Kick.
TikTok
You can live-stream to TikTok if you have authorisation or over 1,000 followers.
TikTok gives you a temporary
Stream KeyandURLfor each different live-stream you make.TikTok allows a resolution up to
1080 x 1920 pixels(1080pwith a90 degreerotation) up to60FPS. For a1080pstream at30FPSwe recommend to select aConstant Bitrateof5,000kbpsand anaudio bitrateof256kbps.
Go to http://livecenter.tiktok.com/producer:
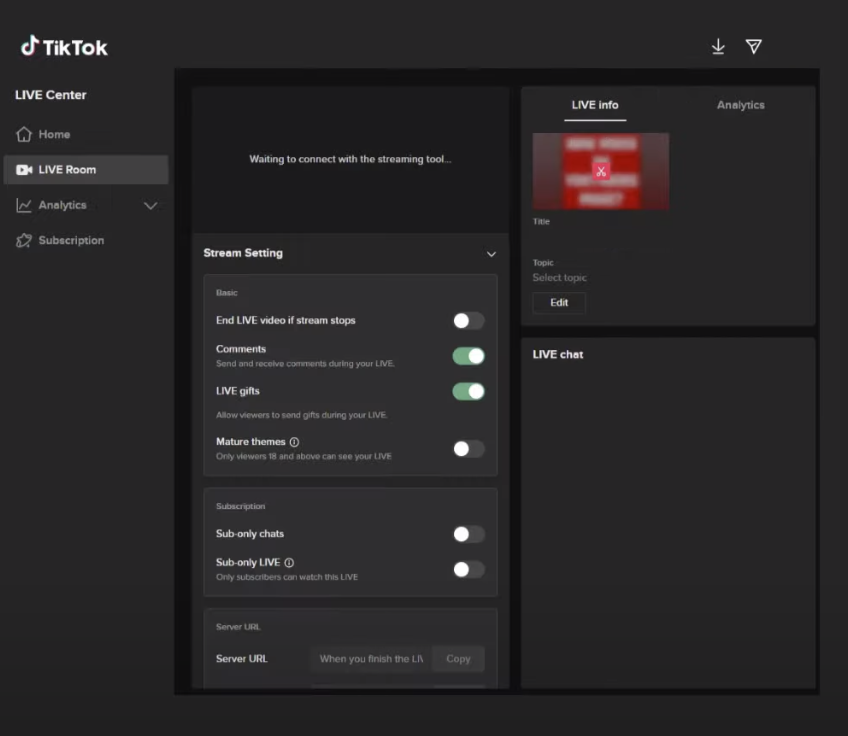
Under
Stream Setting, locate yourServer URLand yourStream Key:
Input these into the
Output Typesection of theMedia Output Encoder:Click
Startor initiate your blueprint in Unreal and you will be streaming to TikTok.
You can live-stream to Instagram via a
Professional Accountwhich you manage inSettings> Account Type and Tools.Instagram gives you a temporary
Stream KeyandURLfor each different live-stream you make.Instagram allows a resolution up to
1080 x 1920 pixels(1080pwith a90 degreerotation) up to60FPS. For a1080pstream at30FPSwe recommend to select aConstant Bitrateof5,000kbpsand anaudio bitrateof256kbps.
In your Instagram Desktop profile go to
Create> Live video:
Click through to the
Stream KeyandURLinformation: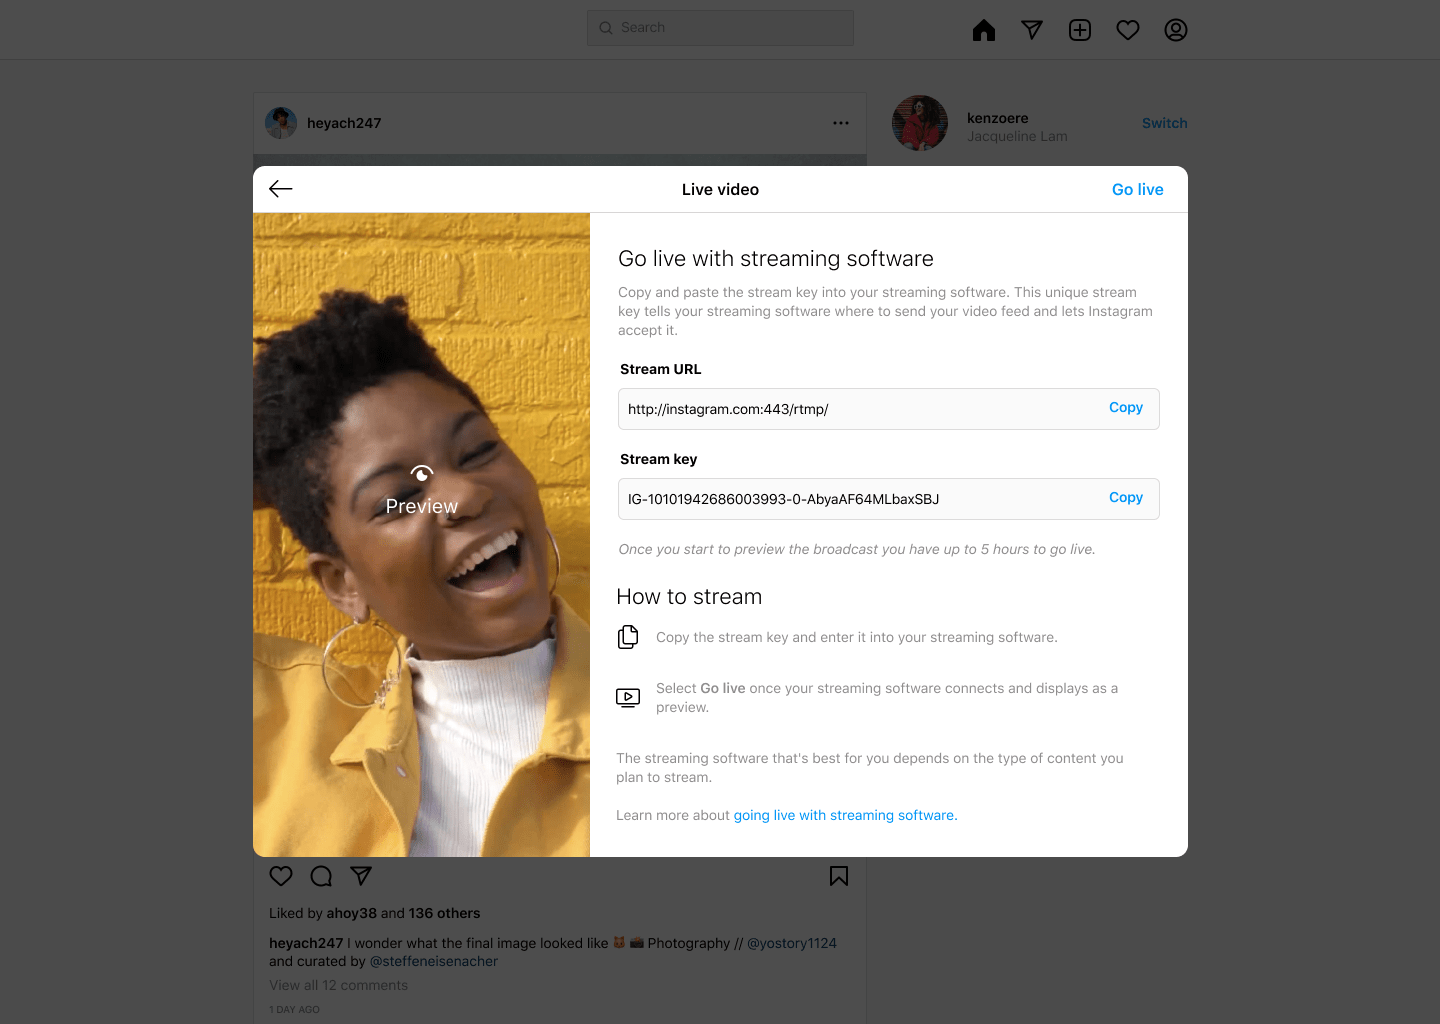
Copy and paste these into the
Output Typesection of theMedia Output Encoder:Click
Startor initiate your blueprint in Unreal and you will see your stream in the preview window. ClickGo Liveto broadcast:
Distributing with your Project/ App
The Media Output Encoder will work automatically when shared to third party users in projects/ apps (provided you have the correct license).
However, it currently only works with NVIDIA GPUs.
Trouble-Shooting
If you have an issue with encoding your content we recommend to follow these steps to help diagnose what might be happening:
Check Output Log
The
Output Loghas a variety of data which may provide an immediate answer to what is happening and is the best place to start if the encoder isn’t behaving as you expect.
Compare Recording with Stream
If you have an issue with the quality of the video or audio, you should
Save-to-Fileto see if the issue persists.Save-to-Fileuses the same encoder as the streaming options but doesn’t have the complexity of network connections, so can show you exactly what the encoder is producing.If the recorded content has the same issue as your streamed content then you need to change your
VideoorAudio Encoder Settings.If the recorded content doesn’t have the same issue as your streamed content, then you need to check the settings of your network or streaming settings like
Don’t Drop FramesorWrite Timeout Seconds.
Stream to Local Connection
If you are using one of the streaming protocols then we recommend to test a local stream first to OBS Studio or VLC Player to check the content quality.
This will advise whether your issue is with your network connection or settings or something to do with the encoder.
Try Alternative Protocol
Whenever you are thinking through your stream pipeline, always check what is the most stable protocol available in your transcoder or media server and use that.
For example,
RTMPis a prolific streaming protocol but is fundamentally less stable thanSRT.If you are streaming a single stream to YouTube or Twitch
RTMPwill be fine, but if you are streaming multiple outputs to a media server then we would strongly advise switching toSRTfor a much higher level of stream stability and reliability.
Decide what Latency you Need
Ultra-low-latency
<3 secondsstreaming is exciting but demands a much more stable network connection and faster network speed thanlow-latencyorstandard latency.If you need audience interactivity or contemporaneity to real-world events, then you may have to use ultra-low-latency in which case you need to focus heavily on your network.
However, in many cases
loworstandard latencywill provide a much better audience experience, guaranteeing that viewers on different devices with different connections can all receive your content seamlessly.
Frame Rate Drop when in Background
By default, Unreal throttles the CPU when Unreal is in the background vs other software.
To change this, go to
Editor Preferencesand untickUse Less CPU when in Background:
Audio not Playing when Editor in Background
By default, Unreal will stop audio playing when the
Editoris in the background vs other software.To change this, pick the Engine version you need in your
File Explorerand go to the file path:
In
Configgo toBaseEngine.iniand open the notepad: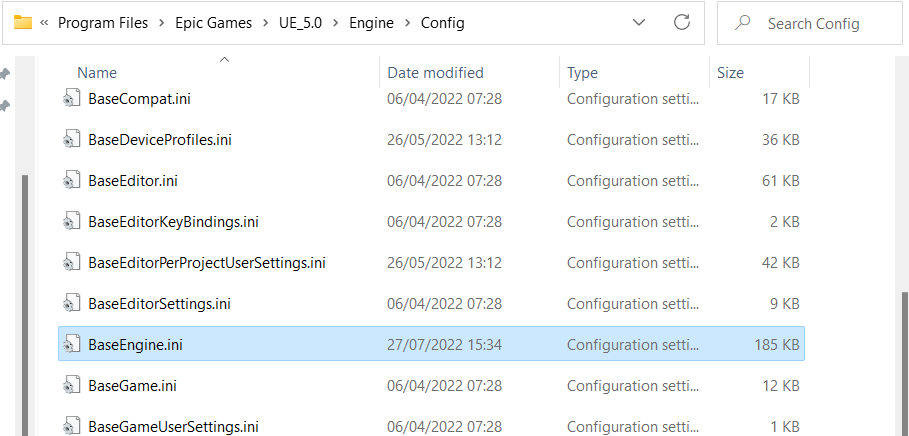
Search for
UnfocusedVolumeMultiplierand change the value from0.0to1.0: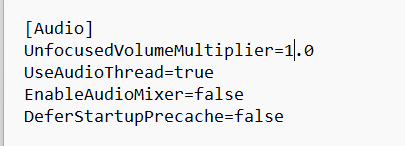
Save the file and close and re-open Unreal. Your audio will now play continuously no matter if Unreal is in the background or minimised.