OWL NDI Sender/ Receiver
An integration of NDI into Unreal Engine with 10bit receiver color support, audio and alpha channel support and output from all major Unreal tools like nDisplay, Media Capture, Composure, Media Plate, Render Target etc.
Last updated 3 months ago
Overview
NDI is a protocol which allows you to share a video (including alpha channel) and audio over-the-network at extremely low latency (<20miliseconds) (including over the internet using NDI Bridge).
It is supported by a wide range of broadcast and creative media software like OBS Studio, VMIX, Wirecast, Resolume, TouchDesigner etc.
We have integrated NDI into a wide range of Unreal inputs and outputs to suit a wide variety of different media workflows and can be used in Editor, Runtime or Packaged modes:
You can live output from any of the
OWL Captureformats (Viewport,Cinecam,360 Camera) direct to NDI using ourMedia Output Wizard.You can live input NDI into an Unreal
Media Plate,PlaneorMaterialusing ourMedia Input Wizard.If you want to use NDI with Unreal native tools like nDisplay, Media Capture, Composure, Media Plate etc. you can use our Unreal
Media Frameworkintegration.If you want to send or receive an Unreal
Render Target, you can do so using theOWL NDI Sender/ Receiver Manager.
NDI Sender
You can live-stream from Unreal Engine via NDI either from a Render Target or from Unreal's Media Framework which can be used with nDisplay, Composure, Media Capture and other useful tools.
Performance
For stability in your NDI output and to make receiving easier we recommend you set a fixed Frame Rate in your Unreal Project Settings. >30FPSmay start to reduce your performance, especially at higher resolutions, due to the CPU load.
You need to have headroom in your actual Unreal FPS above what you select here:

For sending NDI, we currently only support the NDI
SpeedHQcodec which offers extremely low-latency (20miliseconds) but a number of drawbacks:It is
8bitcolor only.It is CPU encoded, so can throttle Unreal quite quickly, especially if you are outputting a high resolution and frame rate or multiple simultaneous streams.
Alpha channel is supported via
BGRAbut it sends double the color information so doubles the CPU computation and so will further limit your performance.It requires extremely high bitrate and bandwidth because it performs very little compression on the frames (that’s how it achieves such low latency) so you need a very stable connection (normally ethernet) to run it with stability.
It has visual artefacts because it sacrifices complex compression techniques for speed:
It has no temporal dimension, so fast differences between frames can create artefacts.
Due to the lack of compression it still can lack the bitrate budget to encode complex foliage, water etc.
UYVYuses4.2.2.chroma subsampling so the color information is at half the resolution of the brightness which can create jaggedness around fine lines.
The real benefits of
SpeedHQare therefore:Speed: It’s latency is virtually unmatched in over-the-network protocols.
Compatibility: It is well supported across media software.
Multimedia: It offers video, audio and alpha channel support.
Always-On: As soon as the output is set to
Activeit will keep streaming, you don’t have toStart/ Stoplike with theOWL Media Output Encoder.
Sender Set-Up
Features
You can use three different methods (listed below) to send NDI from Unreal using Off World Live, all of them include these features:
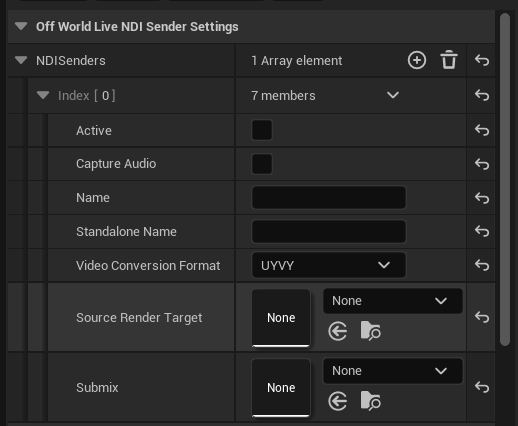
Active:A tickbox you can use to turn your Sender on/ off.If you are not using the Sender you should switch it off to save CPU resources, since encoding is done via the CPU.
If you leave this Active then the Sender will keep sending in the background.
Capture Audio: Select this if you want to send audio as well as video.By default this will be your Viewport audio but you can set an audio
Submixinstead below.
Name/ Standalone Name:This is the name you will see in your NDI receiver software.If you are using Unreal in Standalone mode then you can set this value.
Video Conversion Format:The NDI Sender currently only sends8bitcolor using theSpeedHQcodec.BGRA:This is a4.4.4.color format so will have better colors thanUYVYand is required for using alpha channel. It requires more CPU usage and bandwidth thanUYVY.UYVY:This is a4.2.2.color format so has half the color resolution ofBGRAbut requires less CPU power and bandwidth.
Source Render Target:This is only present in theOWL NDI Sender Manager.It is a
Render Targetfrom a Camera or Unreal output that will be encoded to NDI.If you are using the Unreal
Media Frameworkintegration, theRender Targetwill be selected automatically.
Submix:This is to select an audioSubmixif you would prefer to send this instead of your Viewport audio.
Media Output Wizard
You can use this method to output from any of the OWL Capture formats to NDI:
In the Off World Live Unreal Editor drop down select the
Media Output Wizard: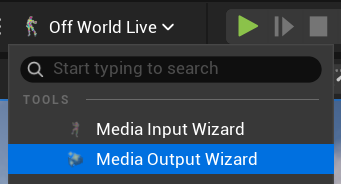
Select the settings you need (if you want alpha channel you need to set this on the Camera) and then click
Create: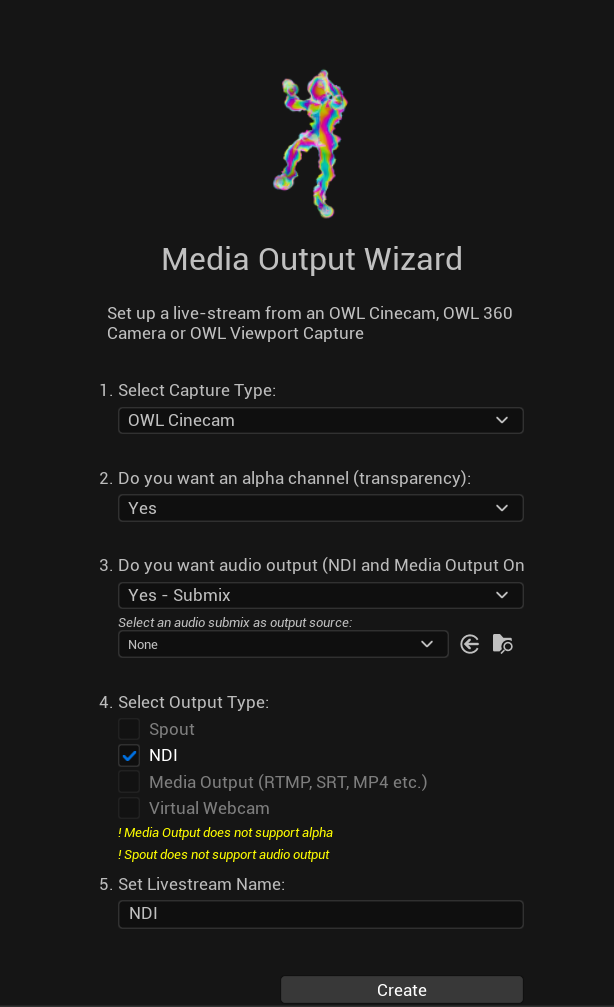
If you go to your
NDI Receiveryou will now see the output you have created.You will also have added an
NDI Sender Manager Actorand OWL Capture Actor of which you can use theDetailspanel to modify your content:
Unreal Media Framework
You can use this method to output from any of the Unreal creative tools (nDisplay, Composure, Media Capture etc.) to NDI:
Right click in the Unreal Engine
Content Browserand selectOWL NDI Output: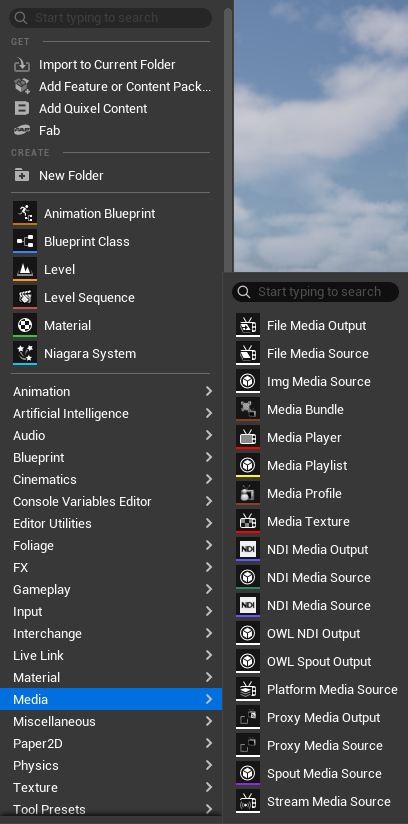
A new
NDI Media Output Actorwill be created in theContent Browser:
Double click the
Actorto set the features you need:
Number of Texture Bufferssets the number of textures used to transfer the texture from the GPU to system memory.A smaller number is most likely to block the GPU (wait for the transfer to complete).
A larger number is most likely to increase latency.
Has Priorityenables the sender to take precedence if multiple senders try to use the same name.This is useful when you want this sender to be the main or fallback sender.
Now in Unreal utilities like nDisplay you can go to the
Media Outputdropdown and select theOWL NDI Outputas aMedia Outputoption:
You need to create a new
NDI Media Output Actorfor each separate NDI output you want to send.
NDI Sender Manager
You can use this method if you want to output a Render Target and Audio Submix via NDI.
Find the
OWLNDISenderManagerActor in thePlace Actorspanel and drag it into your scene.
In
World OutlinerselectOWLNDISenderManagerso it opens in yourDetailspanel, add a newArray elementusing the+sign and set the features you need.You will need to select/ create a
Render Targetby clicking the drop down next to the thumbnail:When you tick
Activeyour NDI feed will start sending out over the network.In your NDI receiver program, just select the name you have given your feed and your video & audio will appear.
If you want to output more
Render Targets, just add anotherArray element.You can use blueprints to switch the
Render Targetwhich can be useful for live-editing between different camera angles while sending to a single NDI receiver.
Sending to Other Software
OBS Studio
To receive NDI in OBS Studio you need the DistroAV plugin installed.
You can only receive
8bitcolor currently withalpha channeland audio.
Ensure your
NDI Senderis active in Unreal andCapture Audiois ticked if you need.In OBS, click the
+button in Sources and selectNDI Source:
In the window that opens you should automatically see your
NDISender.If you have more than one, you can use the drop down to select between them: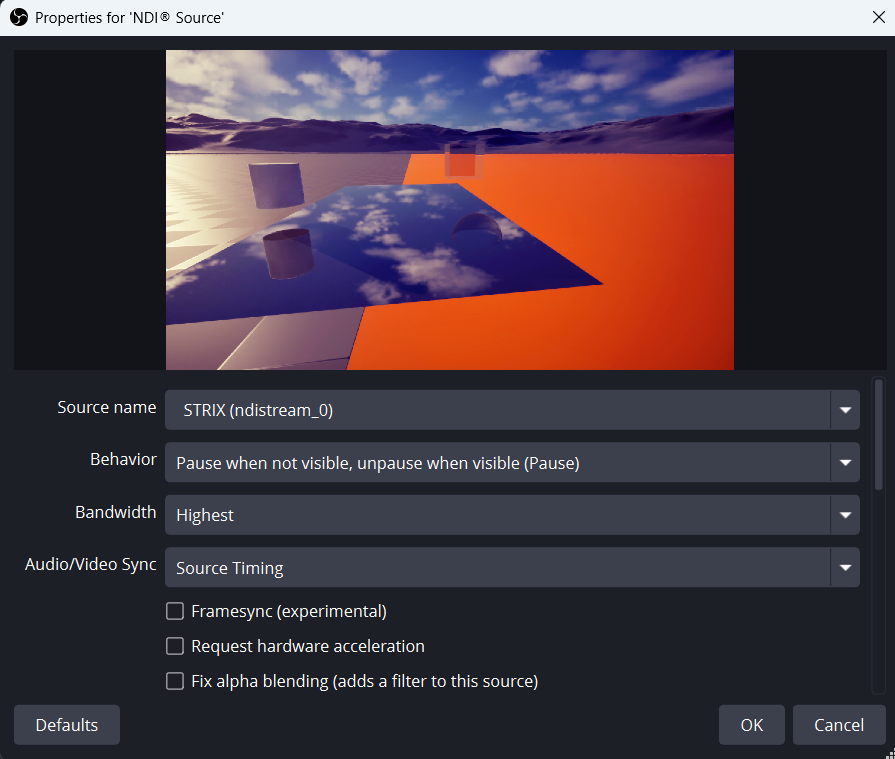
If you are sending
alpha channel, it will automatically be picked up in OBS but you need to ensure that NDI is set to Video Conversion FormatBGRAin Unreal.If you are sending audio, it will automatically be picked up in your OBS
audio mixer.
Resolume
To send NDI to Resolume follow the guide here.
NDI Receiver
You can live-stream to Unreal Engine via NDI either into a Render Target or in to Unreal's Media Framework which can be used with nDisplay, Composure, Media Plate and other useful tools.
Performance
For receiving NDI, we support the NDI SpeedHQ, HX and HX-3codecs, all of which are set in your NDI Sender software.
They offer a wide range of different capabilities and benefits:
HX-3
HX-3can deliver a very high quality image because:It uses
H.265with10bitcolorIt encodes mostly full frames with a very short
GOP(it doesn’t guess content across frames which can cause artefacts).It can handle higher resolutions like
4K.
For this reason
HX-3is also very low latency/ (because it is only decoding 2 or 3 frames at a time)However it has very high bandwidth/ bitrate because it is encoding mostly full frames.
If you have an ethernet connected studio and your NDI Sender can process
HX-3then it’s highly recommended to select this option, especially if you are using chromakey/ alpha channel.If you want to receive 10bit color you need to select the
Bestoption in theColor Managementsection of the relevant NDI Receiver Actor: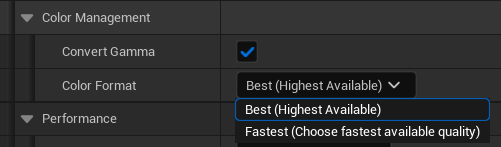
HX
HXdelivers a less high quality image thanHX-3but with much lower bandwidth:It normally uses
H.264with 8bit color.It encodes a much larger
GOP(30or60frames) so has a much lower bitrate.It is generally used for
1080pand lower resolutions.
For this reason
HXis much higher latency thanHX-3but consumes a lot less bandwidth.If you want reasonable image quality but you are sending NDI over the internet (NDI Bridge) or over WIFI in a studio this is the recommended option.
SpeedHQ
SpeedHQis the default format in NDI Senders so if you don’t have the option to selectHX-3orHXthen it is what will be sent.It is a very low latency format but has significant visual artefacts and relatively low visual quality.
We recommend using this if it’s your only option or if you have a technical requirement for ultra-low-latency.
Latency
In the
Color Managementsection of the relevant NDI Receiver Actor there are two options which affect the latency of the stream:Best:This will add a small frame buffer (1-3 frames) so that if there is a network connection issue you still have a smooth video playback.Fastest:This adds no frame buffer, which makes video delivery faster but means that is there is any network drop your video feed will stutter.
Receiver Set-Up
Features
You can use three different methods to receive NDI in Unreal Engine using Off World Live, all of them include these features:

Active:A tickbox you can use to turn your Receiver on/ off.If you are not using the Receiver you should switch it off to save CPU resources, since decoding is done via the CPU.
If you leave this Active then the Receiver will keep decoding in the background.
Render Target:This is only in theOWL NDI Receiver Manager.If you are using the Unreal
Media FrameworkorMedia Planethen theRender Targetis handled in the background.
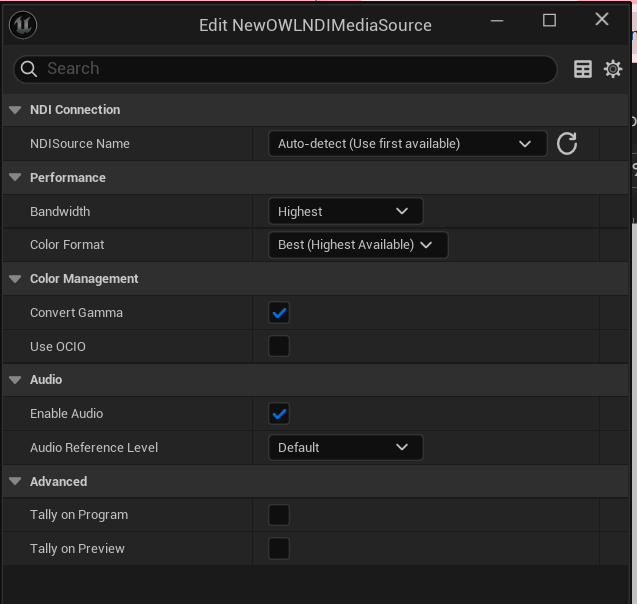
Name:This is your list of NDI Senders which are coming from external software.Convert Gamma:Use the Fix Gamma Checkbox for media sources that are in a different colorspace to UE’s default sRGB colorspace.This helps ensure proper color reproduction when receiving from external applications.
Keep this unticked if you want to receive the raw color input.
Color Format:You have two options:Best:This will decode 10bit color space if it has come from your Sender resulting in a much higher quality image but a slightly longer decode time.Fastest:This will just find the color space option that it can decode in the fastest possible time so will result in a lower quality image.
Bandwidth:This is used to select between:Highest: Decodes the native stream resolution plus audio and metadata.Lowest:Decodes a640x380resolution stream plus audio and metadata.Audio only:Only decodes any audio that is being sent.Metadata only:Only decodes any metadata being sent.
Audio:These options are only in theOWL NDI Receiver Manager. If you are using the Unreal Media Framework or Media Plane then the audio is handled in the background.NDI Soundwave:To add audio you need to create aSound Waveusing the drop down (this is done automatically in the Media Input Wizard).Reference Level:Lets you select betweenEBU,SMPTEandManual.Audio Sync Mode:You can select automatic audio-video sync or create a delay if you need.
Media Input Wizard
This is the fastest way to set up an NDI input to Unreal with compatibility to an Unreal Media Plate (clean media and no anti-aliasing), Plane or Material.
In the Off World Live Unreal Editor drop down select the
Media Input Wizard: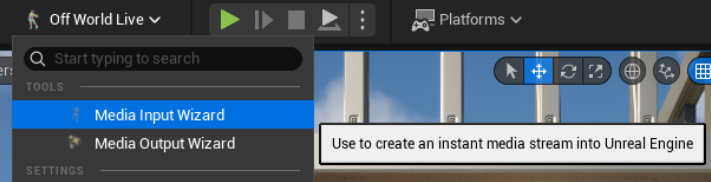
A pop-up will appear in which you can select the Media source you want as well as where you want to display the media:
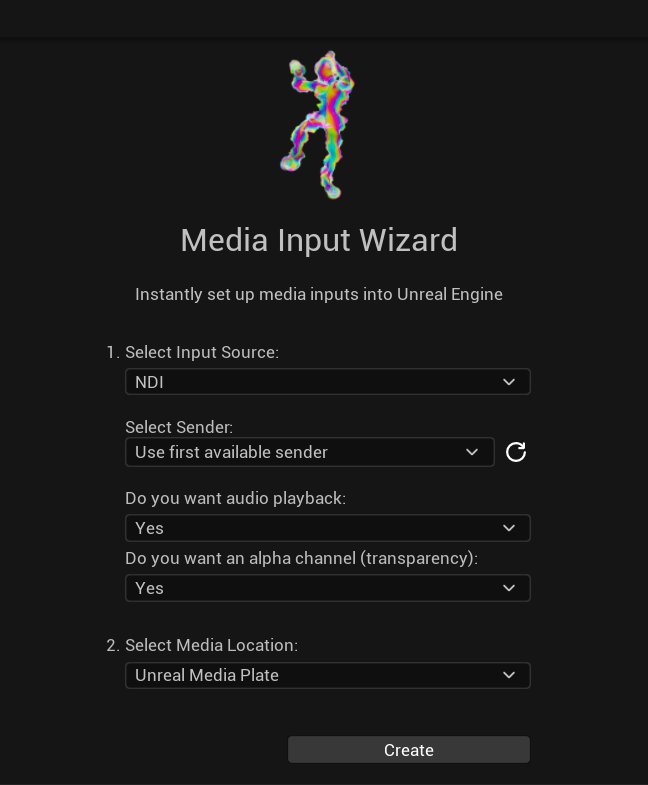
Click
Createand the NDI receiver will automatically be generated in your scene.If you select
Unreal Media Plate, you will generate anNDI Media Source Actorwhich you can manage in theAssetssection of theMedia Plateor yourContent Browser.If you select
PlaneorMaterial, you will generate anOWL NDI Receiver Manager Actorwhich you can manage using itsDetailspanel (see below).
Unreal Media Framework
You can use this method to input NDI to any of the Unreal creative workflows like nDisplay, Composure, Media Plate etc.
Right click the
Content Browserand selectNDI Media Source: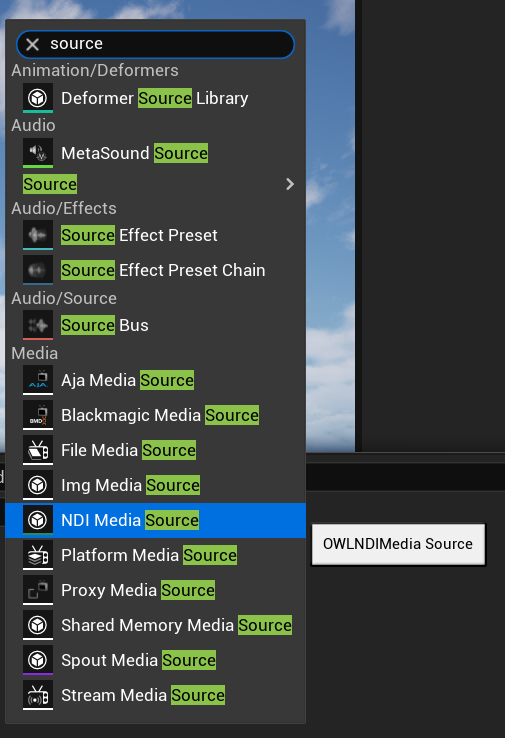
This will create a
NDI Media Source Actor. Double click to access it’s properties.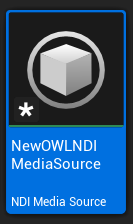
In the pop-up you can select the NDI input feed as well as any other features you need:
Dragging the
OWL NDI Media Sourceinto the viewport will create a new UnrealMedia Plate Actorwith theSourcealready assigned.Click the
Openbutton in theDetailspanel of theMedia Plateto make it play: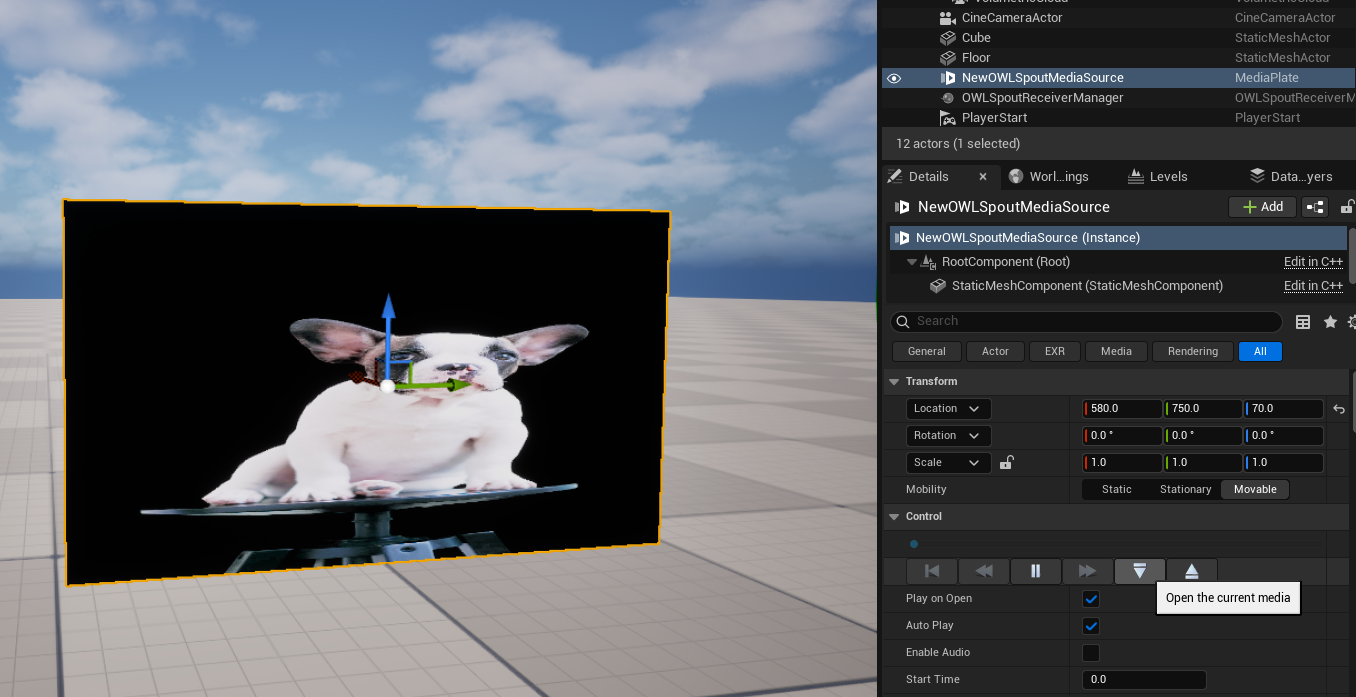
If you want to add NDI to an existing Unreal
Media Plate:tNavigate to the
Media PlateDetailspanel, find thePlaylistsection and then select theNDI Media Sourcefrom theAssetdropdown: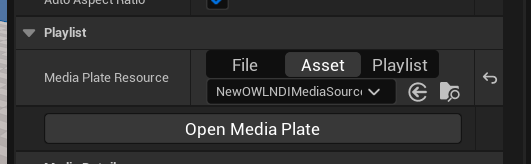
NDI Receiver Manager
You should use the OWL NDI Receiver Manager if you want to output a Render Target from Unreal via NDI.
Go to the
Place Actors' panel and drag-and-drop theOWL NDI Receiver Manager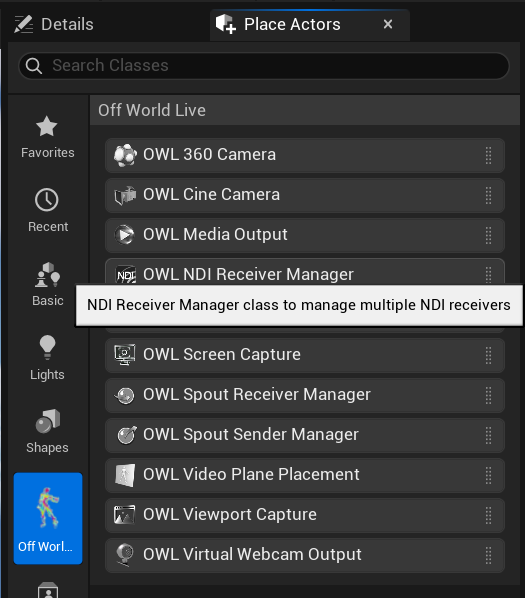
In the
Detailspanel, go toOff World Live NDI Receiver Settingsand add anNDI ReceiverArray elementand click the arrow in the right hand corner to open it and modify the settings you need: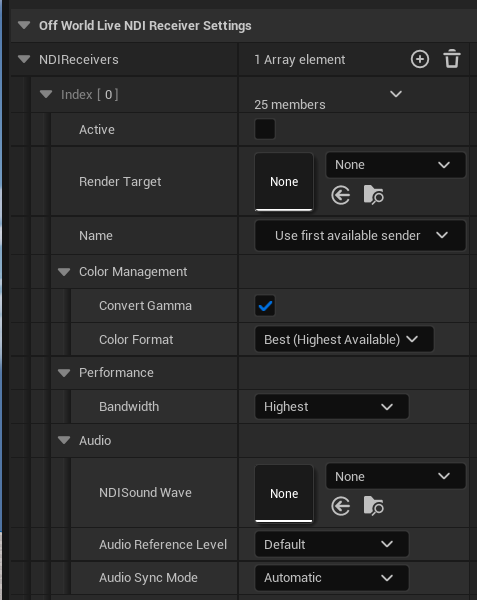
Once set up, your NDI source will be sending to a
Render Targetin Unreal which you can use as you need: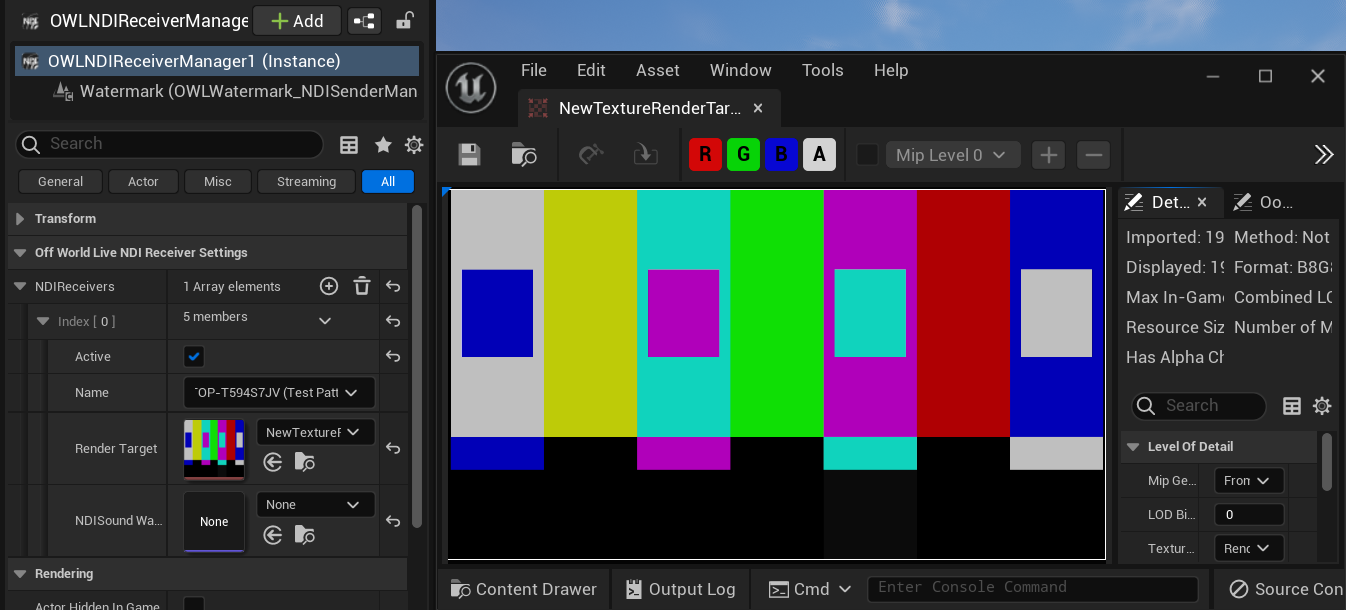
To receive multiple input feeds, just add additional
Array elements.
Receiving from Other Software
OBS Studio
To send NDI from OBS Studio you need the DistroAV plugin installed.
You can only send in
8bitcolor at present.There are two ways to send, via a
Filterand usingTools.A
filteris recommended because it allows you to send any OBSsourceas an individual layer and it supportsalpha channeloutput, which allows you to add achromakeyin OBS.If you want to send your whole OBS
CanvasthenToolsis best.
Filter
Click on the OBS
Sourceyou want to send from so it is highlighted blue and then click theFiltersbutton: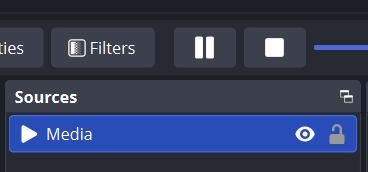
In the window that opens click the
+button inEffect Filtersand selectDedicated NDI output: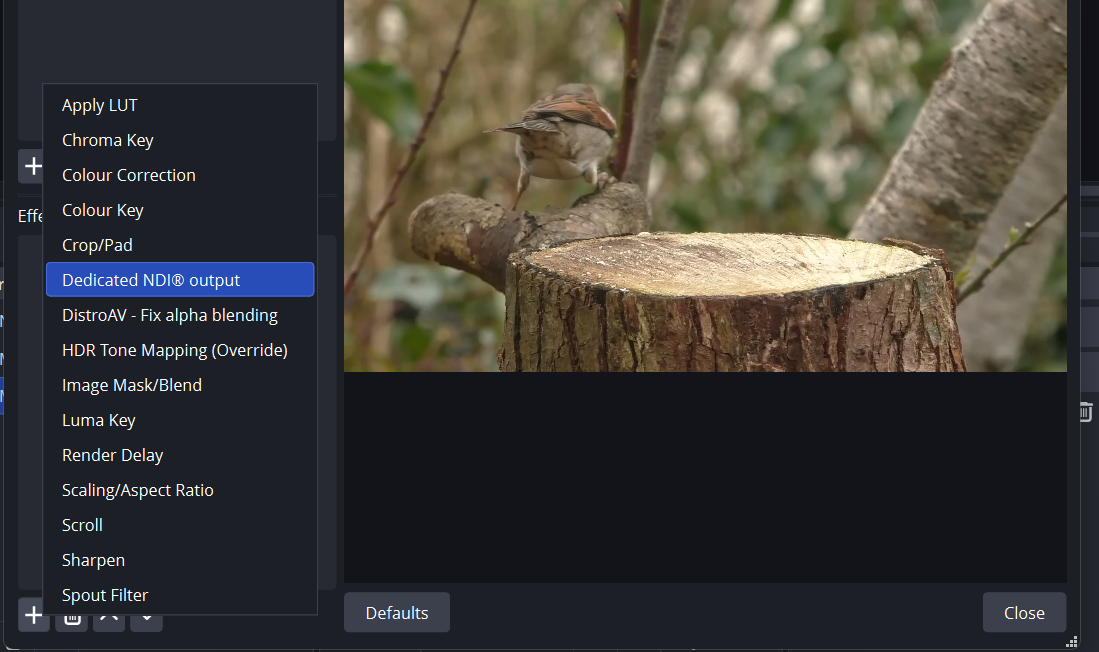
Add a
nameif you need and your NDI output will now be active: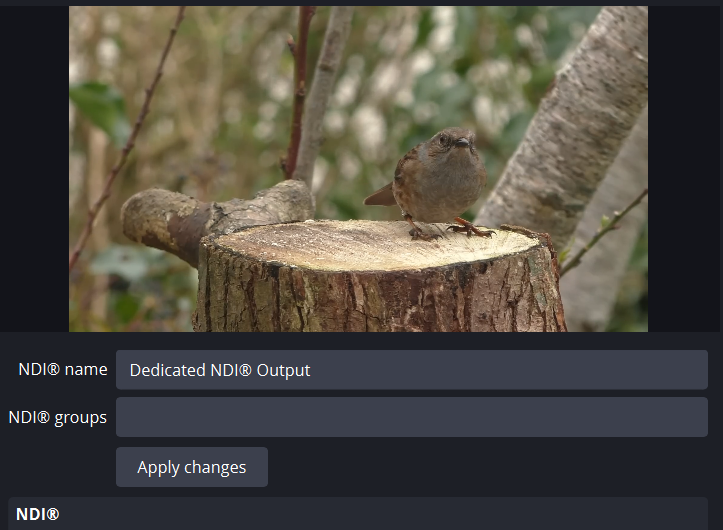
For example, in your
Unreal Media Plateyou should now see the NDI input (if not, select it from the drop down in your NDI settings):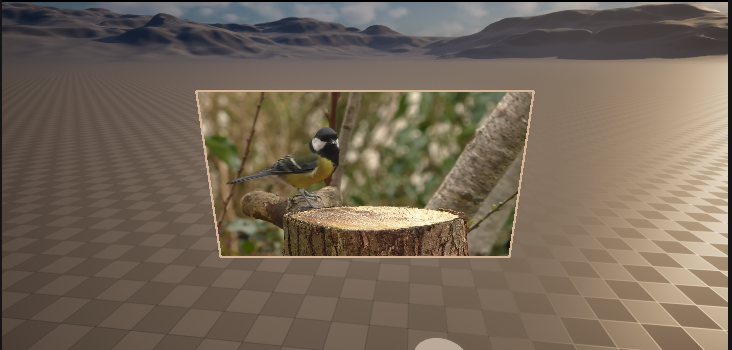
Tools
In your OBS toolbar go to
Tools> DistroAV NDI Settings: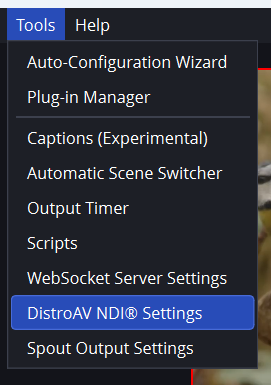
Tick
Main Outputto send your OBS canvas and then click OK to begin sending: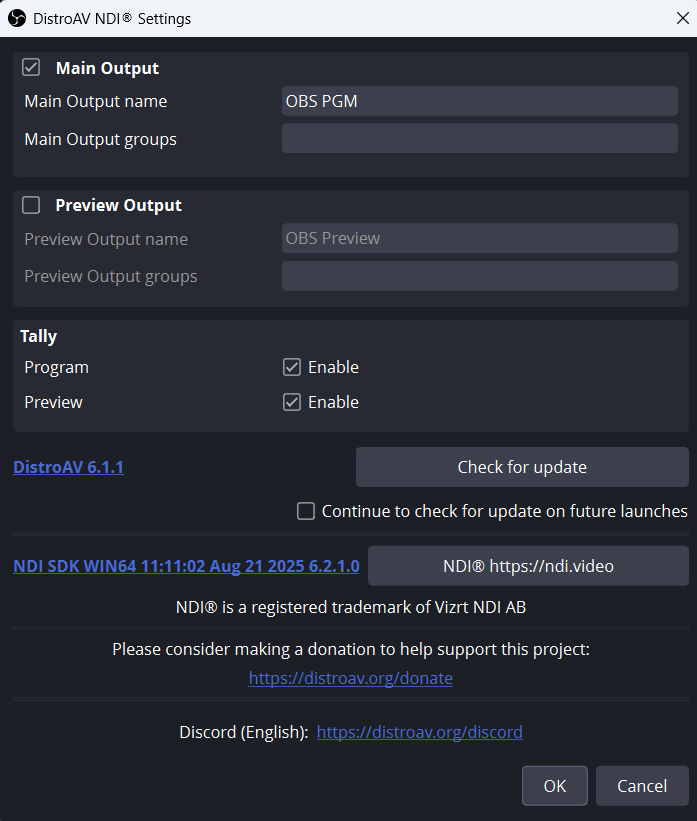
For example, in your
Unreal Media Plateyou should now see the NDI input (if not, select it from the drop down in your NDI settings):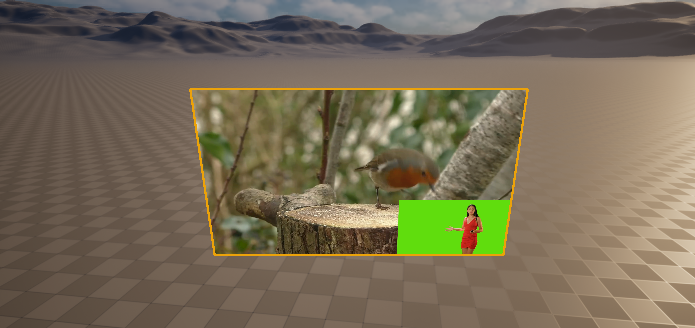
Blueprints
Toggle NDI Outputs from two OWL Cinecams
You will need to add your
Render Targetsinto theSet membersnodes:
Switch between NDI Inputs
This lets you loop between different live NDI inputs on a single keypress.
Installing NDI SDK to Games/ Apps
If you want to install NDI to your game/ app then you need to include the installer so that your end user has the NDI SDK installed on their machine:
Go to
Project Settings>Pluginsand tickLaunch NDI Installer Automatically: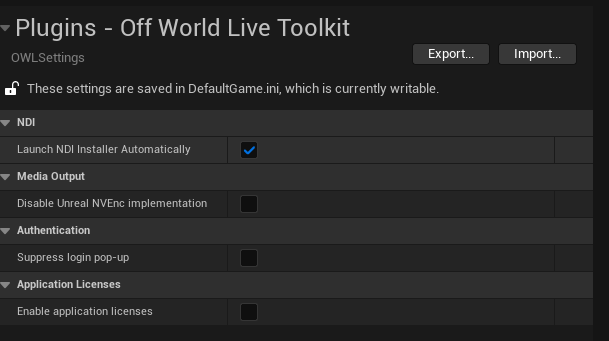
Now when you package your application the NDI installer will be packaged with it and will automatically load when your users open your application for the first time.
Troubleshooting
NDI has a very helpful set of tools for debugging which can be downloaded here.
Wifi vs Ethernet
The NDI protocol doesn't currently have a way to select which network interface it uses to send data.
As a consequence, it will often use your Wifi when you have both wireless and wired connections active.
It’s recommended therefore to switch off Wifi when you have Ethernet sending set up.
Firewall Blocking
The main issue that arises with NDI feeds is them getting blocked by a firewall, because they are being sent over IP.
If you can’t see the feed coming through (either to Unreal or to your receiver software) then please check your firewall settings.
You can also use
NDI Access Managerin the tools linked to above to designate white-listed IP addresses for your NDI feeds.
Black Output from Sender
If you are sending in
BGRAformat and your video doesn’t include an alpha channel then your screen may show as black.To resolve this you should switch your
Video Conversion FormattoUYVY:
Audio Drift
Although it’s better in NDI 6, over longer streams if your CPU is over-loaded NDI can desync audio and video.
To resolve this, set a fixed FPS in Unreal Engine such as
30 FPSto reduce load.You can also check the
NDI Analysis Toolin the tools linked above for ‘clock deviation’.
Receiver Stutter
Some NDI Receivers (like VMIX) need a fixed FPS to process your NDI feed properly, otherwise they will show major ‘stutter’ and a very low frame-rate.
To resolve this, set a fixed FPS in Unreal Engine such as
30 FPSso that the Receiver has a stable input.
Frame Rate Drop when in Background
By default, Unreal throttles the CPU when Unreal is in the background vs other software.
To change this, go to
Editor Preferencesand untickUse Less CPU when in Background:
Audio not Playing when Editor in Background
By default, Unreal will stop audio playing when the Editor is in the background vs other software.
To change this, pick the Engine version you need in your
File Explorerand go to the file path:
In
Configgo toBaseEngine.iniand open the notepad: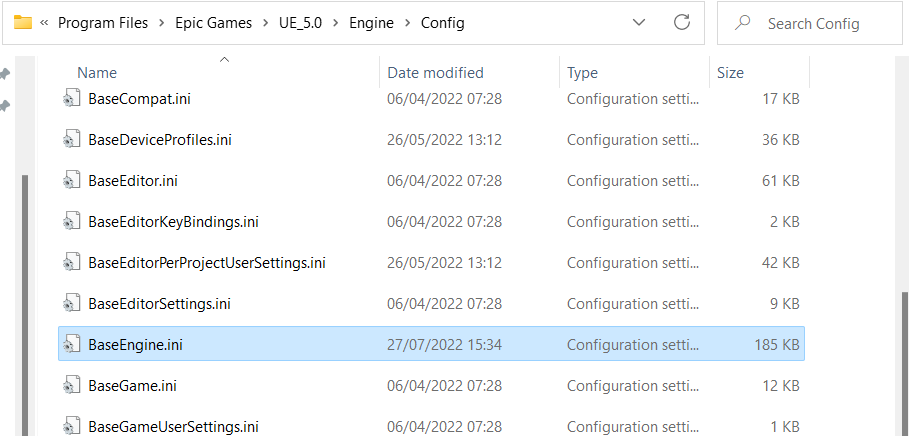
Search for
UnfocusedVolumeMultiplierand change the value from0.0to1.0: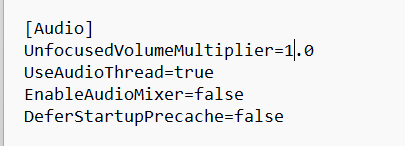
Save the file and close and re-open Unreal. Your audio will now play continuously no matter if Unreal is in the background or minimised.
Windows UDP Bug
As of early 2026, a specific Windows Security Update (related to KB5063878) has been known to cause traffic drops for NDI.
To resolve this, in
NDI Access Manager, go to theAdvancedtab, and change theReceive ModefromAuto (RUDP)toSingle-TCP.This forces a more stable connection method that bypasses the Windows UDP bug.