OWL Cinecam and Component
An augmented Cinecamera Actor and Component for Unreal Engine with precise Viewport color matching, output to a Render Target, Alpha Channel support, Stereoscopic output and various other features.
Last updated 5 days ago
Overview
The OWL Cinecam and Capture Component let you capture live outputs from Unreal Engine with identical colors to your Unreal Viewport and a wide range of additional useful rendering a compositing features.
It is primarily used for live-stream from Unreal in workflows such as:
Projection mapping and VJing (including live stereoscopic 3D).
VTubing (character with alpha channel).
Previsualisation in Digital Twins from drones or moving actors.
Broadcasting from virtual studios.
Cinecam Actor
The OWLCinecameraActor is a standalone Actor that you use in your Unreal level like any other camera.
To use the OWL Cinecam:
Go to
Place Actorsand in the Off World Live section find theOWL Cine Cameraand drag and drop it into your level.You can now use the
Camera Actorin Unreal like you would any standard camera.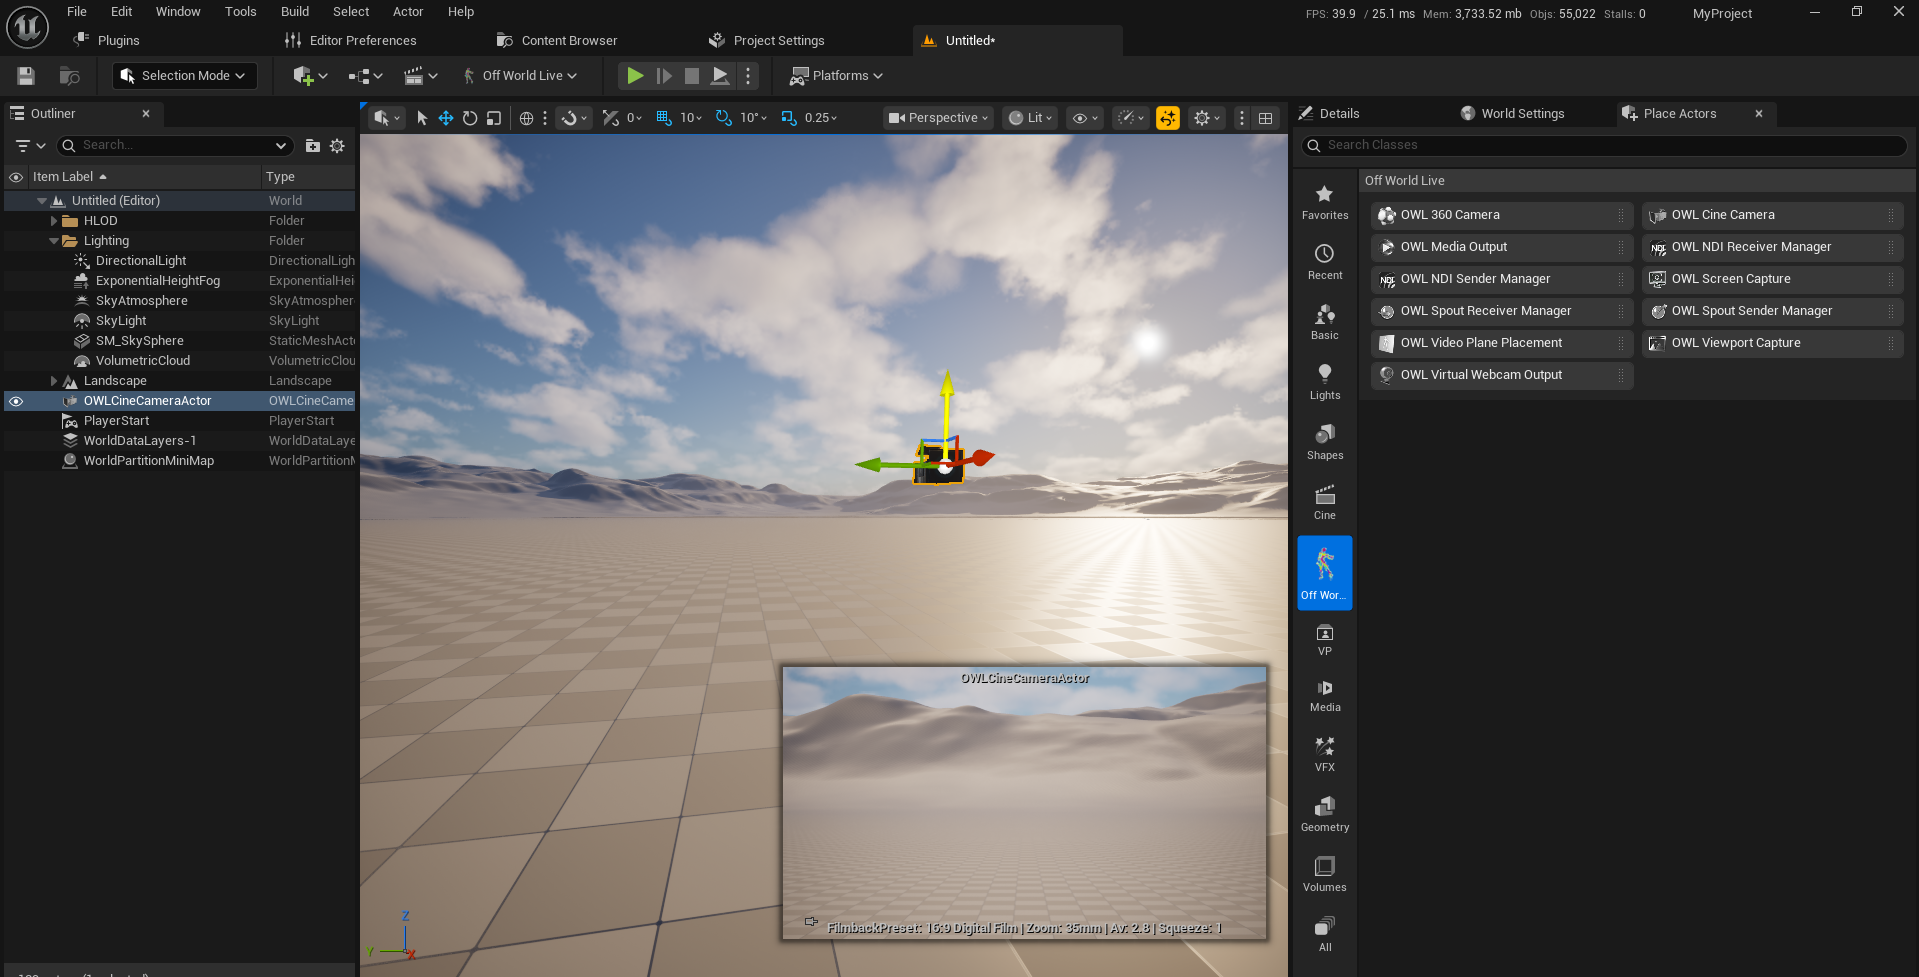
Capture Component
The OWL Capture Component adds the OWL capture capabilities to whatever Camera or Actor you attach it to. This is useful if you have an existing sequence which you want to live-stream from.
To use the OWL Capture Component:
Select any Unreal
Camera,CinecamorActorin yourWorld Outlinerand at the top of itsDetailspanel clickAddand type and selectOWL Capture: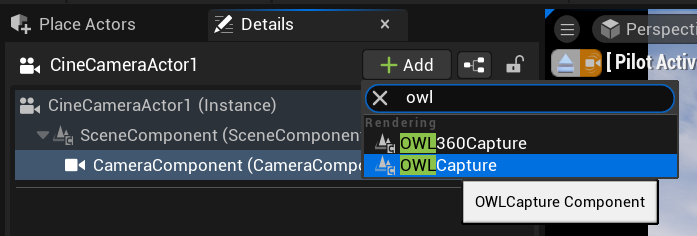
This will add an
OWL Capture Componentto yourCamera/Actorwhich you will see in your components list. Make sure that thisOWL Componentis attached to yourCinecamorActorby dragging it and seeing the green tick: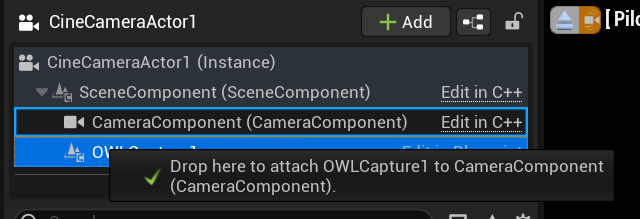
Blueprint Set-Up
The
OWL Cinecamis made up of aScene Component, aCamera Componentand aCapture Component: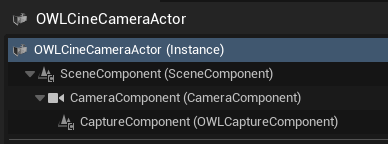
The details for all of these components can be accessed from the
OWLCineCameraActor, but to change some of these settings via Blueprints you will need to know which settings are a part of which component.The
Transformsettings for the Camera are controlled just as any otherActorin Unreal and can be keyframed or controlled dynamically via Blueprints.The Off World Live
Capturesettings are unique to theCapture Componentand can be controlled via Blueprints by accessing theCaptureComponentas a child of theCineCameraActor, below is an example of setting some of the settings dynamically via aCustom Eventin theLevel Blueprint:
Live-Streaming
You can live-stream the Render Target of the OWL Cinecam using both the OWL Media Outputs and Unreal’s Media Capture framework:
OWL Media Outputs
The easiest way to set this up is to use the OWL Media Output Wizard, which will let you set up an
OWL Cinecamalong with any media outputs you need.OWL has outputs for Spout, Virtual Webcam, RTMP, SRT, RTSP, HTTP and Save to File which aren’t available in Unreal.
This works in Editor, Runtime and in Packaged games.
Unreal Media Capture
Unreal has a Media Capture Framework which can send Render Targets.
It has a large number of configurations and is excellent for studio outputs such as capture cards and SMPTE 2110 (Rivermax), which you will need to configure by adding their respective plugins and media captures.
You can also use the OWL Spout and NDI Media Output integrations via this method, to take advantage of the studio workflow configuration options.
It is for Editor/ Runtime usage only so won’t work in packaged games.
To set up:
Go to
Edit> Pluginsand ensure that theMedia Framework UtilitiesPlugin is enabled: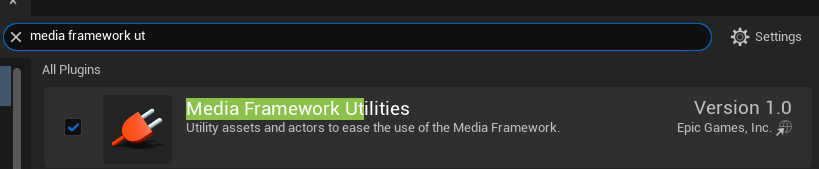
In
Windows> Virtual ProductionselectMedia Capture: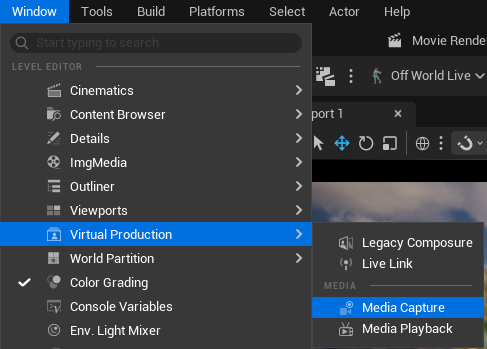
In the
Media Capturewindow, select theRender Targetyou want to send from the list and select theMedia Outputyou want to send it via and then pressCaptureto begin sending: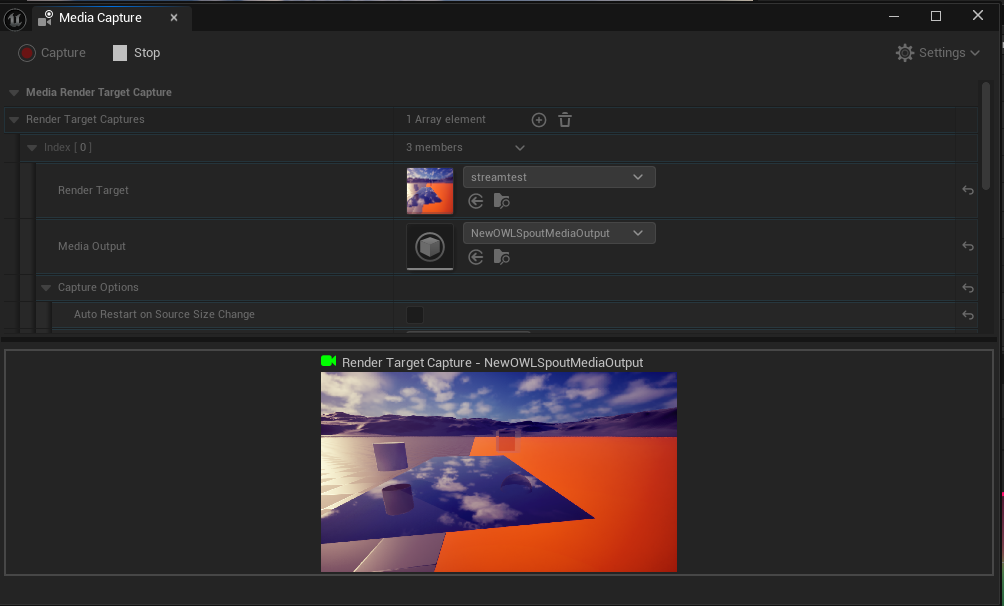
Color Grading
You can use the color grading tools in Unreal with the OWL Cinecam to give cinematic beauty to your output.
This can create very distinctive visual output without requiring third party software, which is particuarly efficient if you are live-rendering:
Open the
Color Gradingtab inWindow > Color Grading: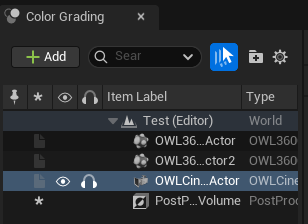
When you adjust the settings in the color panel you will see the
Previewof yourCinecamchange. TheTabsandDialscorrespond to different sections of theColor Gradingpanel, but are easier to use due to the color visualisation: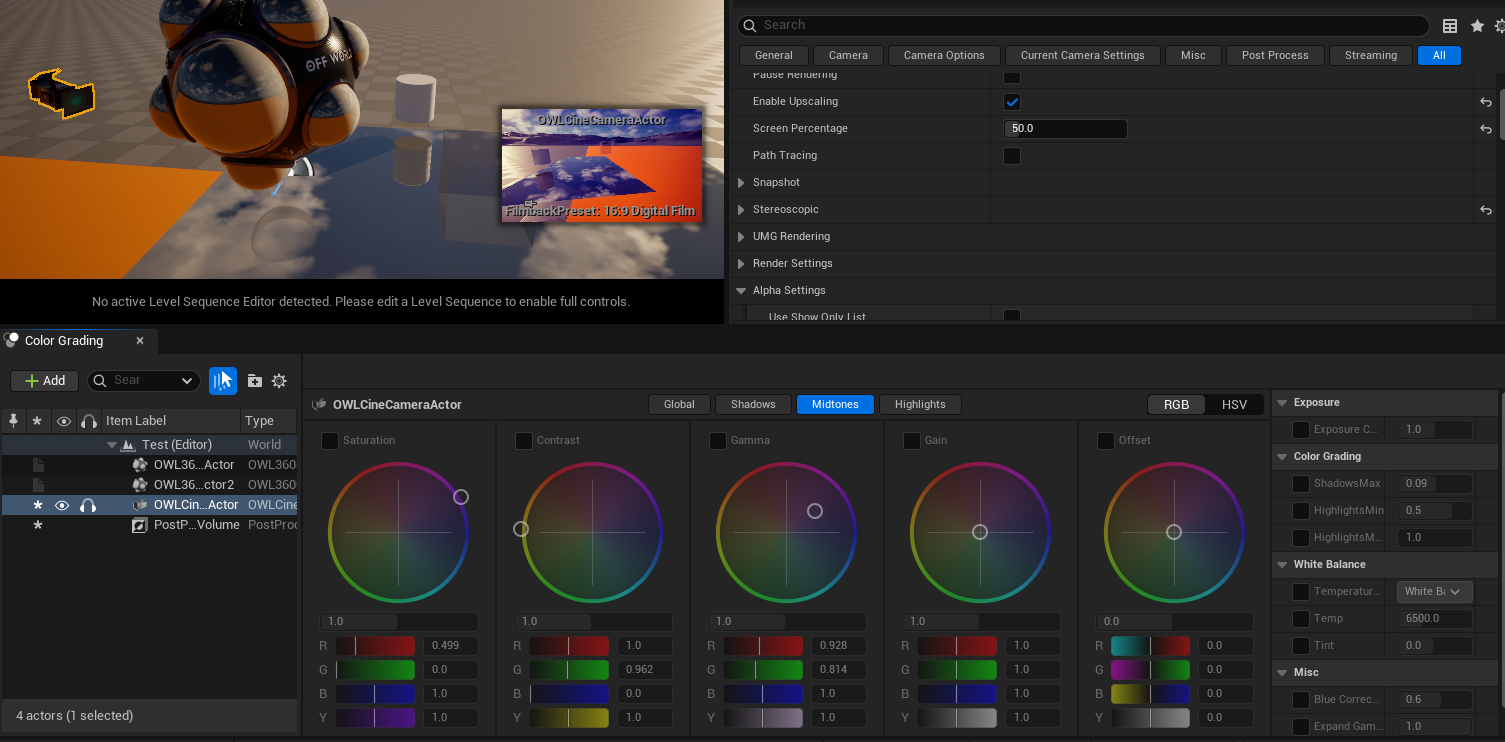
Performance
Frame Rate
Rendering to the Render Target is performance intensive because you are rendering an additional set of pixels to your Viewport and your output is likely much higher resolution than your Viewport.
To increase your live frame rate from the Cinecam/ Component the main options are:
You can use the
EditorandRuntime Viewport Renderingtickboxes in the OWL Editor drop down to switch off theViewport(If you haveNanitein your scene, you cannot switch off the EditorViewportor it will crash Unreal.)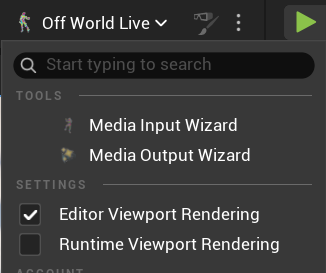
This is a toggle that you can also activate in Blueprints.
Enable upsampling with
TSRorDLSS,which is particularly effective at higher resolutions, by ticking theEnable Upscalingbox in the Details panel and setting a new screen percentage for your output. More details in theFeaturessection below.You can use
Frame Generationfrom theDLSS Streamlineplugin, with a blueprint like below, selecting in theSet DLSS-FGNode the number of frames per real frame rendered you want. (More frames will give you a higherFPSbut more artefacts):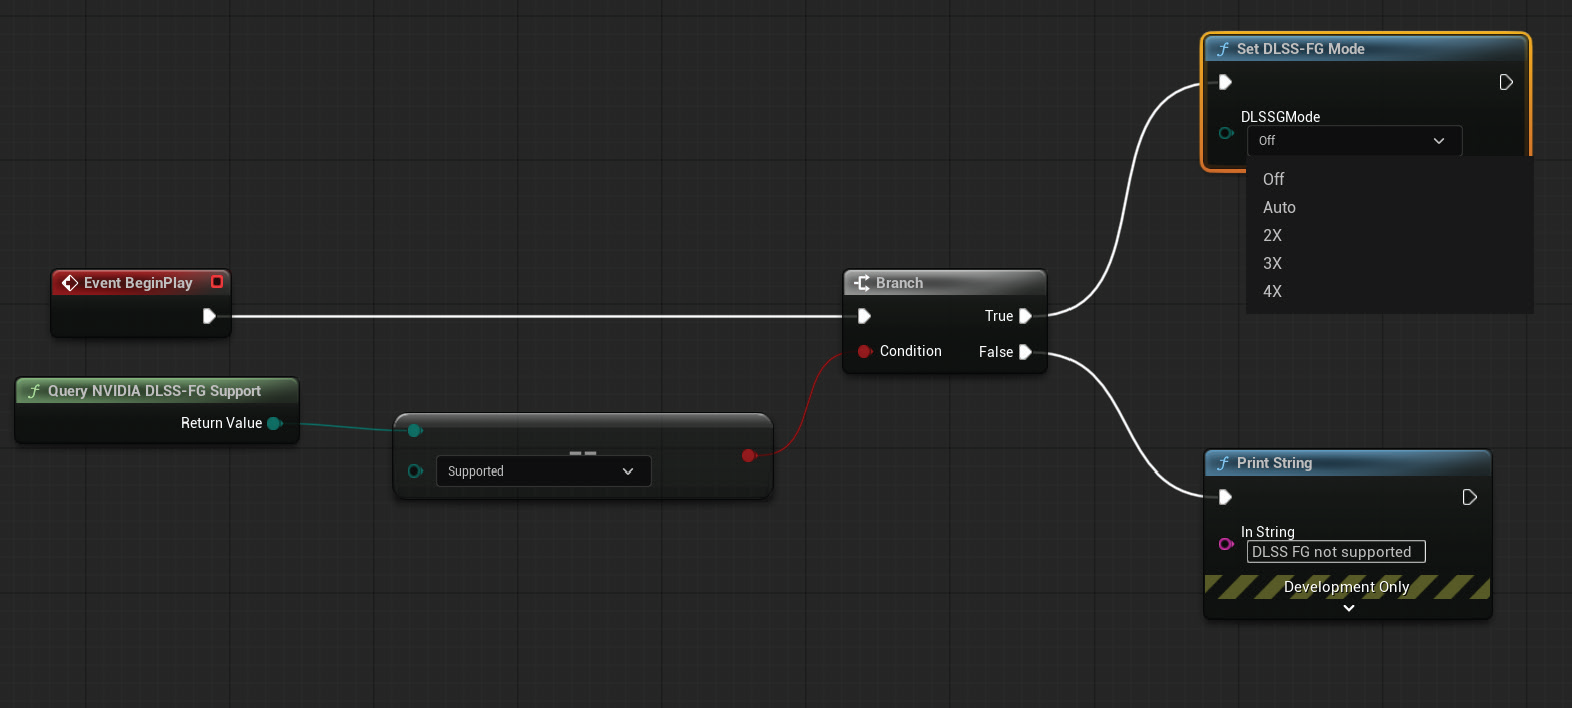
Visual Quality
The
OWL Cinecamuses the identical rendering pipeline as the UnrealViewportand so should have complete color consistency with what you see and do in theViewport.This includes responding to
Post Process Volumesetc.You can use
OCIOto deliver a precise color pipeline if you need it for your production purposes.In this respect the
OWL Cinecamis more color precise than Unreal’sCinecam Capture Componentwhich uses aScene Capture 2D Actor(not the same as theViewportrendering pipeline) with variousScene View Extensionsto add post process effects.If you use
DLSSthen you may see a reduction in visual quality, especially in very fast moving scenes because of the predictive nature of the upsampling algorithms.
Render Target
Render Target
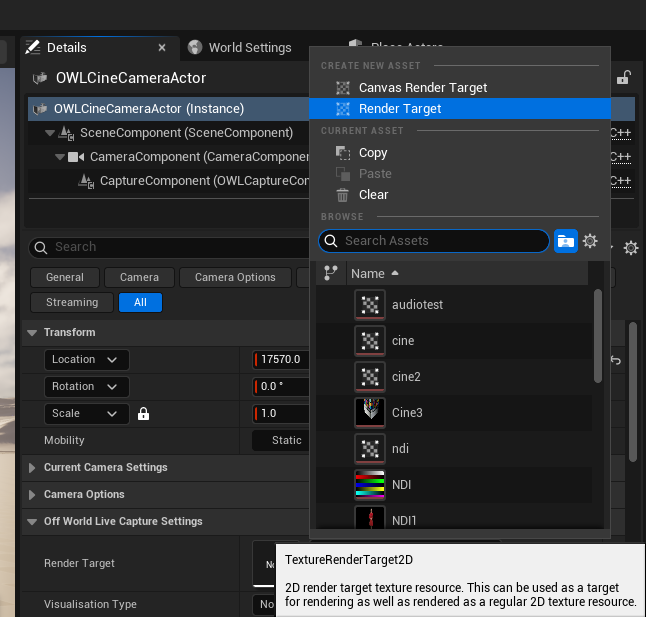
You can capture the output of the camera to a
Render Targetfor previs, live-streaming or adding to a material.Either add an existing one or go to
Create New Asset>Render Targetto make a new one.Adding a
Render Targetwill render a separate output from your UnrealViewportso you will see a decrease in your frame rate.You can pause the capturing if you don’t need the live camera output (see below).
Resolution
This let’s you set the
Resolutionof the output you are writing to theRender Target.By default, the
aspect ratioof the camera is inheirited from theFilmback Settingsin theCinecam: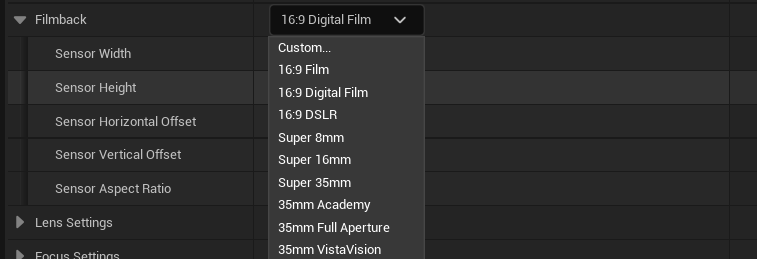
You can change the
Yvalues of theResolutionand it will scale theXvalue automatically depending on thisaspect ratio:
If you don’t want a fixed
aspect ratio, untickConstrain Aspect Ratioin theCamera Optionssection:
You can now set whatever
Xvalue for theResolutionyou need and theFilmback Settingswill update automatically to your selection:
Pause Rendering
Pause Renderingis used to stop theRender Targetfrom capturing the camera.When ticked you will see the camera
Previewalso show a pause sign: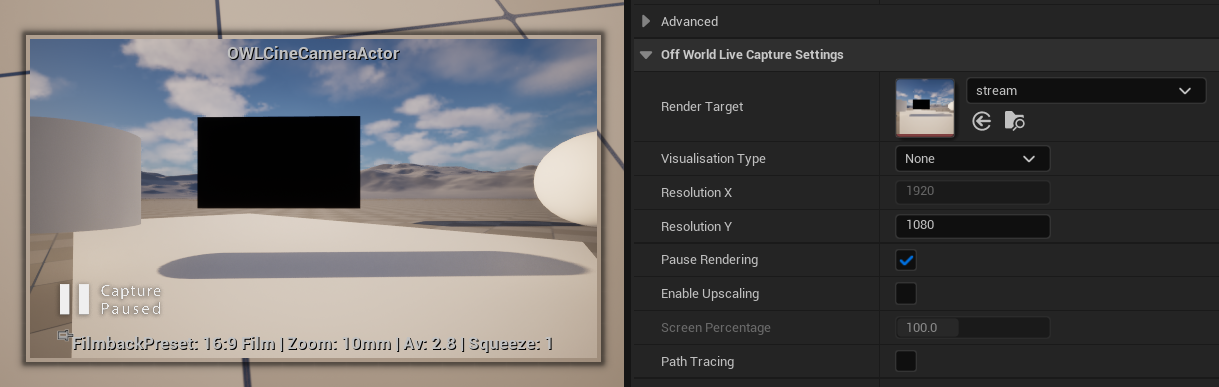
Capture on Movement Only
Capture on Movement Onlyis a performance optimisation which lets you keep the Render Target unpaused.It only updates the image when you move the camera or change a setting in the
Detailspanel.It’s recommended to use if you are working with the camera for previsualisation because you can see all your changes but won’t use rendering resources to render every frame.
If you are streaming from the
camerathen you need to keep this setting unticked or your output will be frozen.
Path-Tracing
Path Tracingpreviews in yourRender Targetyour scene as it would look in the path-tracer, which can be useful for render previz.If you have a high
Resolution, it will take some seconds for the final image to emerge.You can use the path-tracer in combination with the
Snapshotfunction to capture the output to a png.
Visualisation Type
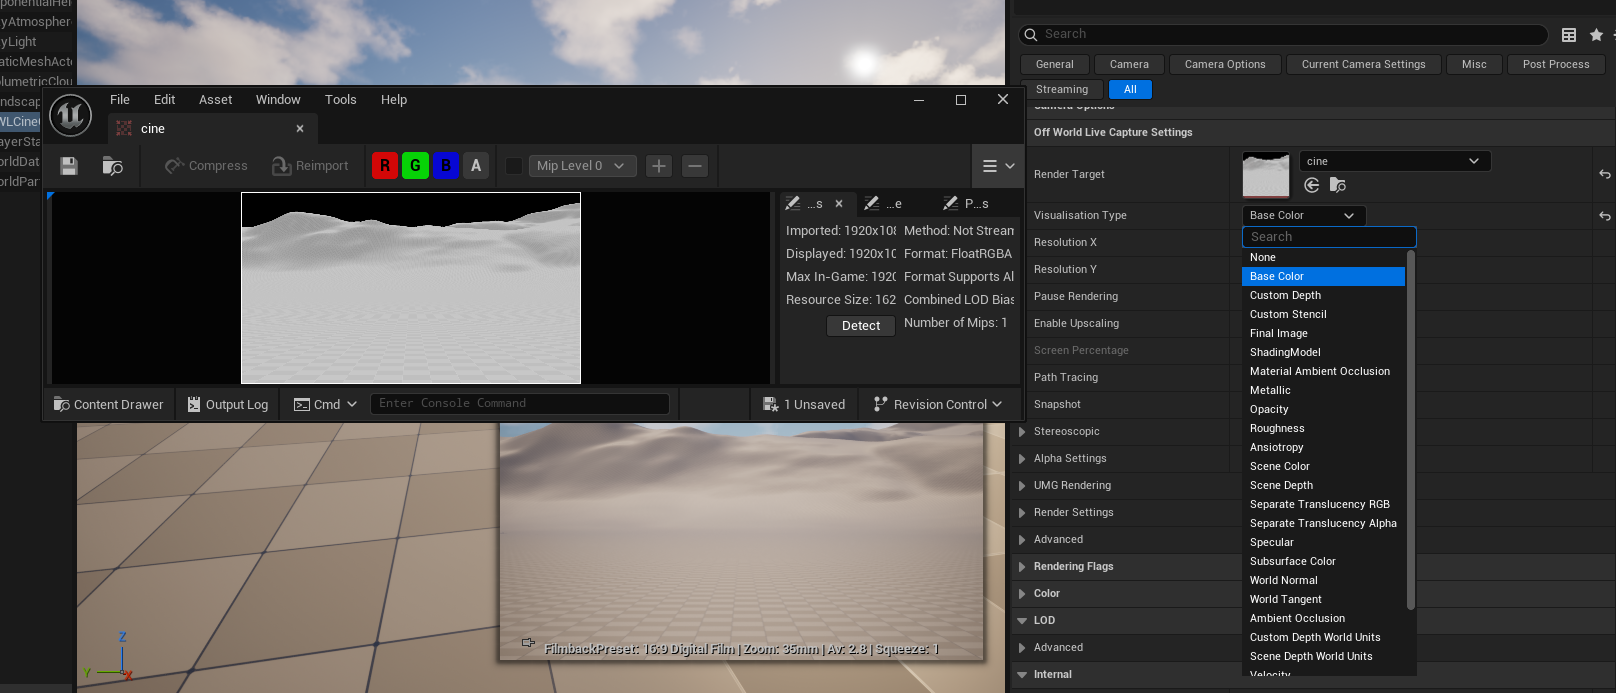
This allows you to output
Custom Buffersfrom theCinecamof the different layers in the Unreal render pipeline.This can be useful for previz or compositing:
Upscaling and DLSS
NVIDIA Streamline/ Frame Gen doesn’t work with OWL tools and we recommend not to include it in your active Plugins when using OWL.
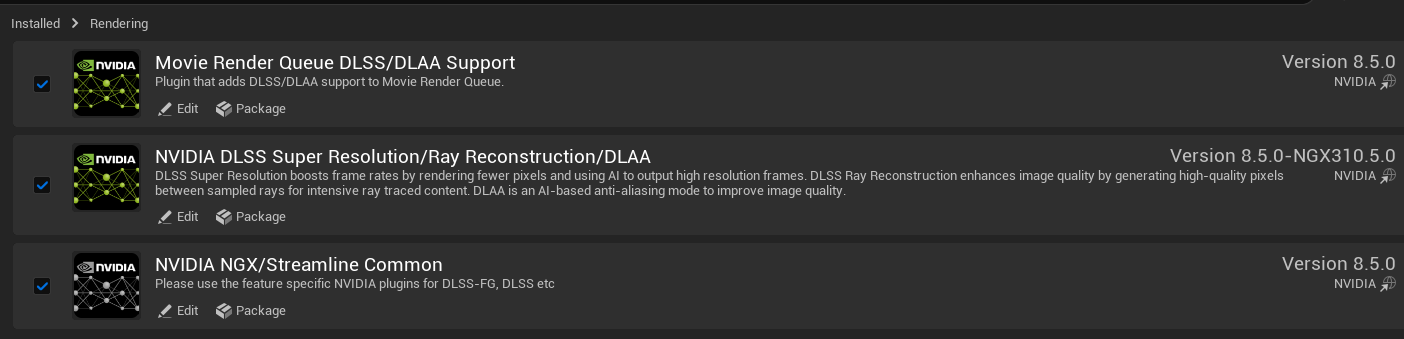
We recommend to only include these plugins if you want to use DLSS with OWL:
Enable Upscalinglets you increase performance by using AI upscaling to render a%of the pixels in your output:
This is much more effective at higher resolutions where the total number of pixels to be rendered is much greated.
Generally, at around
70%in4Kyou will see a significant performance improvement without major artefacts.By default, the AI upscaling method used is Unreal’s
TSR (Temporal Super Resolution)but you can also use NVIDIA’s DLSS or other upscaling solutions, which will work automatically when you enable them in the Engine: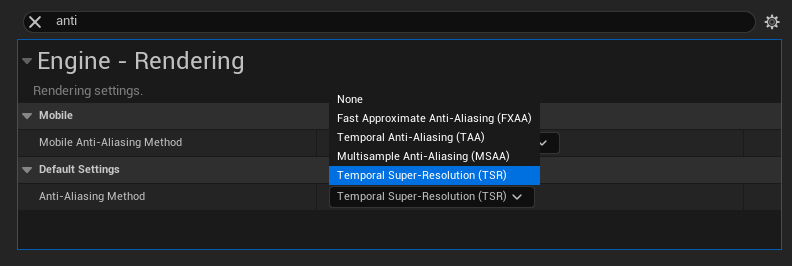
If you want to use
DLSSyou need to select these options after installing and activating the plugin in yourPluginssection in Unreal. IfDLSSis installed it will overrideTSR/ any other anti-aliasing setting in yourProject Settings: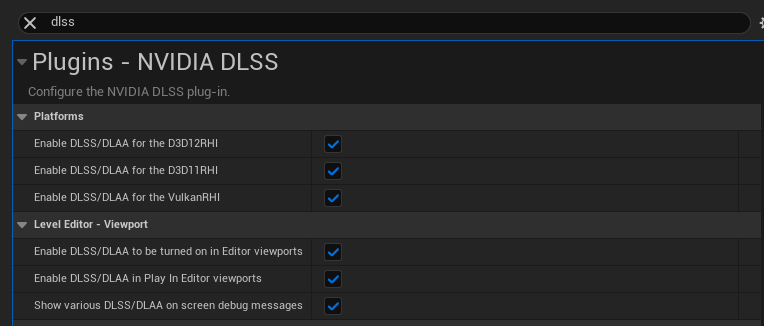
You may see a difference in performance between
TSRandDLSS(including different visual artefacts).
Stereoscopic Output
Stereoscopic allows you to output the Cinecam in 3D for use with VR Headsets or 3D glasses.
Output Type
You can select between four different
Output View Modes: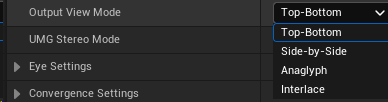
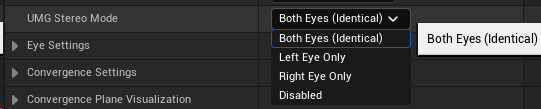
All output modes can include a UMG overlay:
Top-Bottomjust layers the eyes and is normally used for VR headsets: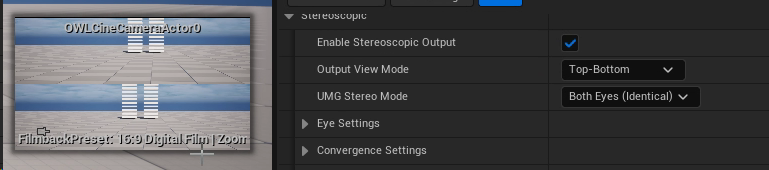
Side-by-Sidecombines left and right eye into a lateral image output and is normally used for VR headsets: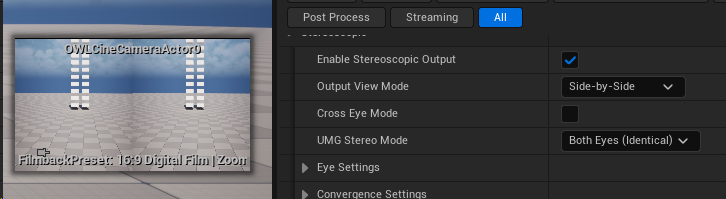
If you select this output type you can choose Cross Eye Mode if you need that for your content.
Anaglyphoutputs both eyes in a single frame so that you can view with cheap VR glasses: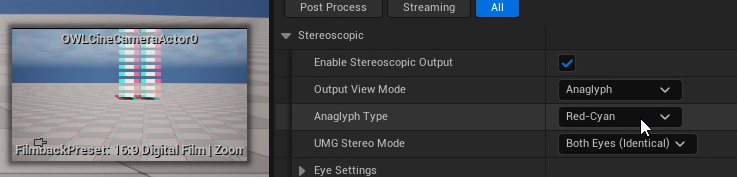
It is a fun format because you can stream it to youtube or use it in indie productions and your audience only need very cheap and easily accessible color glasses to experience the 3D effect.
The downside is that the original colors in the content are compromised, so it’s not acceptable for cinematic quality output.
You can select between three different color frameworks depending on the glasses you will use:
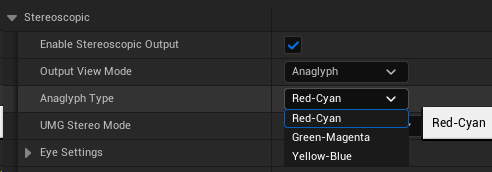
Interlacedcombines the left and right eyes into a single frame with alternating pixels: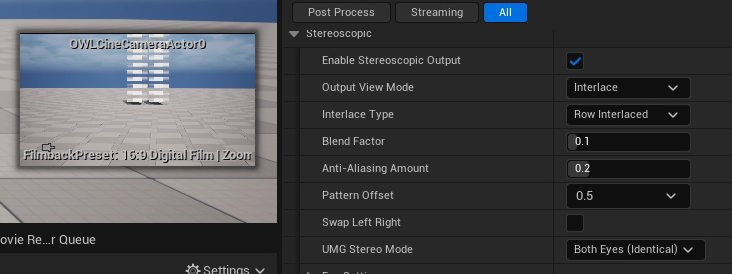
This is the method used in professional 3D cinemas because it enables perfect color delivery (as opposed to anaglyph which distorts colors).
You can select between three different interlaced methods (select these depending on how you will project your final content):
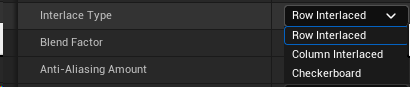
Blend FactorandAnti-Aliasing Amountboth affect the smoothing of each strip in the interlaced output. You should increase these values for a smoother image.Pattern Offsetchanges the alignment of the strips that are interlaced.Swap Left-Rightlets you switch the eyes.
Eye Settings
Eye separationdefines the IOD, the distance between the two eyes and is set to the industry standard.Eye separation scaleshould only be used if you change the world scale in Unreal and so want to scale the units up or down.
Convergence Settings
These settings are essential for creating the 3D effect:
Anything sitting exactly at the
Convergence Distancewill seem to be at the same physical distance as the screen the audience is viewing.Anything closer than this distance will look like it is popping out of the screen toward the viewer (Negative Parallax).
Anything further than this distance will look like it is pushed deep inside the background of the screen (Positive Parallax).
We recommend to
Sync Convergence with Camera Focusbecause you can then use the CinecamFocus Settingsto track objects in your scene and automatically change focus etc.The
Convergence Planeis like theDebug Focus Planeand visualises the ‘screen’ in your level. You can change it’s color to make it easy to see.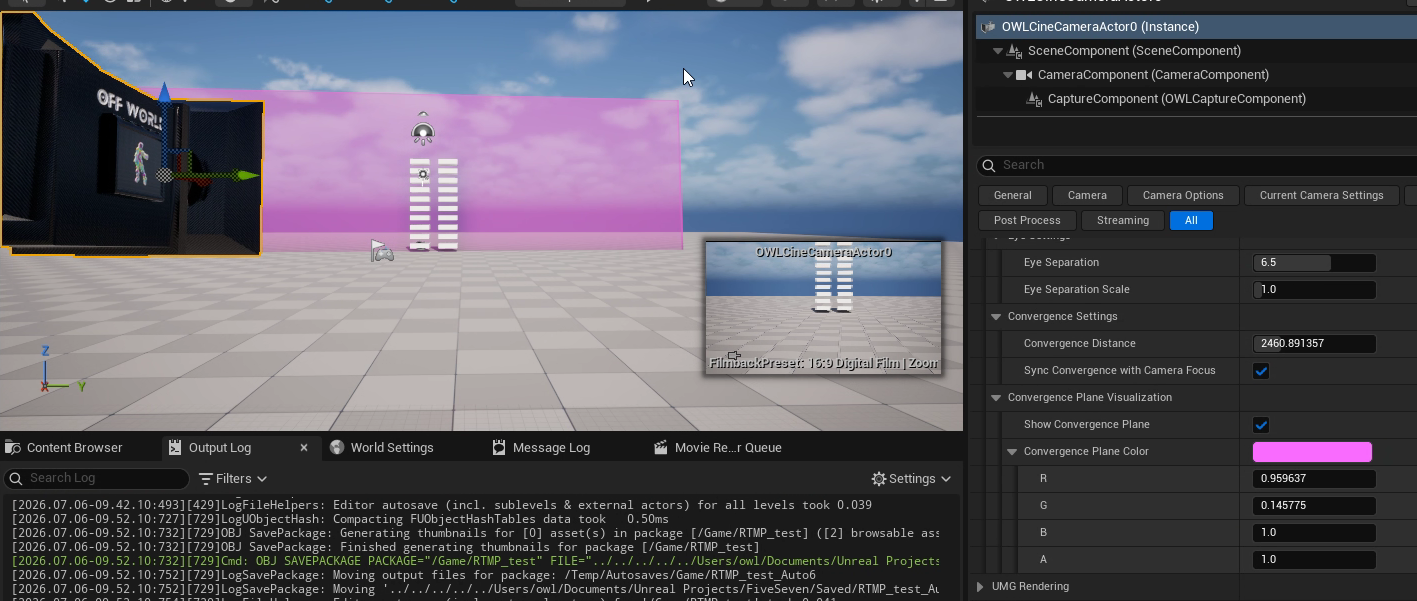
UMG/ HUD Overlay
UMG Settingslets you render aHUDorUMGon top of yourRender Targetoutput.You can select any
HUDWidget Blueprintfrom the drop down list including any which you custom make yourself: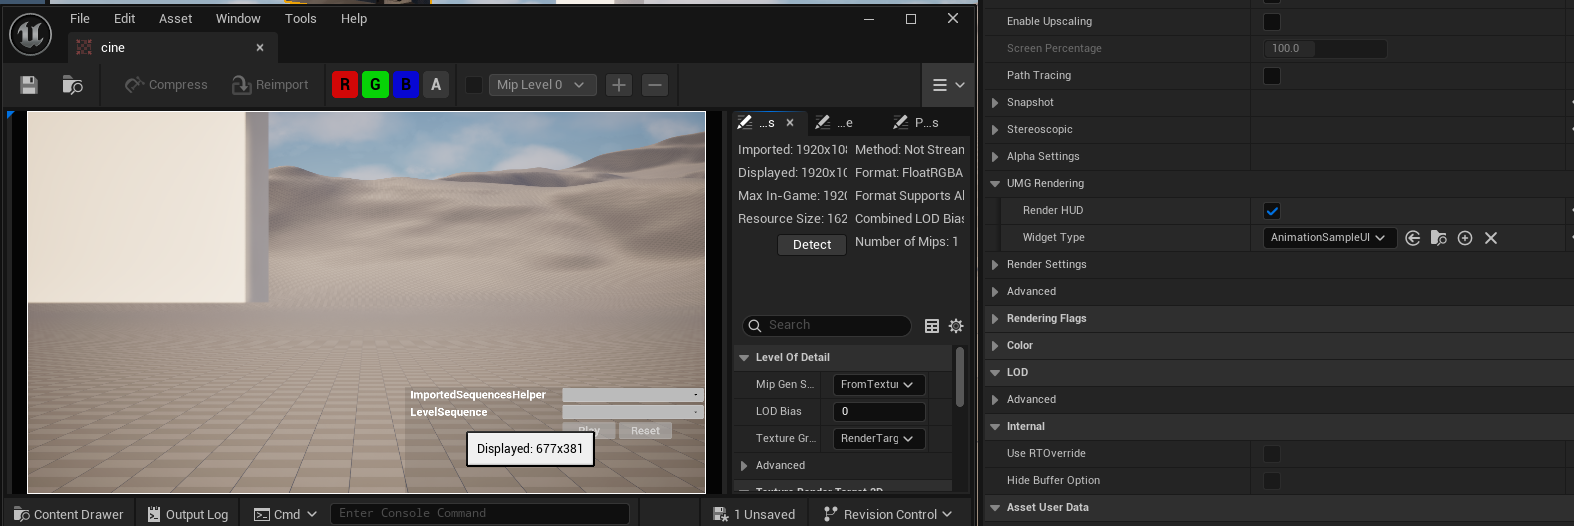
Snapshot
Output
Snapshotwill instantly generate apngfrom theRender Targetof what the camera is seeing at that moment in time.You can set the
NameandDirectoryyou want for when it is generated: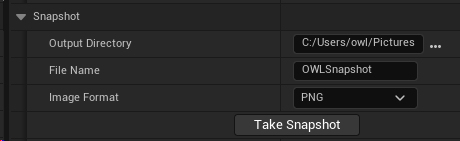
Snapshot can be generated from within Editor, Runtime or Packaged and works with both
LumenandPath-Tracing, as well asalpha channel.
Settings
You can configure the settings and metadata that go with the
Snapshotin theAdvancedsection: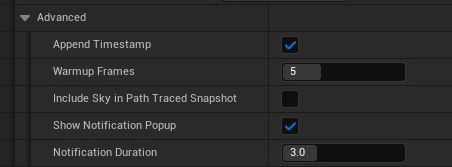
If you see flicker or the lighting not correctly resolving then add
Warmup Frames.
Alpha Channel
Alpha Output must be ticked in Project Settings to enable alpha channel, otherwise the pixels will be black (alternatively use CVAR r.PostProcessing.PropagateAlpha 1):

If you remove an Actor from your scene which has particles or other effects rendering over it, those will also be removed because of how Unreal’s render pipeline works.
Show Only
The
Show Onlylist allows you to selectActorsin your scene so only those are rendered (against an alpha channel background).You need to tick
Use Show Only Listfor this to work.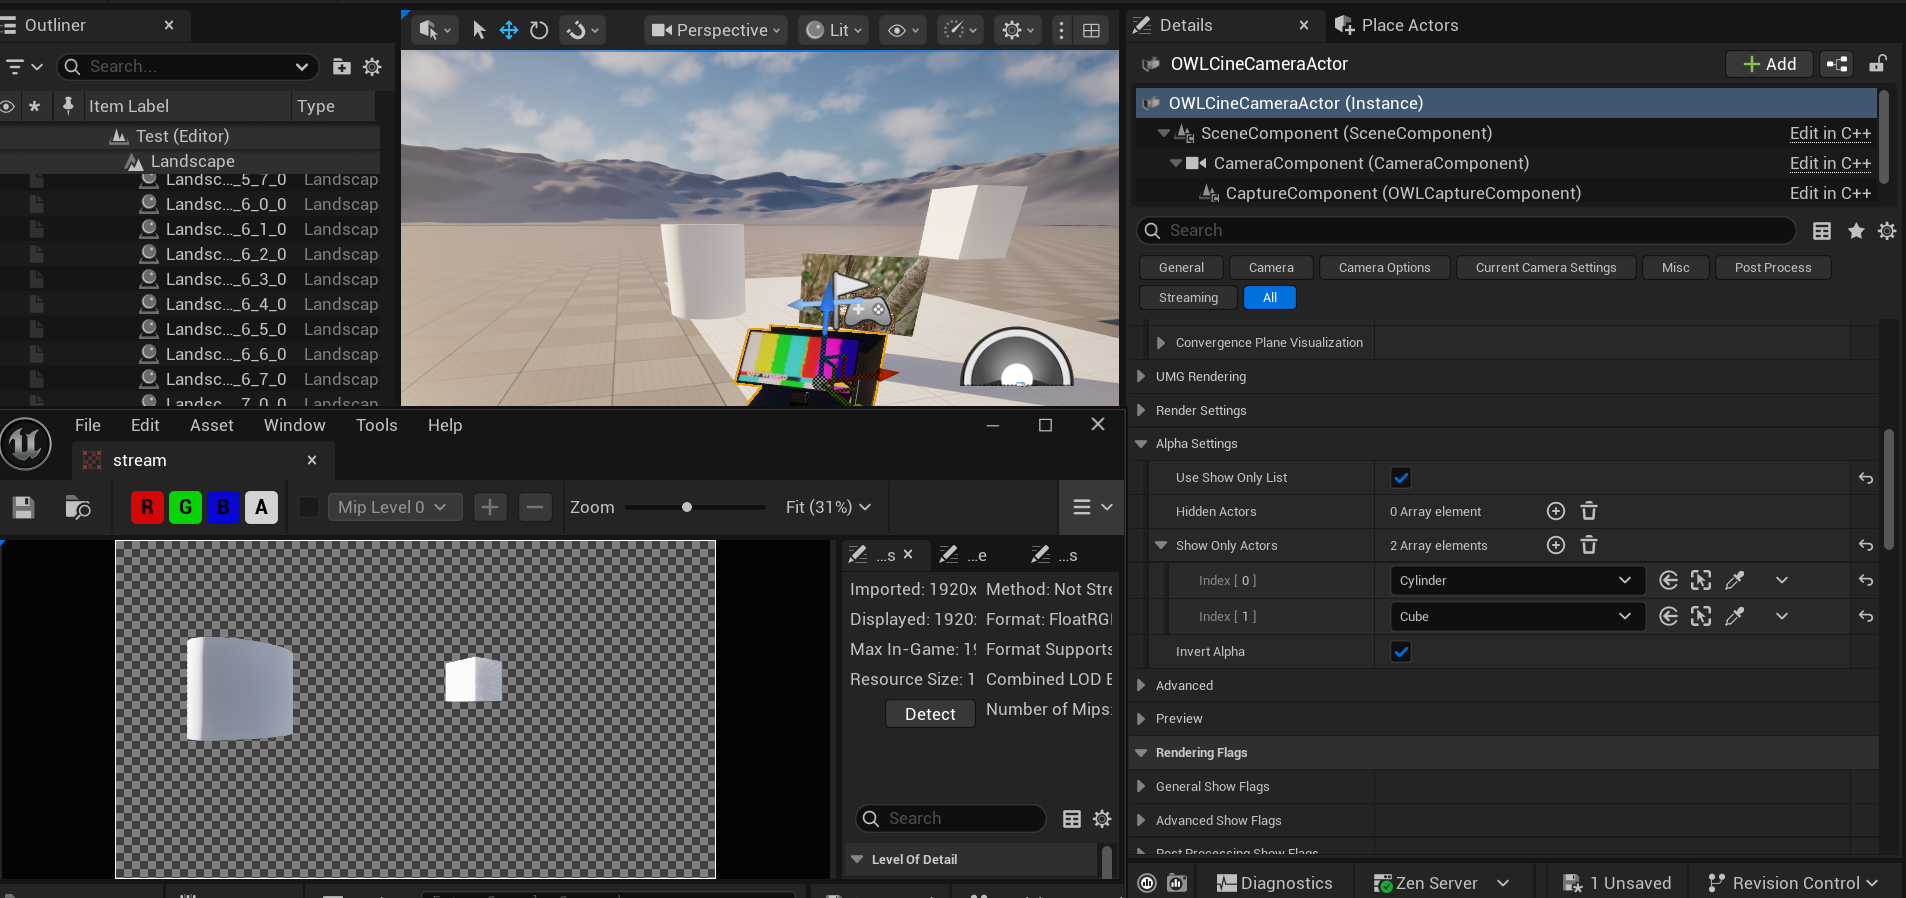
Invert Alpha
You can also use
Invert Alphachannel to create a mask: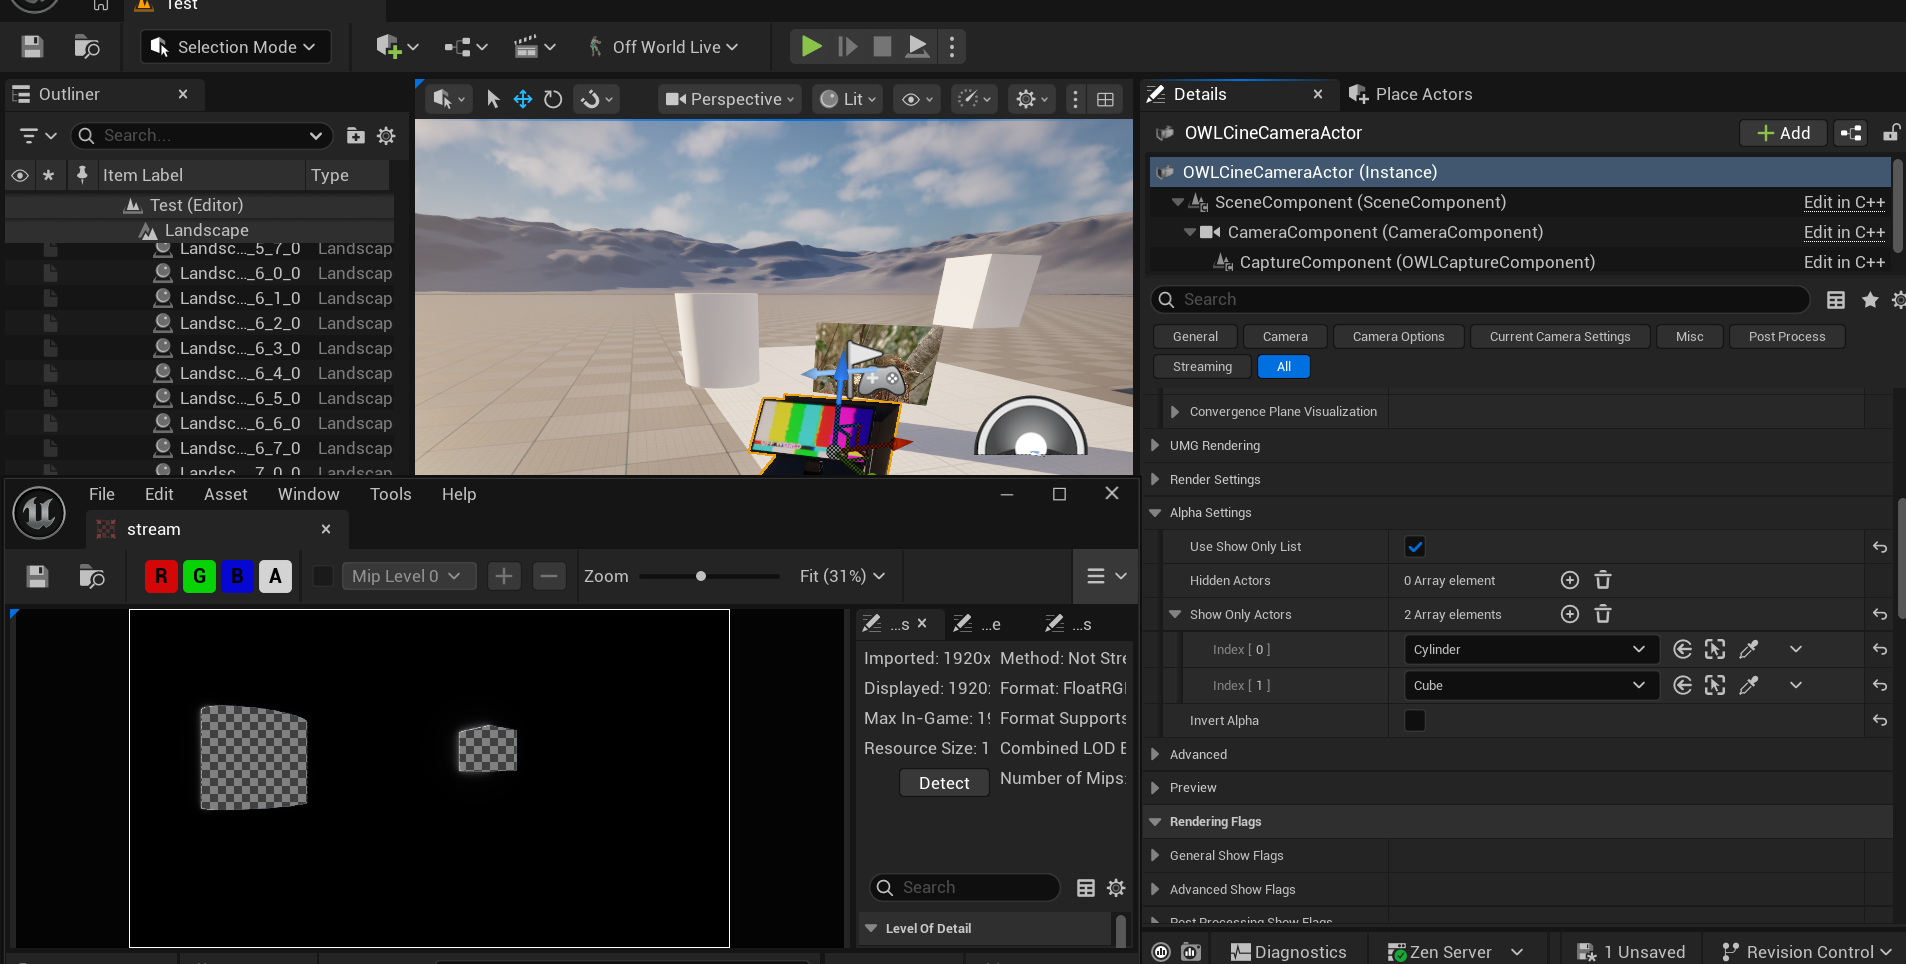
Hide Only
The
Hide Onlylist removesActorsfrom your scene (such as the cylinder in the case below):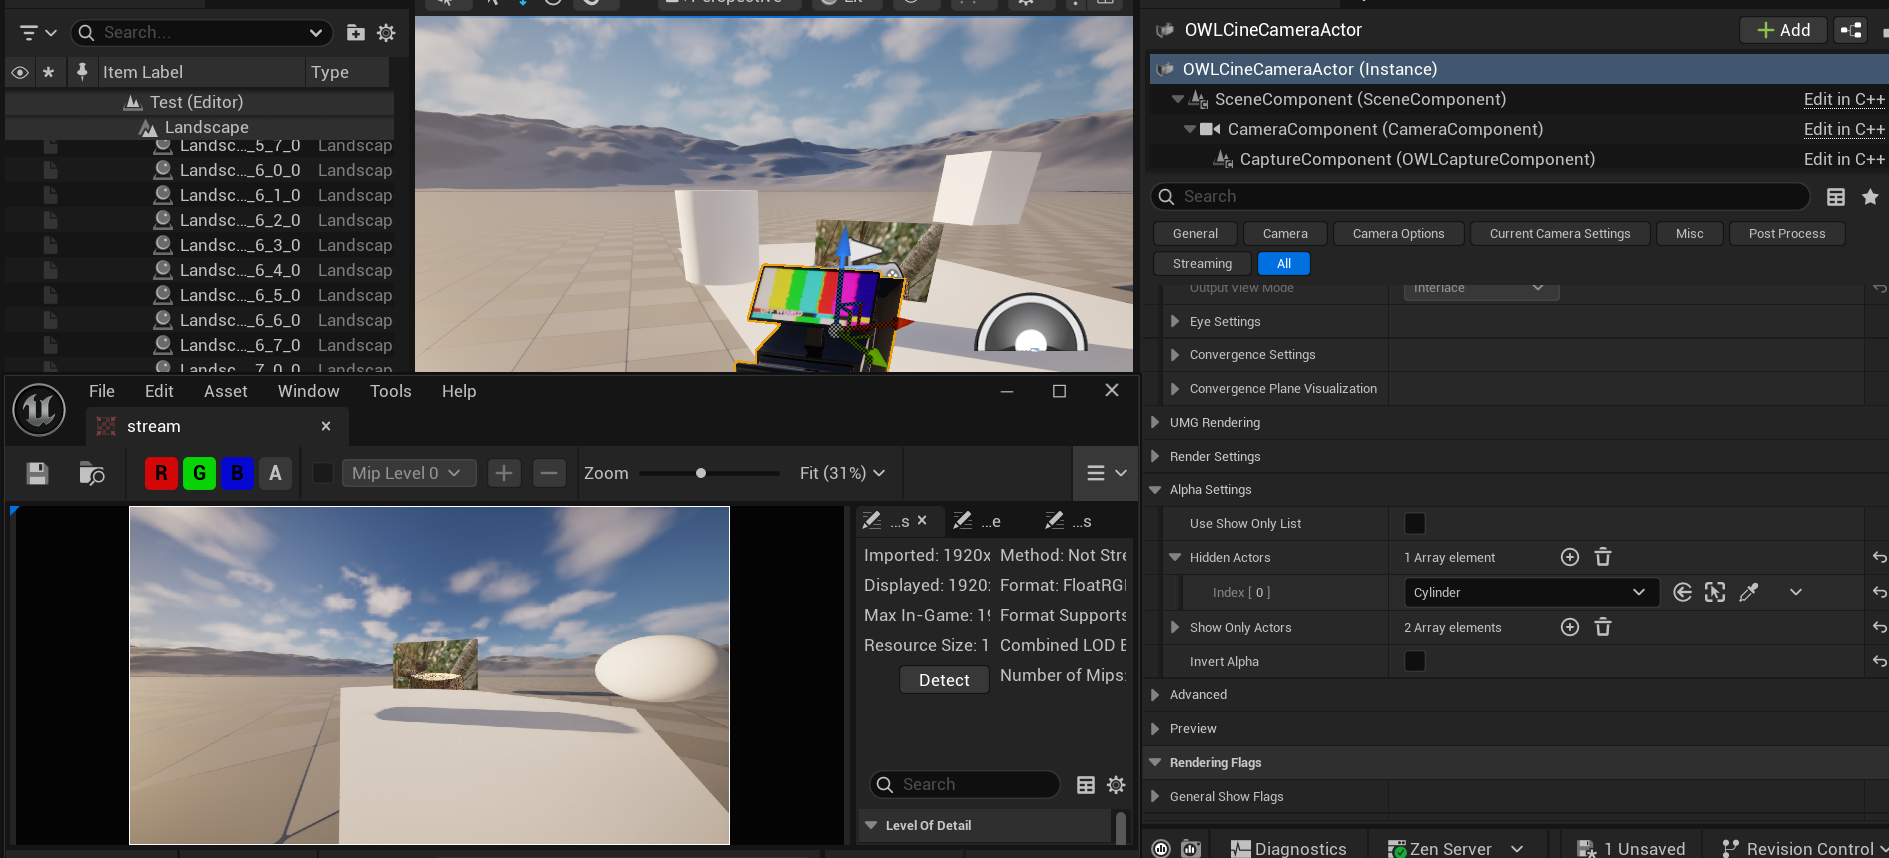
Advanced
Render Scene View Extensionsis recommended to keep ticked as it’s required to see landscapes and foliage.
Preview
If the
Render Targetis unpaused, your preview window will automatically show the exact output of theCinecam, including any modifications you have made: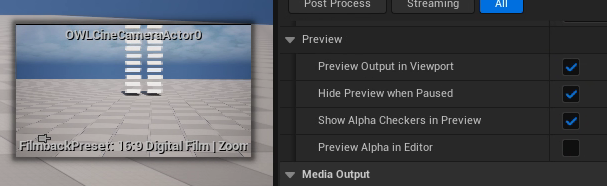
You can switch this off if you prefer.
Preview will also respect alpha channel if you have that selected.
Media Output
The Media Output section combines Unreal and OWL media options making them all available to stream out video from the
Cinecam.This makes it extremely simple to output to Capture Card, Rivermax SMPTE 2110, NDI, Spout, Save-to-File, RTMP, SRT, RTSP, HTTP as well as many other formats.
This is very useful for content previsualisation but can also be used for live-streaming.
Audio is not supported via this method so if you need audio output then use OWL NDI Sender Manager or OWL Media Output Encoder.
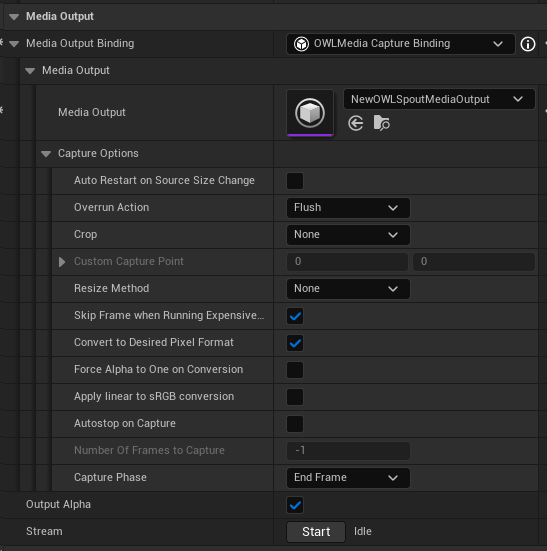
Output Type
Media Outputlets you select between different output options such as Spout, NDI, Media Output Encoder, SMPTE 2110, Capture Card (you need to ensure you have the correct plugins enabled for these to show in your list).You need to configure the
Media Output Actorfor any type you want to use by selecting it in the drop down and then opening it in yourContent Browserto configure its settings:
Capture Options
These settings are inheirited from the Unreal Media Framework and can be used if required but in most scenarios won’t need modifying.
Stream
Once you have configured your options, you can click
Streamto initiate your output.This will continue streaming while you change
Detailspanel settings etc, which is useful if you are doing previz work.
Render Flags
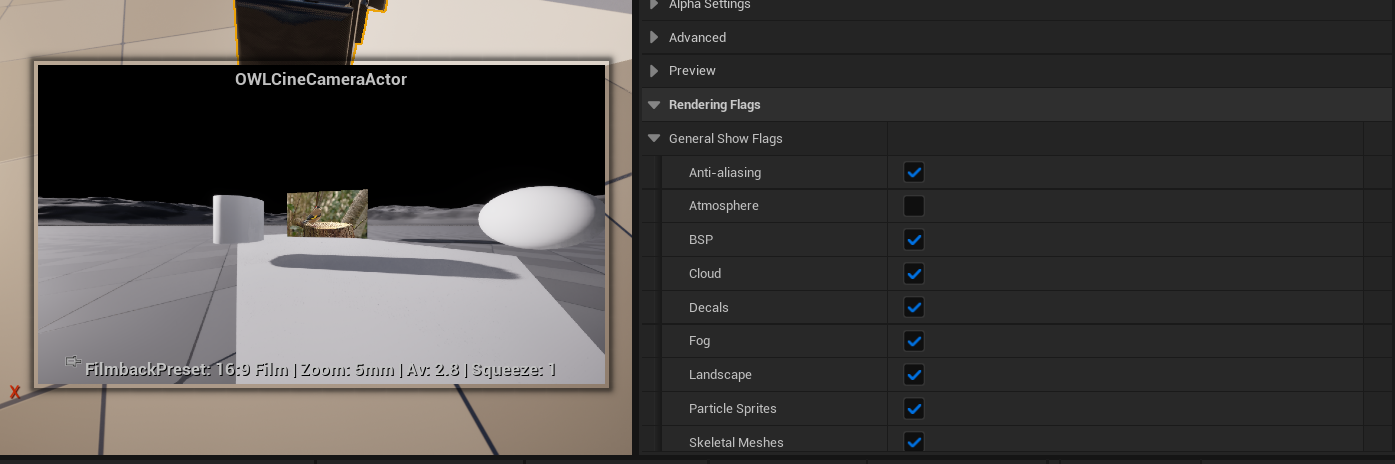
You can use the
Render Flagsto switch off different post process effects in the render pipeline.This can be helpful if you want to see how a certain post-process effect is affecting your scene:
OCIO Color Management
Use the
Colorsection to addOCIOcolor configurations to theRender Target.
Load an
OCIO Configin to theContent Browserthen set this asset as theConfiguration Source.Then choose the
Transform SourceandDestinationfrom theOCIOConfig Fileas explained here as explained here.
Example Blueprints
Camera Switching
We recommend camera switching by teleporting a single OWL Capture Component between different Unreal Cinecams you have active in your scene, such as in the blueprint below.
Enable Control of a HUD
Toggle Camera Movement
Zooming and X/Y Nudgable Camera
Camera Switching with HUD Fade Transition
Trouble-Shooting
Frame Rate Drop when in Background
By default, Unreal throttles the CPU when Unreal is in the background vs other software which causes the frame rate to drop.
To change this, go to
Editor Preferencesand untickUse Less CPU when in Background:
Audio not Playing when Editor in Background
By default, Unreal will stop audio playing when the Editor is in the background vs other software.
To change this, pick the Engine version you need in your
File Explorerand go to the file path:
In
Configgo toBaseEngine.iniand open the notepad: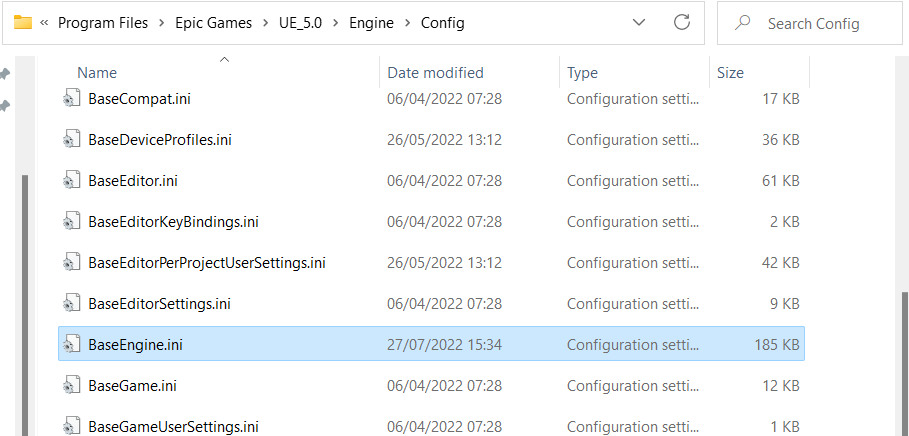
Search for
UnfocusedVolumeMultiplierand change the value from0.0to1.0: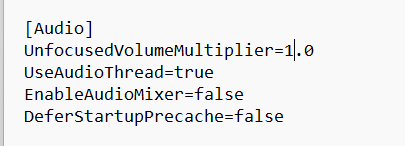
Save the file and close and re-open Unreal. Your audio will now play continuously no matter if Unreal is in the background or minimised.