Enabling and Previewing Path-Tracing
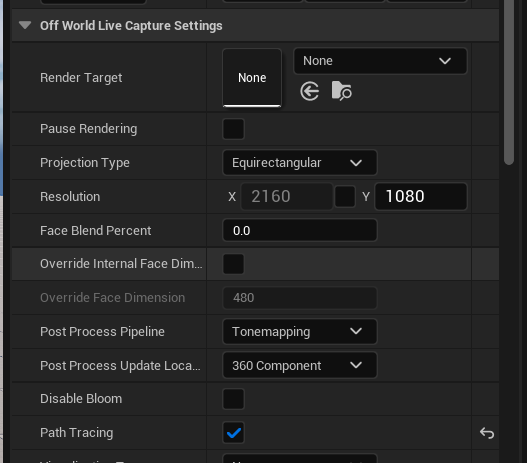
- To enable Path-Tracing in the OWL 360 Render Pass please tick the box at the top of the Settings:

- Ensure that you are using DirectX12 by searching RHI, going to Targeted Platforms, and selecting DirectX12:

- Restart Unreal
- To view the Path Tracer view, go to View Modes and select Path Tracing:

-
To Fix the Skylight in your scene you can search it in the outliner, then check Real Time Capture to enable the Sky. Upping the Cubemap Resolution will restore the cloud detail:

- You will now see the grainy image of the thousands of rays that make up the Path Tracer, then the denoising that happens to smooth over the final image. The progress bar at the bottom of the screen indicates the Path Tracer’s completion of the image:

- To change the Path Tracer settings within the viewport you can use a Post Process Volume.
- If there is none in your scene you can add a new one from the Place Actors tab, or search for an existing one in the Outliner.
- Search Post Process and in it’s details panel search path. You will find the Path Tracer settings.
- Ensure that the Post Process Volume is set to Infinite Extent (Unbound):

- To understand the Path-Tracing PPV Settings:
-
Max Bounces: Controls how many bounces each path makes before ending it’s journey. More bounces can result in more light in dimly lit areas, but will increase render times so is worth using sparingly.
-
Samples Per Pixel: Indicates how many rays are used to calculate the image, lower samples per pixel will result in a grainy image while higher samples per pixel will result in longer render times but a clearer image. Samples per pixel and denoise can be balanced to give the highest fidelity with the lowest render times.
-
The Post Process Setting Max Exposure Path: Controls the maximum exposure used in the rendered path-traced scene. Adjusting the exposure to be a few steps higher than the current scene exposure, set by the Post Process Max EV100 (found under the Lens > Exposure section), will reduce the chance of fireflies occurring.
-
Reference Depth of Field: Indicates whether the Path Tracer uses focus settings from a Cinecam or Post Process Volume. To test this out you can search Depth in the PP Volume and set the Focal Distance to something like 12.
-
Reference Atmosphere: Enables the ability to calculate distance baseExponential Fog and Sky Atmosphere.
-
Reference Atmosphere: Enables path tracing in the atmosphere instead of baking the Sky Atmosphere contribution into the skylight. Any Sky Light component present in the scene is automatically ignored when this setting is enabled.
-
Denoiser: Smoothes over the image created by the Path Tracing to reduce noise.
-
- You can also Preview the 360/ 180 output in Path-Tracing using the preview window or Render Target by ticking the Path-Tracing option in the 360 Camera Details panel:

Rendering in Movie Render Queue using Path-Tracing and Anti-Aliasing Settings
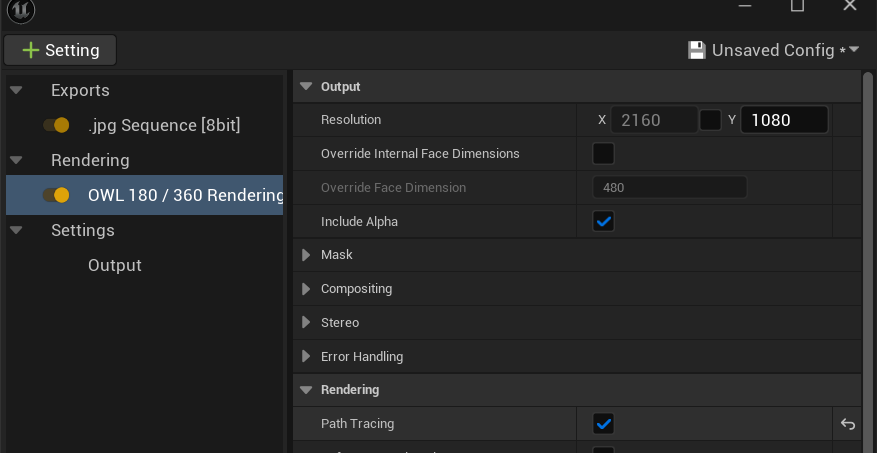
- Ensure that the Path-Tracing tickbox is selected in your Movie Render Queue settings:

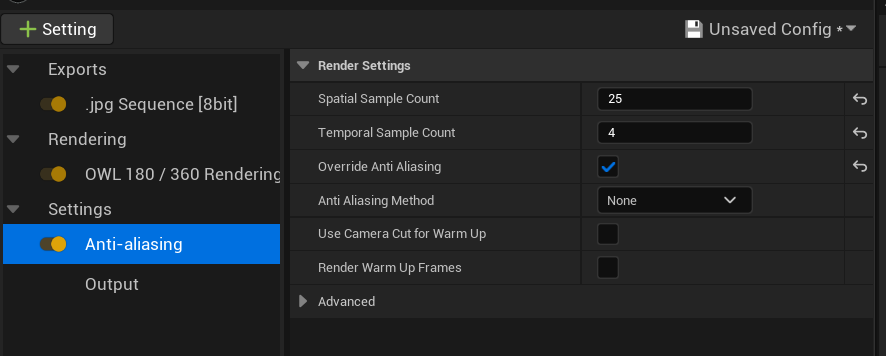
- Add the Anti-Aliasing Setting, and begin adding samples (as explained below) to achieve the intended detail of your render. This will override the sample count setting that you selected above in the Post Process Volume:

-
The first Path Traced render you make will look different to the viewport. You may need to up the samples to increase the image quality.
Temporal Sample Count interpolates several rendered frames at slightly offset instances in time, improving motion blur quality.
Spatial Sample Count sets the number of samples per pixel to use per temporal sample. Increasing the samples per pixel, decreases noise present in each render pass while increasing the time needed to render each frame. The Post Process Volume samples per pixel setting is ignored when using MRQ. In most cases Spatial samples are to be used when creating a still image. So only raise this value if you are not planning to create a motion graphic.
There are two types of samples used to control Anti-Aliasing:
- Temporal Samples: These are samples taken across multiple frames which helps smooth out moving objects or effects caused by moving cameras. This accumulation of samples happens after denoising occurs, helping stabilize residual artifacts from individual spatial passes. However, if Reference Motion Blur is enabled, all temporal samples will be taken before denoising. In this case, we recommend leaving Spatial Samples at 1 and driving all sampling through Temporal samples to maximize motion blur quality. Faster moving shots will need more temporal Samples than slow ones.
- Spatial Samples: These are samples taken around the area of a pixel to determine the best average of colors with the goal of smoothing transitions between the colors to stop jagged lines. Increasing the samples per pixel decreases the noise present in each render pass while increasing the time needed to render each frame. The Post Process Volume samples per pixel setting is ignored when using MRQ. In most cases Spatial samples are to be used when creating a still image so only raise this value if you are not planning to create a motion graphic.
How does Path Tracing use Temporal and Spatial Samples?
Path-tracing is different to deferred rendering:
- It turns off default anti-aliasing methods like TAA (Temporal Anti-Aliasing) and TSR (Temporal Super Resolution).
- The blending of Temporal Samples happens on the CPU.
- The blending of Spatial Samples happens on the GPU.
- Denoising happens on the last spatial sample where temporal blends the denoised frames.
Therefore, when using Path-tracing:
- You need to use both Temporal and Spatial samples.
- You need to add a LOT more samples than when using Deferred Rendering.
What's the Most Efficient Way to Add Samples in Path-Tracing?
Epic suggests:
- Gradually increase the number of Spatial Samples until you get an acceptable anti-aliased image.
- Gradually increase the number of Temporal Samples until you get clean motion blur and/ or less flickering in denoising.
- Divide the number of Spatial Samples by the number of Temporal Samples to get your final number.
- For example, if you need 100 Spatial Samples and 4 Temporal Samples then your final settings should be 25 Spatial (100/4) and 4 Temporal.
Anti-Aliasing Samples isn't the Only Setting you Need to Care About!
In particular, Epic notes that in the following areas it's better to change other settings such as:
- Shadows: "If you see chattering in the shadows consider raising the Samples Per Pixel on the lights. If you have any softness to your shadow at all you’ll want to consider raising it above 1. Especially for Area Lights."
- Reflections: "If you see noise in the reflections then have a look at the settings in the Post Process Volume... They all have their own Samples/Quality.
- Refractions, Global Illumination, Ambient Occlusion: "If you see noise in your refractions, Global Illumination, or Ambient Occlusion, that needs to be addressed in the Post Process Volume, not Movie Render Queue."
Review Console Variables (CVars): They will be Affecting your Renders!
Epic says "A lot of people don’t realize that everything in the “Game Overrides” section in MRQ is having an effect on your render even if you don’t have it active in the GUI." 
Epic recommends:
- Remove all Console Variable overrides unless you have a specific reason you are including them.
- If you see any large low-frequency noise, that's from Denoisers. You have to find the right Denoiser (Ambient Occlusion, Global Illumination, Reflections, etc.) and shut it off.
- If you disable all the options in the Game Overrides section, aside from Flush Grass Streaming, that will get you as close as possible to what you are seeing in the Editor Viewport (assuming you don’t have any CVar overrides in MRQ).
- The geometry LOD settings here will NOT override anything Nanite. They are only for non-nanite actors.