Color Grade your 360/ 180 Degree Renders from Unreal Engine
How to use a professional color grading pipeline in Unreal Engine with .exr, OCIO and ACES and color accurate pre-visualisation
Last updated About 1 month ago
Overview
The OWL 360 Camera/ Component integrates with Unreal’s OCIO and .EXR tools for use with post production software such as Premier Pro, Davinci or Nuke.
Unreal’s OCIO pipeline comes with a preset config and can be used with the ACES workflow.
Alternatively, you can useDisable Tone Curve without OCIO to preserve the full dynamic color range and prevent the clipping of highlight values, providing an image similar to a RAW workflow in a real world camera.
You can render to .EXR file format with multiple different compression options to ensure color fidelity. EXR is a file type that can encode data as 16-bit for beauty passes. But also 32bit floating point values for compositing channels such as a Z depth pass or a matte.
Unreal Engine also offers a range of color grading tools within the engine, these can be used to achieve cinematic looks that can be rendered out as final pixel beauty passes, bypassing the need for color grading in Post Production software.
Color Grading in Unreal Engine
Unreal Engine has it’s own color grading tools which in many cases will be sufficient to enable final beauty pass rendering direct from Movie Render Queue.
These can be used to decomplicate your production pipeline or can be employed by creators who wouldn’t normally add these passes to improve the look of their content.
Some of the features of more tailored color editing softwares, such as advanced scopes and pre-existing LUTs, are not included.
The workflow is very simple, and just requires a Post Process Volume from which the 360 Camera will inheirit its settings:
N.B. The Exposure value cannot be changed in the color grading panel. It must be set in the OWL 360 Camera/ Component as explained in the main documentation.
Open the
Color Gradingtab inWindow > Color Grading: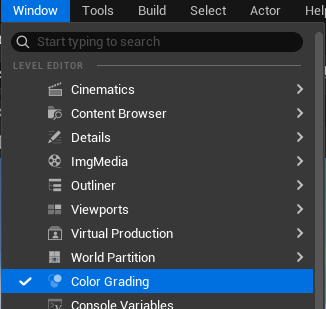
Add a
Post Process Volumeto your scene fromPlace Actorsand set it’s bounds toInfinite Extent (Unbound):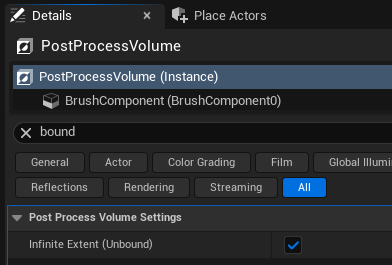
In the
Color Grading Tab, you will see both yourOWL 360 Camera/ Componentand thePost Process Volume: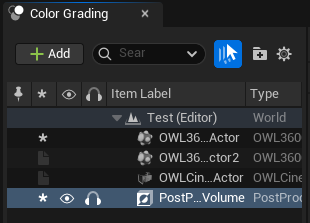
Only use the
PPVas360 Camerawill not inheirit the settings from thecolor gradingpanel.If you are using the
360 Componentattached to an UnrealCamerayou can select andcolor gradewith that camera and the settings will be inheirited if yourPost Process Update Locationis set toCamera Component(in the Details panel of the360 Component).
Tick one of the color panels to adjust it’s settings using the color wheel. The
TabsandDialscorrespond to different sections of thePost Process VolumeColor Gradingpanel, but are easier to use due to the color visualisation.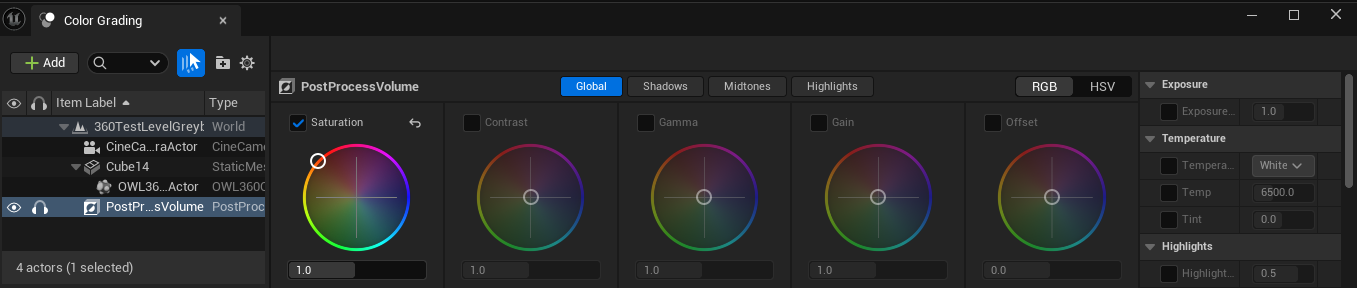
Any adjustments you make will automatically update your
Post Process Volumeand carry through to the finalMovie Render Queueoutput: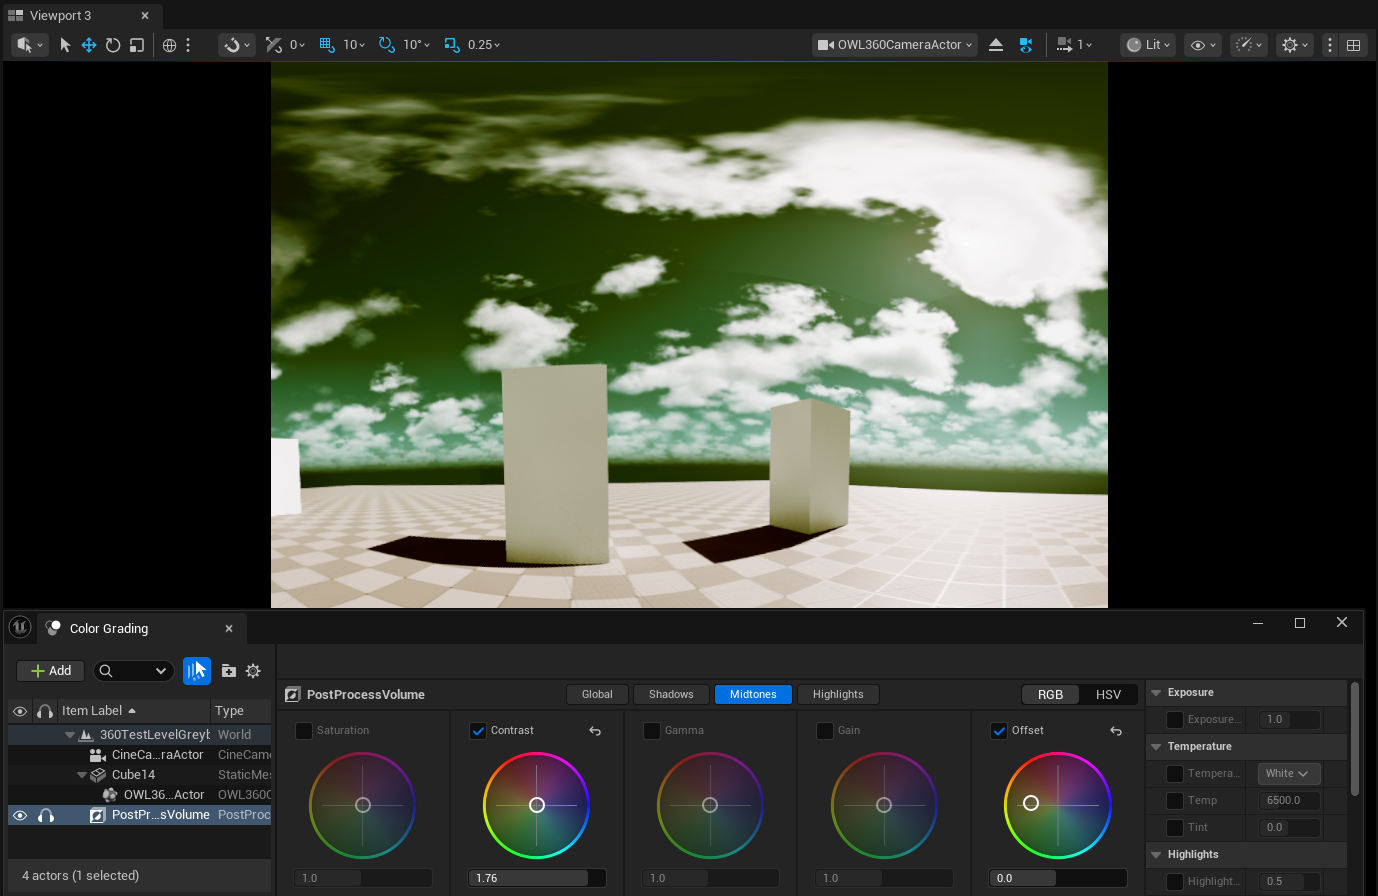
Unreal Set-Up for External Color Grading
OCIO
OCIO is a Library of LUTS and color spaces designed for converting colors between devices and systems. Color spaces are used to ensure that color is exactly right when viewed on a screen or program.
Since Unreal Engine 5.2 the OCIO Plugin includes a configuration file with a selection of commonly used color spaces.
To use OCIO in Unreal, you need to create a Config Actor which stores the different color spaces you want to convert to/ from.
You can then use this config in your Editor Viewport, OWL 360 Camera/ Component and Movie Render Queue to preview and render the exact color output you need:
Enable the
OpenColorIO PlugininEdit> Plugins, restarting if prompted.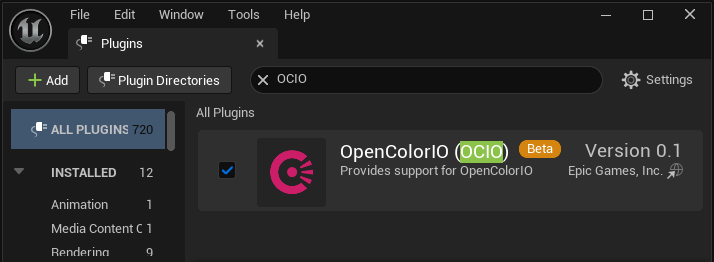
Right click in the
Content Browserand searchMiscellaneous> OpenColourIO Configuration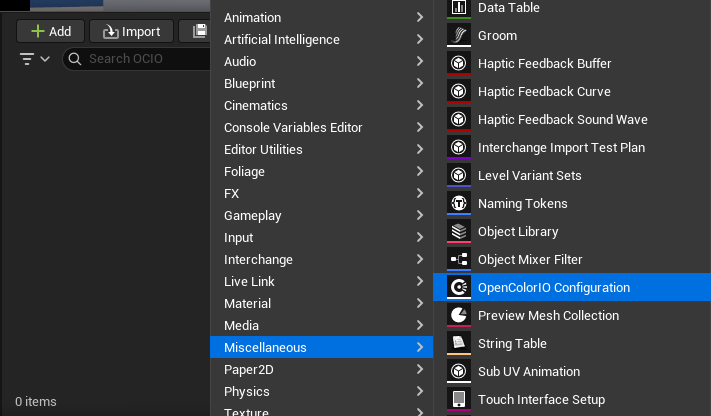
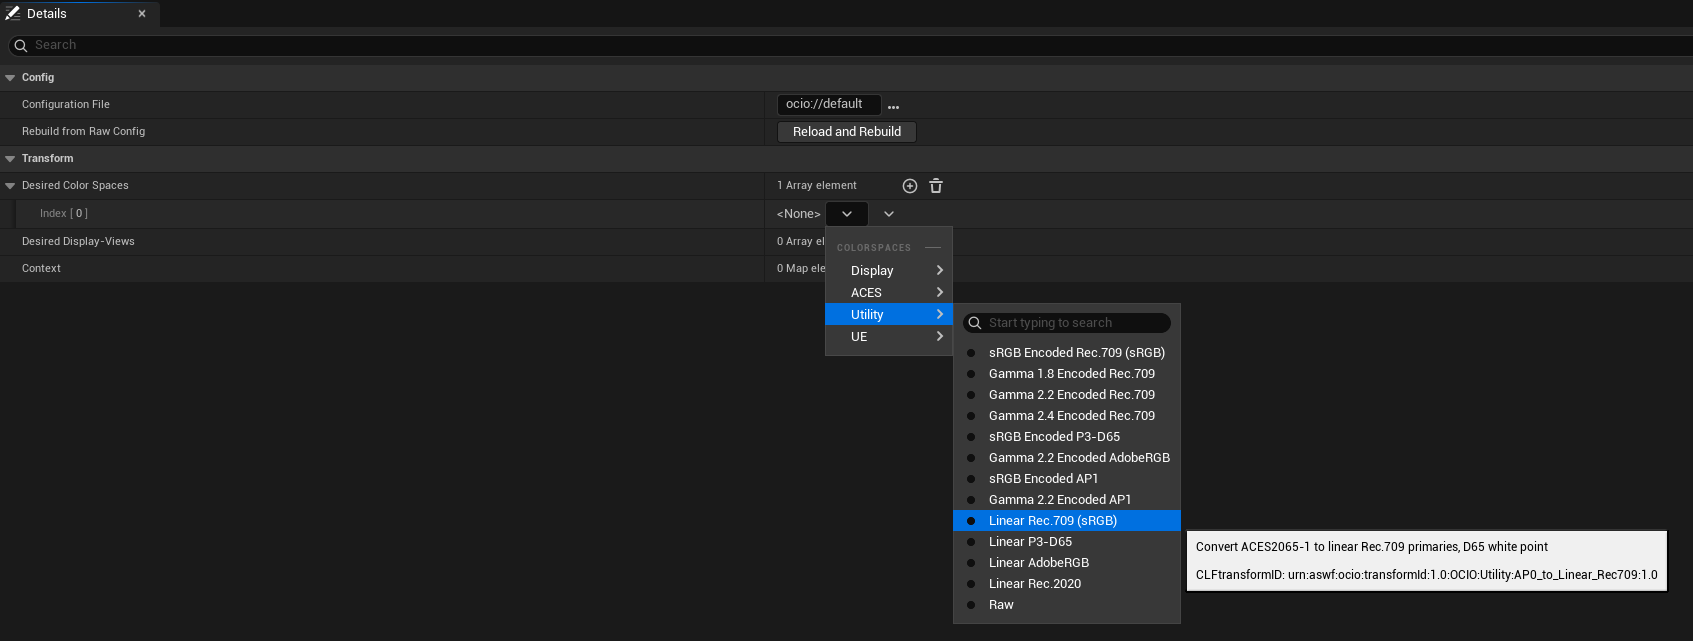
In the
OCIO Actoryou can modify the input and output color spaces you want to use, as well as the config file that has the instructions on how to use them:
Configuration File:Unreal provides a lightweight version ofACESwhich may be sufficient for your needs but otherwise you will should replace it with a comprehensive library such as this (clickReload and Rebuildafter you have changed the file destination to your target library).Desired Color Spaces:Is where you chose the color space you want to work in:Utility Linear Rec 709 sRGBis the default workingcolor spacefor Unreal Editor so you need this option as it will typically be what you convert from in your renders.If your monitor works in a different colorspace and you have already modified your
Project Settingsthen select that option instead.
If you are using the
ACEScolor workflow then you also should selectACES> ACEScgso you can select this as your output color space inMovie Render Queue.You can add other working color spaces here as well if you need (they can be selected between both in your preview and in your render settings).
Desired Display-View: Is where you select the color space of your monitor/s or display:sRGBis the standard for computer monitors and web content.If you have a specialist monitor/ display then you can select it from the list.
You can add more than one option here if you will be toggling between different color spaces. You can select between these in
Viewport/360 Camera/Movie Render Queue.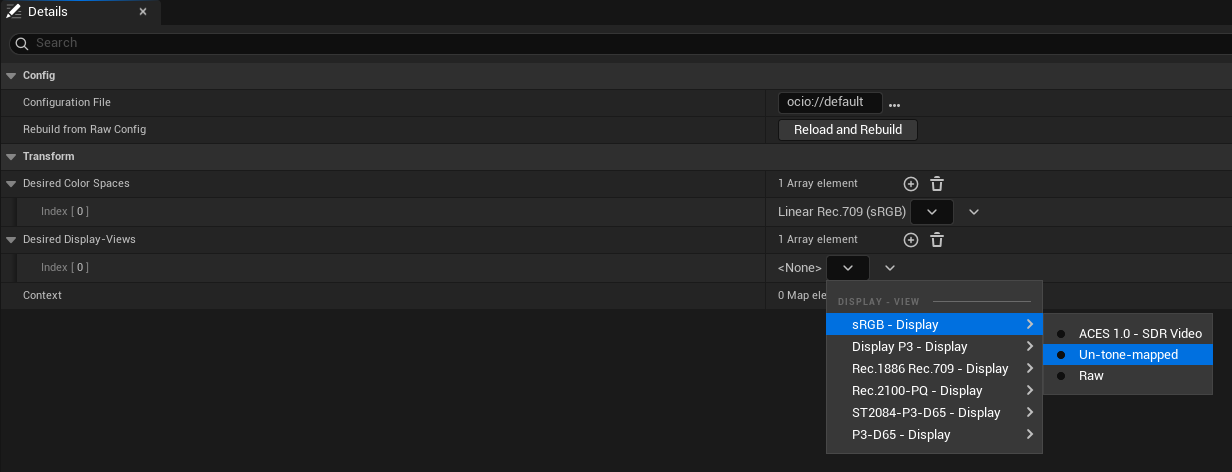
Context:This is an advanced setting which lets you define specific shots for which you want to use differentcolor spaces,this is normally reserved for high-end studio pipelines.
Real-Time Preview
The OWL 360 Camera/ Component can be used with OCIO so that you can preview your content in the correct color space while working on it.
Monitor Color Space
Although Unreal does it’s calculations in Linear colorspace, most computer monitors show color in sRGB, so Unreal automatically converts its colors to Rec 709 sRGB in Editor.
If your computer monitor is set up in a different
colorspace,you can change the working color space in yourProject Settings. If you change this you will also need to select the same in yourDesired Color Spacein yourOCIO config Actor.In most cases you don’t need to change this option.
Viewport and 360 Camera Preview
To change the
colorspacein theViewportyou just select theOCIO config Actoryou have set up in the View Mode menu, and then select the color spaces you need from its options: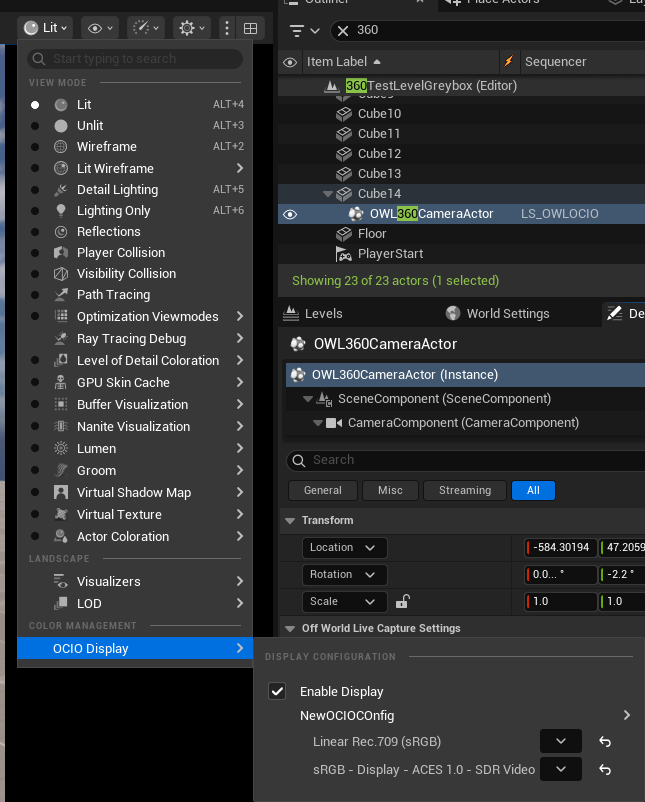
To change the color space in the
360 Camera/ Component, you load theOCIO config Actorin theDetailspanel inColor>OpenColorIO Configuration,select the color spaces you need and then tickEnable OCIO: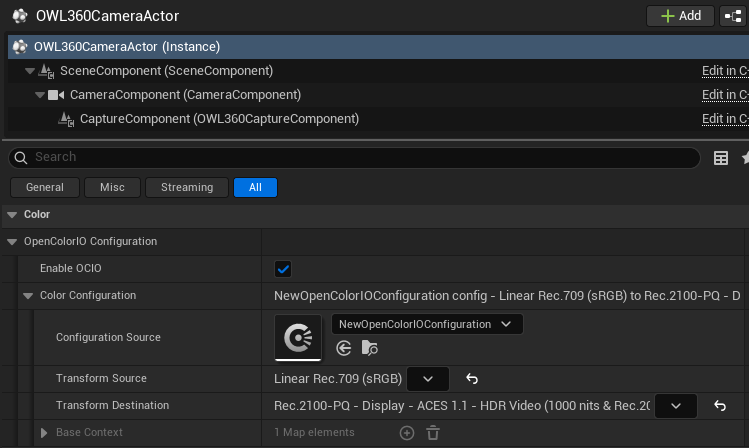
If you haven’t selected
OCIOin yourViewport, you should instantly see the difference in colors in your360 Camerapreview: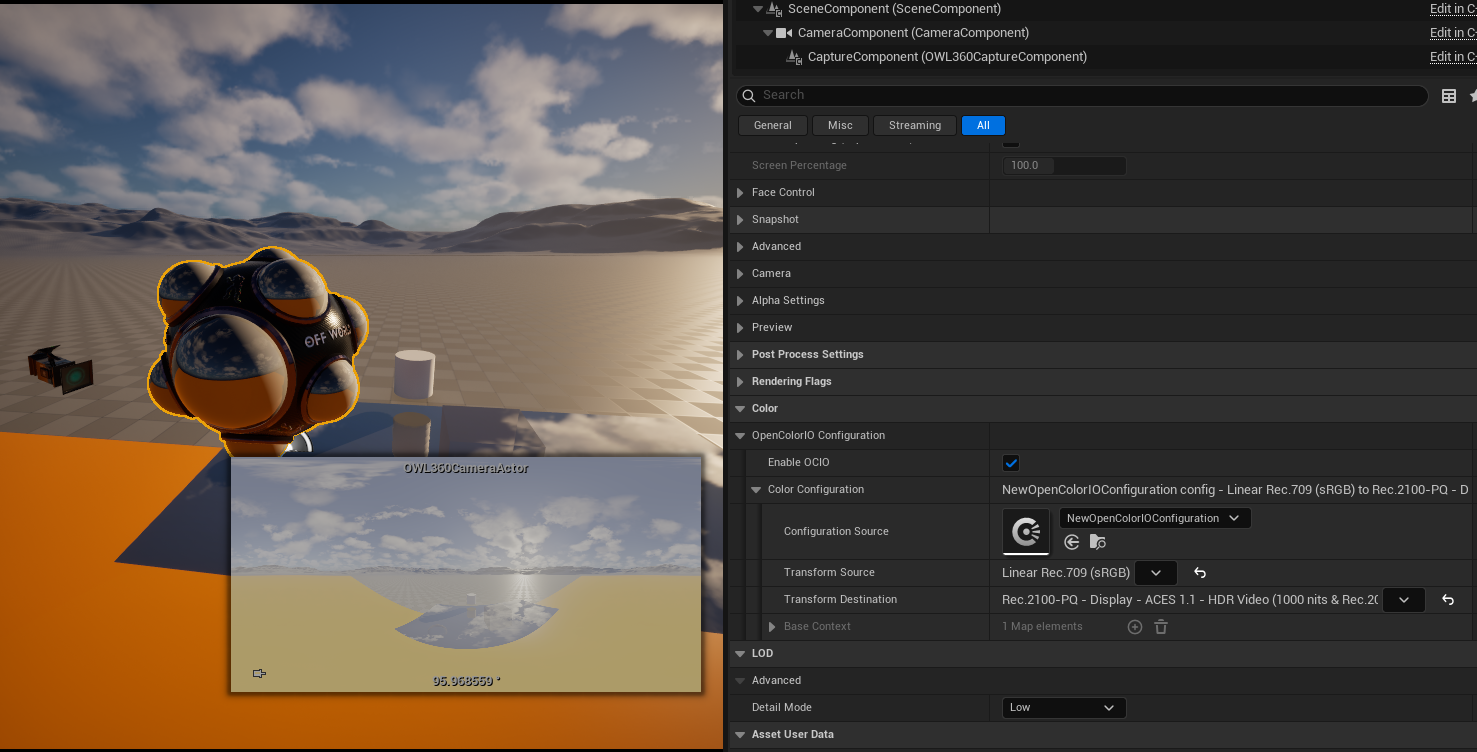
Rendering: ACES Color Workflow (OCIO)
The ACES (Academy Color Encoding System) color workflow enables compatibility between many different types of cameras and graphics software to ensure color consistency through the creation pipeline.
It’s easy to use this workflow in Unreal, either with the default OCIO config files or using a more comprehensive ACES library.
You set up your OCIO and preview your output as explained above.
In
Movie Render Queuesettings, select.exr: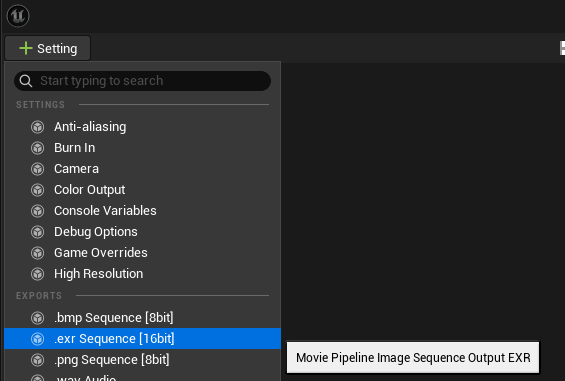
In the
Color Outputsection inMovie Render Queuesettings: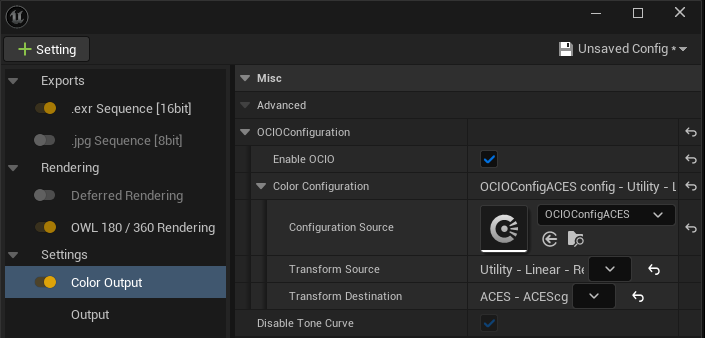
Enable OCIO:TickedConfguration Source:Use theOCIO config Actoryou set up above (this determines the color space options you have available).Transform Source:This should be thecolorspaceyou have set in your Unreal Project Settings. The default isUtility Linear Rec 709 sRGB.Transform Destination:This is thecolorspaceyou want to render in. In ACES this is normallyACEScg.Disable Tone Curve:This should be ticked to remove the UnrealTonemapper(which will otherwise affect the colors of your output).
In your
OWL 180/ 360 Renderingsettings, go toRendering> Optimisationsand ensure that is set to at least16bitso that colors are not crushed.32bitis sometimes necessary for very subtle gradients if color banding is visible but will significantly increase render times: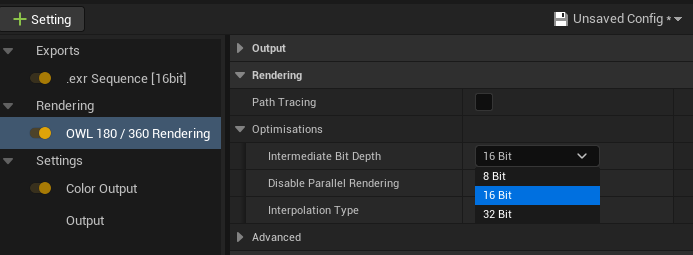
Now when you render, you will output to your selected
colorspace.
Rendering: Disable Tone Curve (no OCIO)
In Movie Render Queue, we can use EXR output with Disable Tone Curve to preserve the original Linear colorspace of Unreal before it is converted to sRGB for your monitor, giving a wider colour gamut for more color conversion options at a later stage.
This option doesn’t require any OCIO configuration:
In
Movie Render Queuesettings, select.exr:In the
Color Outputsection inMovie Render Queuesettings, open theOCIO Configurationdrop down andUntick
Enable OCIO.Tick
Disable Tone Curve: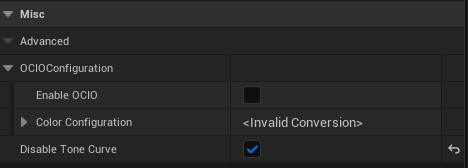
In your
OWL 180/ 360 Renderingsettings, go toRendering> Optimisationsand ensure that is set to at least16bitso that colors are not crushed.32bitis sometimes necessary for very subtle gradients if color banding is visible but will significantly increase render times:
Your render is now ready for color correction in post production software.
Post-Production Workflows
Using a LUT from External Software in Unreal Engine
Unreal’s documentation lists this as a workflow that is not recommended for precise color accuracy because of it’s application after Unreal’s Tonemapper. This workflow may also lead to a lack of flexibility due to the reliance on the Look Up Table asset.
However, you can use the process below to get your Look Up Table configured correctly for Unreal giving you color precision in your final render without needing external post process software.
Look up tables can be imported in to Unreal Engine to achieve an approximation of a film look from existing software.
Sometimes it can be preferrable not to use Post Production Software, in which case, this is a way to get final pixel from Unreal Engine with color looks from external software.
Importing a LUT into Unreal for a Render
Download the
Color Neutral LUTfrom Unreal Engine’s Documentation.Import the
LUTin to a sequence within Premier Pro or Davinci and apply anycolor gradingto this image. For Example the FujiFilm Stock below: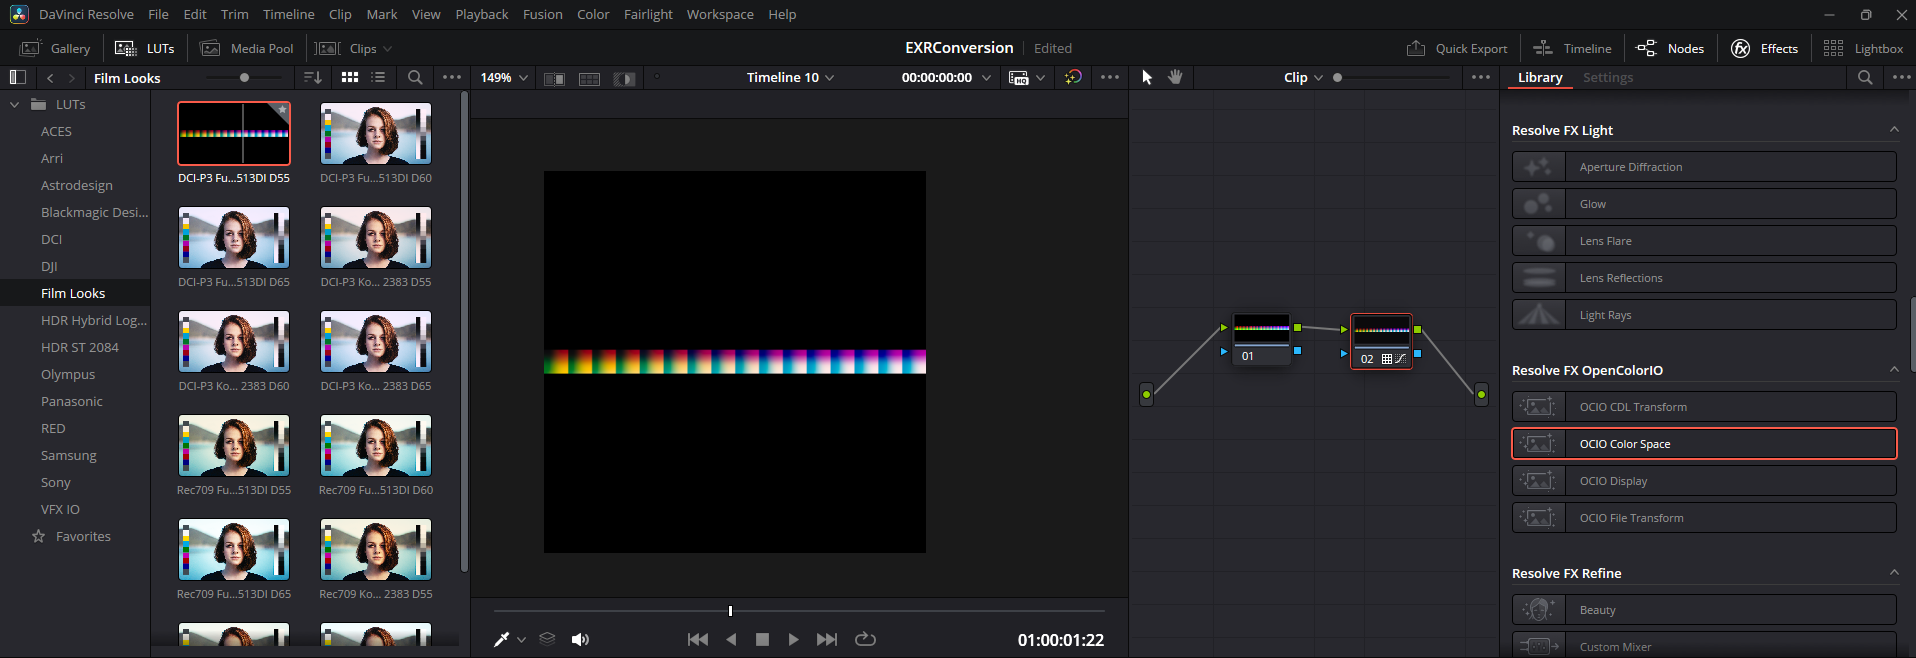
In DaVinci, right click in the
Timeline Preview Viewportand selectGrab Still: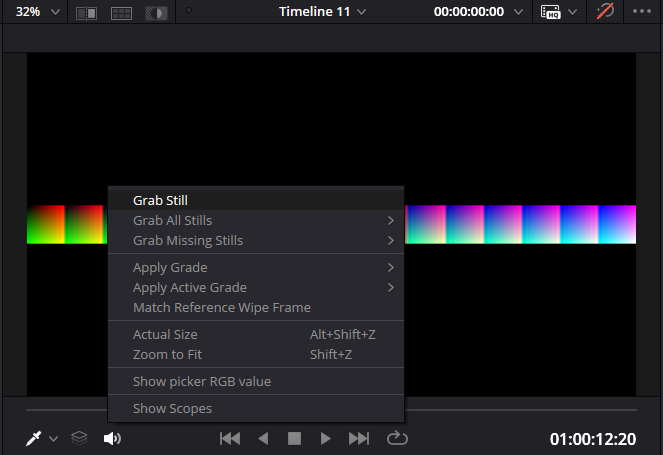
In the
Gallery Tab,Exportthis Still as aJpeg.You will need to crop this image to
256×16in another image editing program: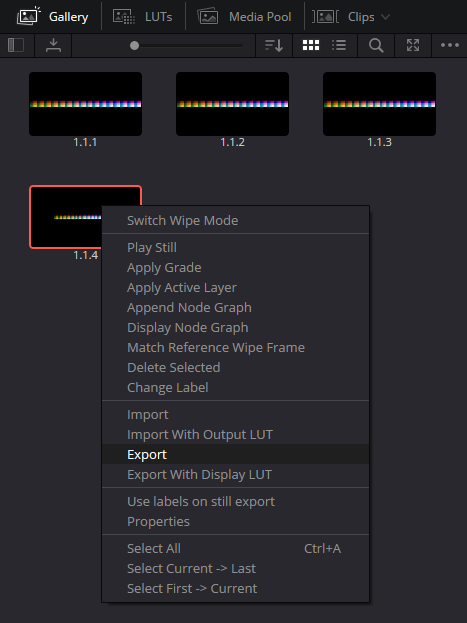
Drag the Image into your Unreal
Content Browser: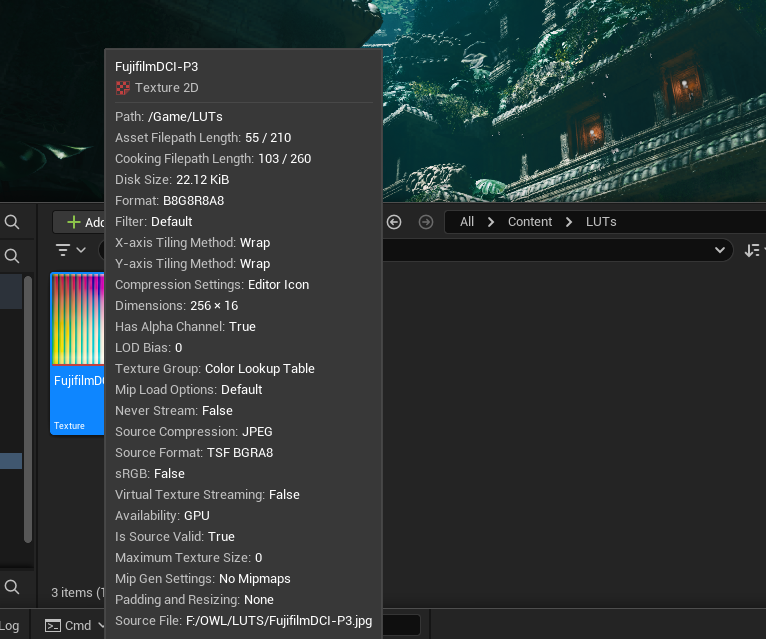
Double click the image and ensure that:
Mip Gen Settingsare set toNoMipMaps,Texture Groupis set toColorLookupTableandCompression Settingsis set toUserInterface2D (RGBA8):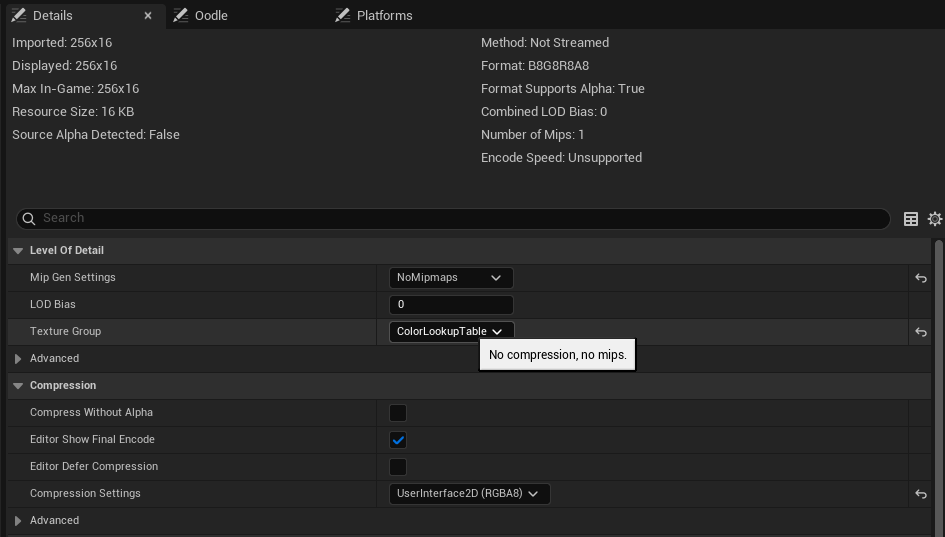
With your
OWL360CameraorPost Process Volumeselected, searchLUTand apply yourLook Up Table Textureto theColor Grading LUTsection: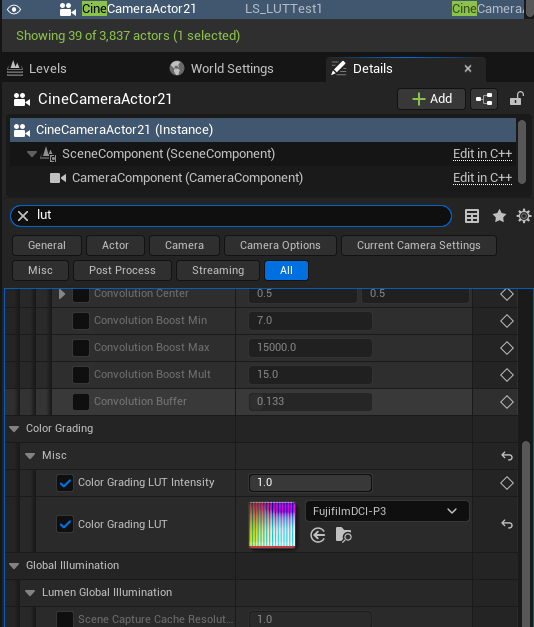
The resulting image will be an approximation because of Unreal Engine’s
Tone Curveso some settings will need to be adjusted:For this image it was necessary to set
Tone Curve Amountto0;and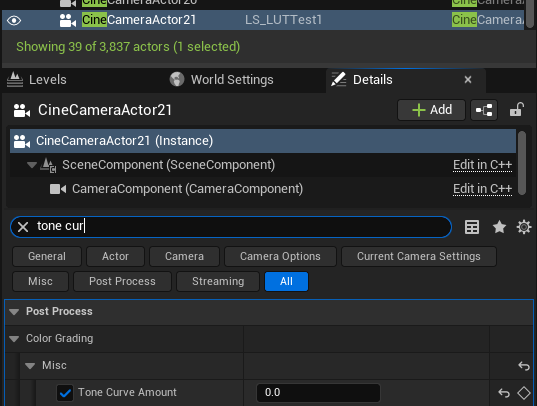
To increase the
Gammaof theShadowsby1.4to acheive a comparable image.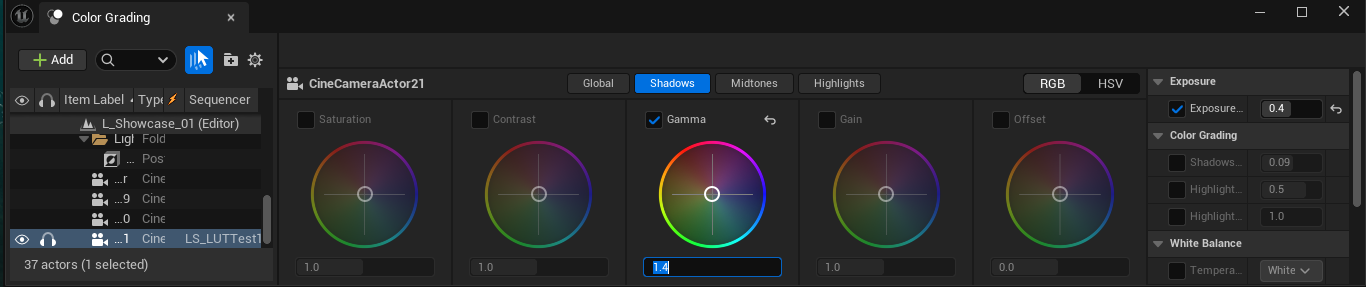
Previewing your Render Ouput
To preview
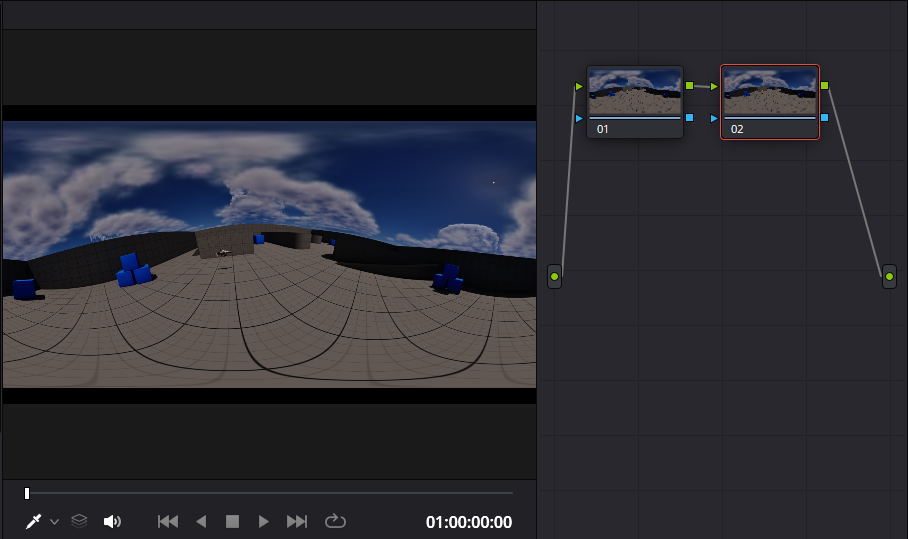
LUTsfrom your Unreal render, use anEXRwith aDisabled Tone Curve: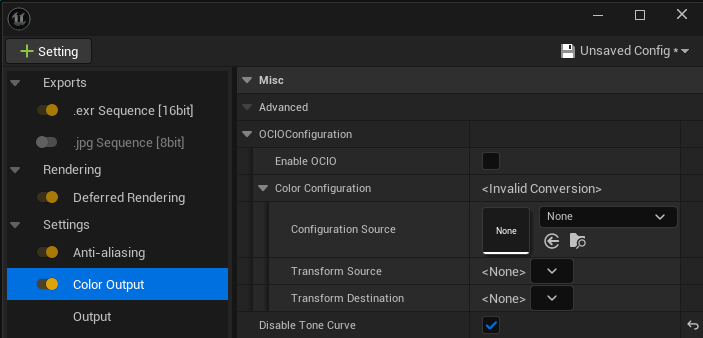
In Davinci, convert the image to
sRGB, followed by any further color adjustments: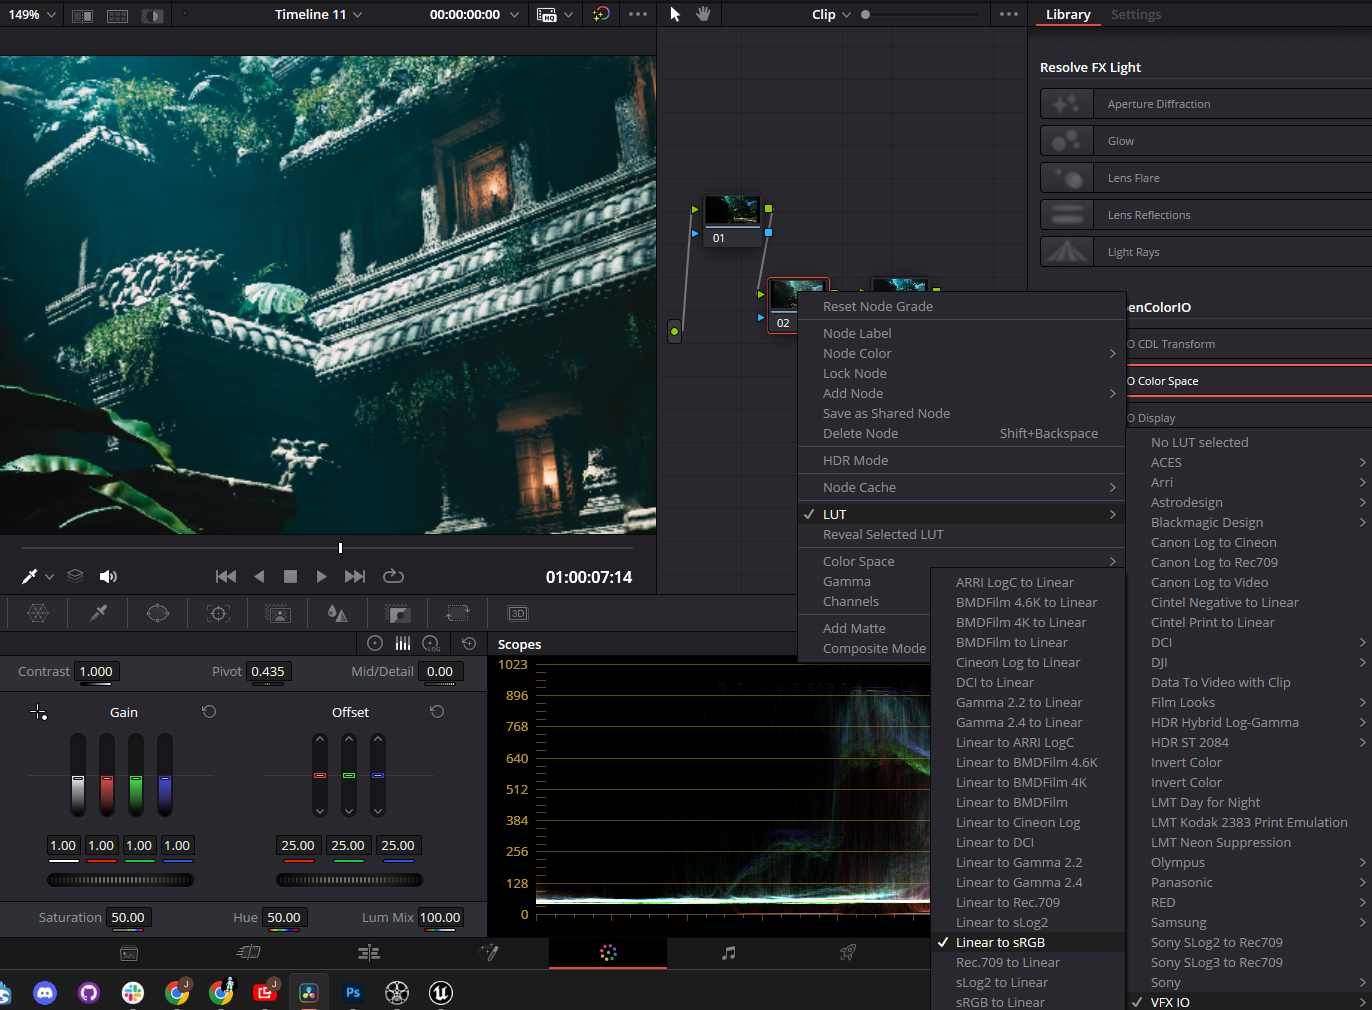
Apply any
color gradingto this clip after theVFX I/Oconversion: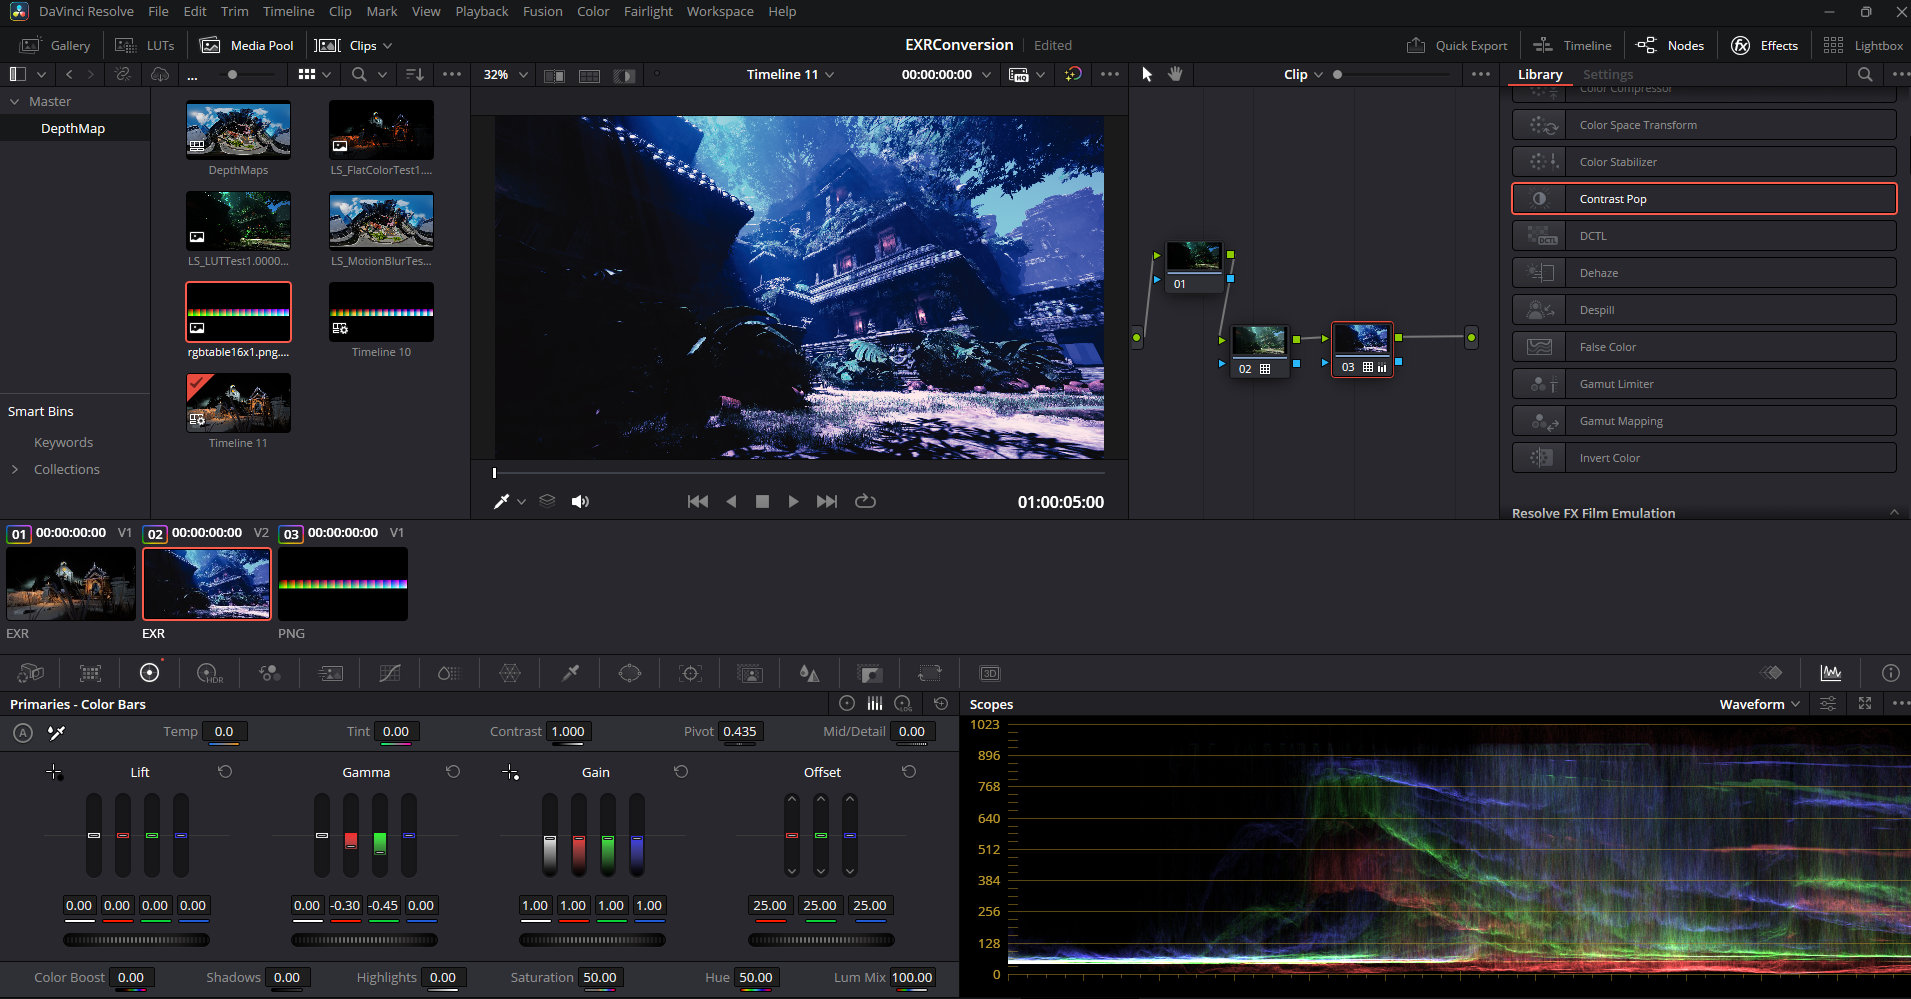
Apply the same colour adjustments to your
look up tableclip by dragging theLook up tableimage in to the samesequence, then in theclips panelof theColor Gradetab select theLUT clip, then right click thecolor graded clipand selectApply Grade: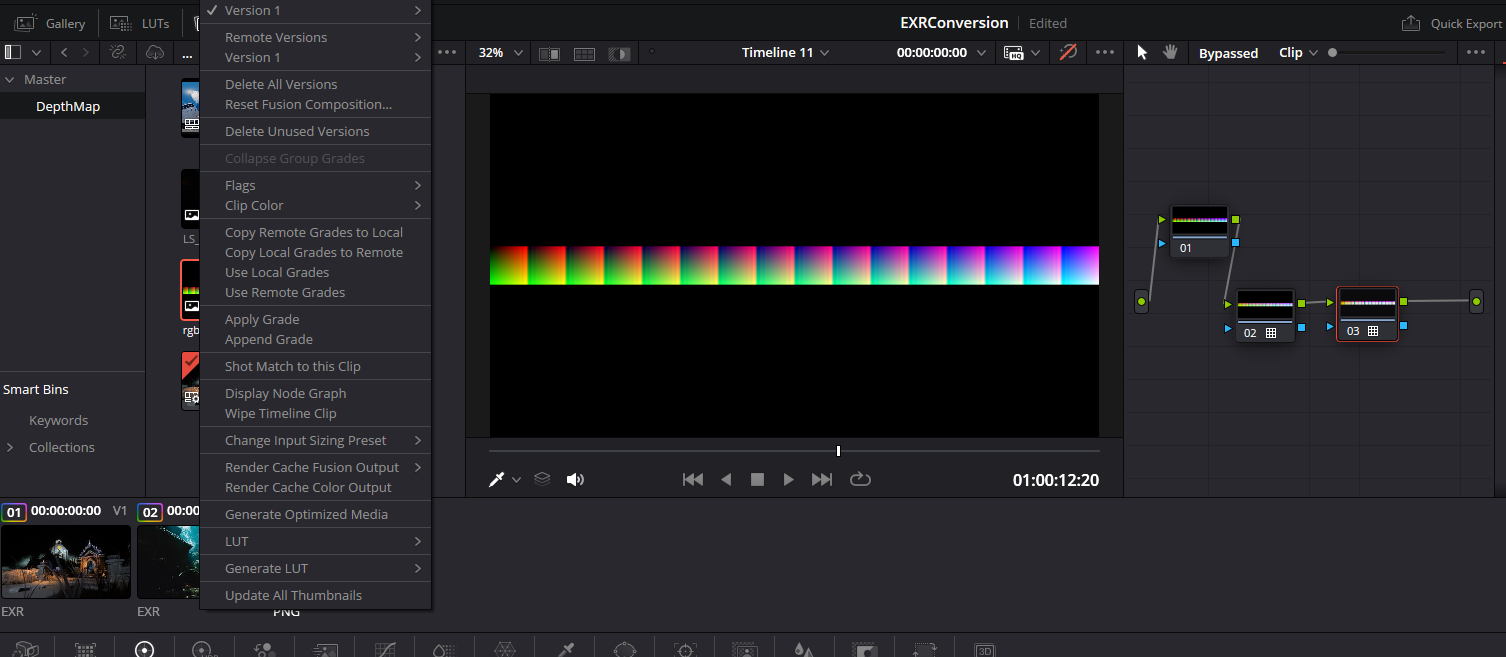
Remove the
VFX Conversionnodefrom this clip: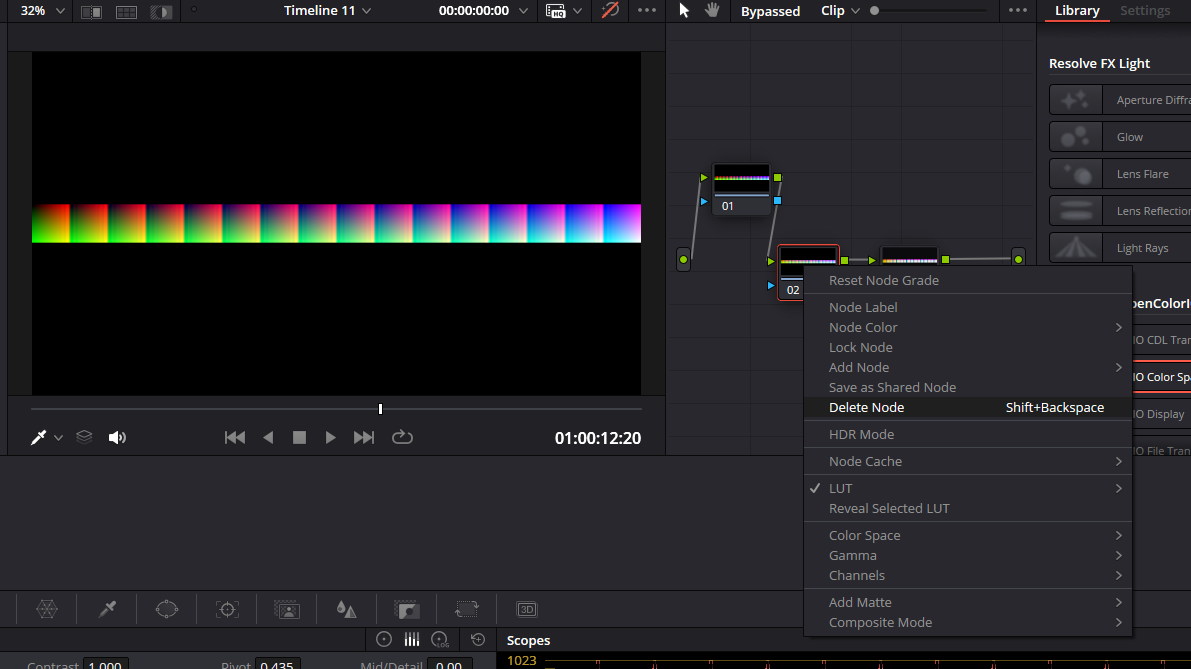
Export this
LUTusing the sameGrab StillandExportprocess as above.Import and apply this
LUTin the same way as before, remembering to make any final adjustments in theColor Gradingwindow: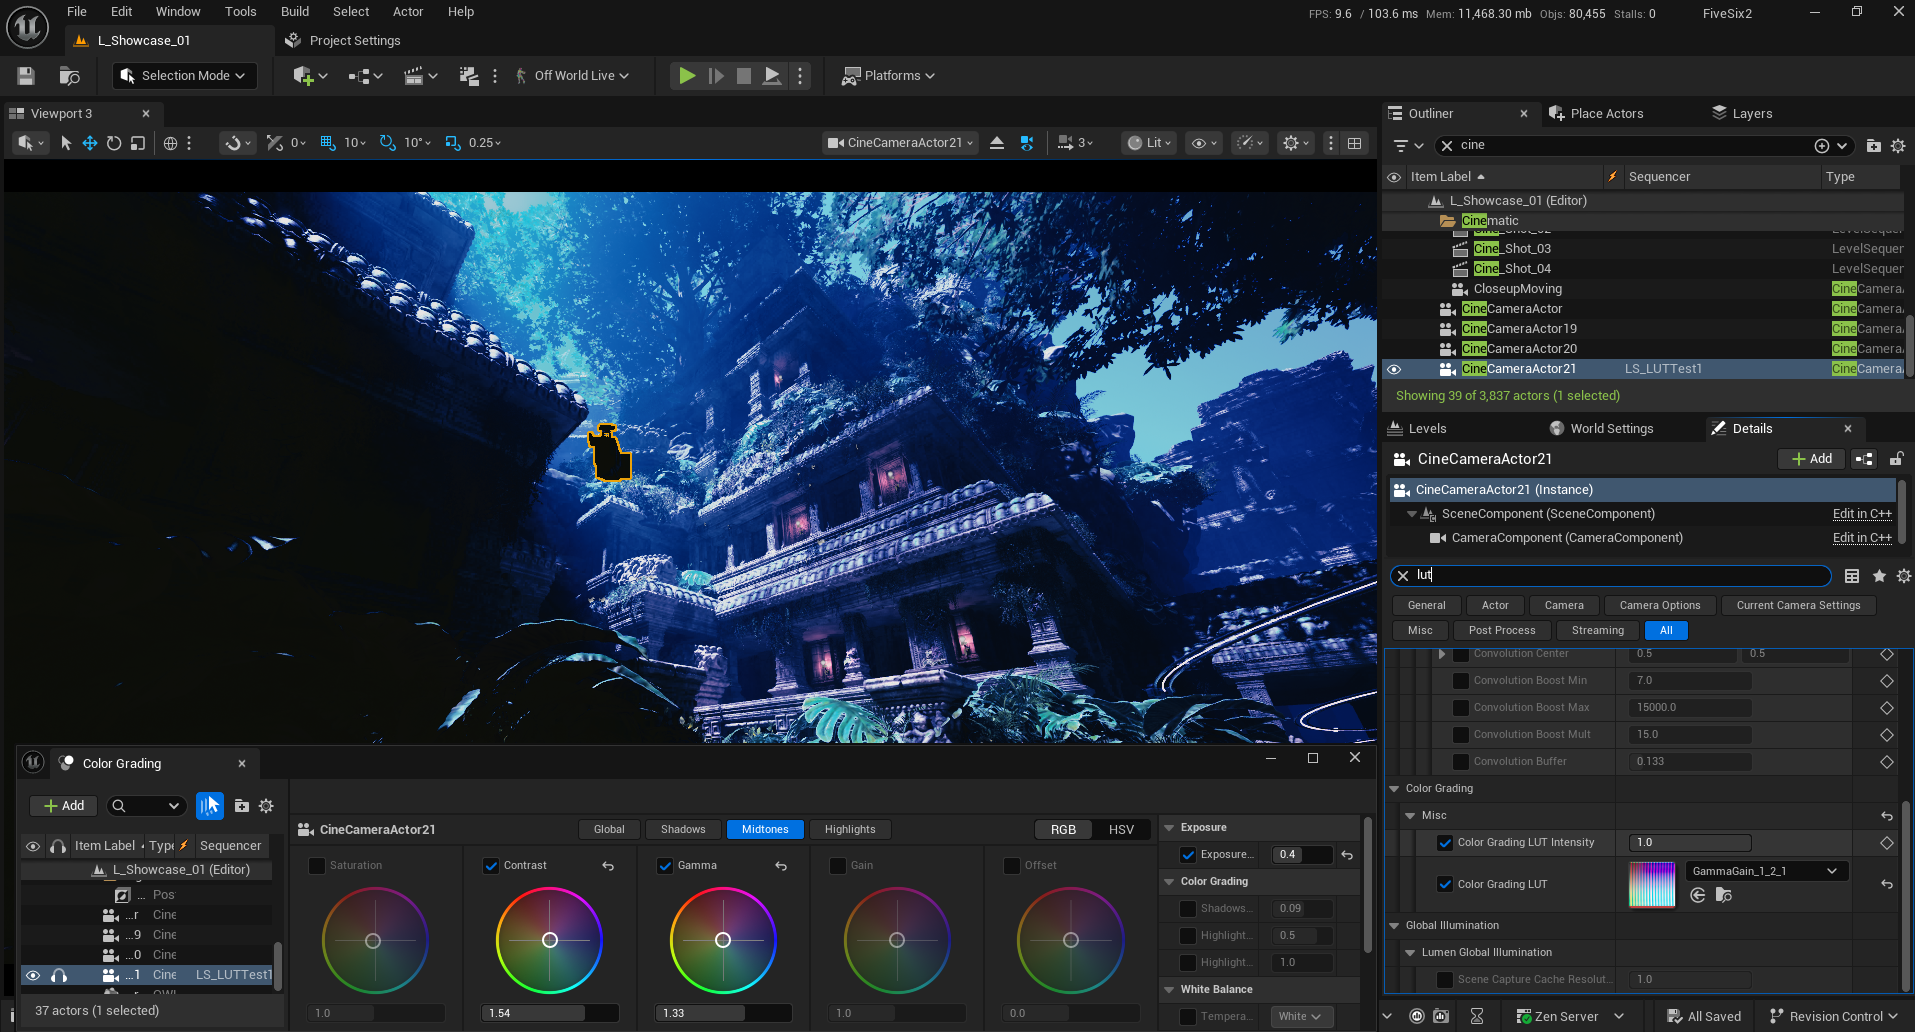
Once you are happy with the colors you can then progress to final pixel render.
Converting EXRs in Davinci
Once rendered, EXRs can be brought in to Post Production Software as a single sequence and color graded with full color precision.
In Davinci, open a new project and go to the
Cutpanel. Bring your still or sequence in to any selected bin: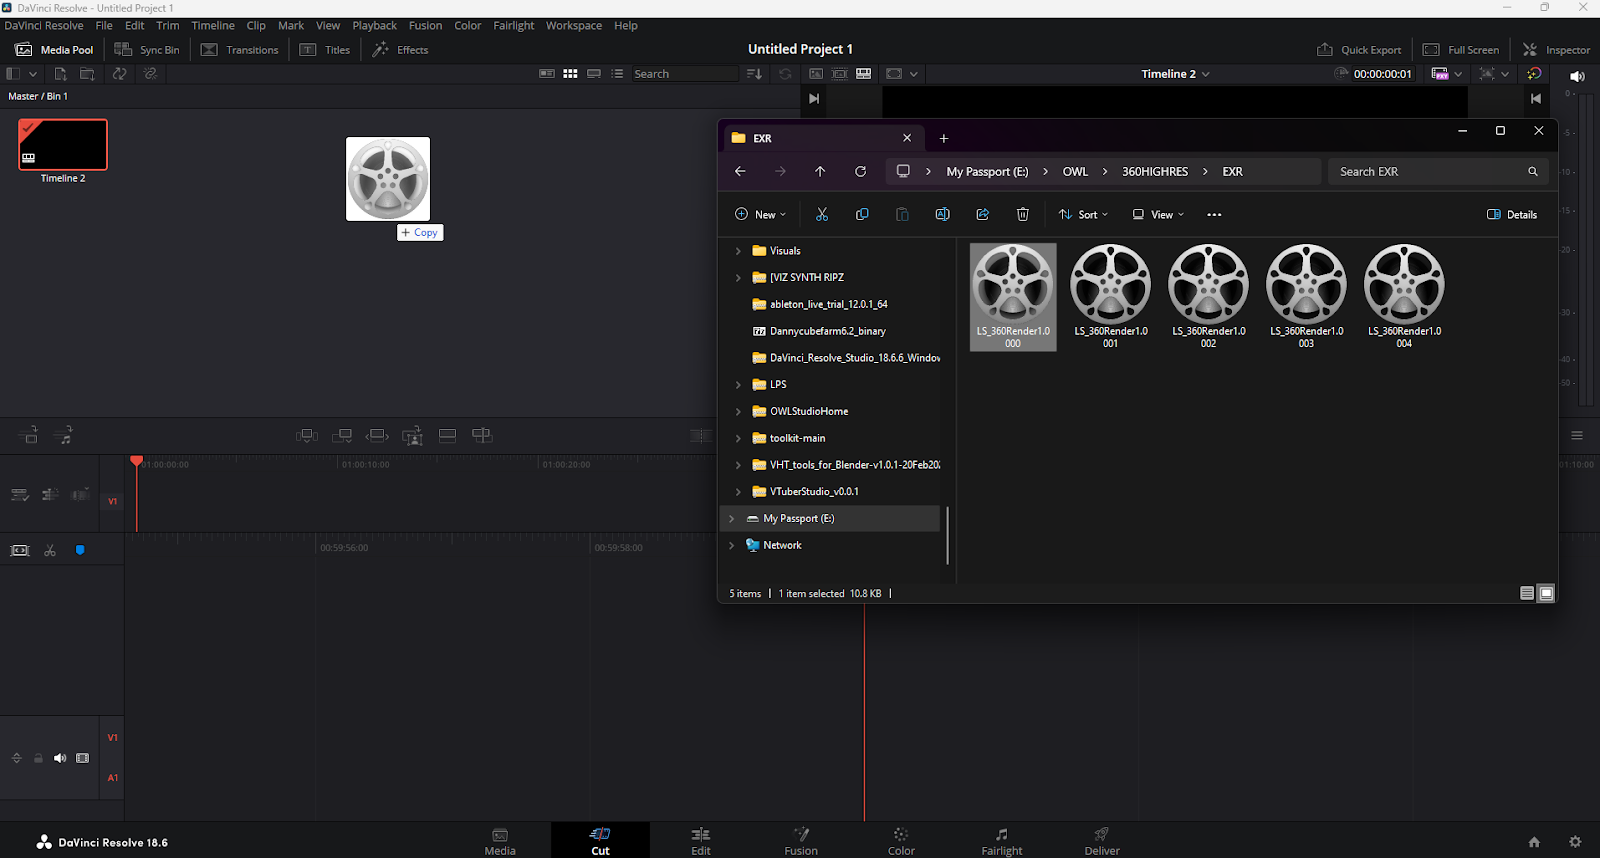
Right click on the newly imported clip and select
Create New TimelineUsing Selected Clip..:
Check the timeline settings and press
Create: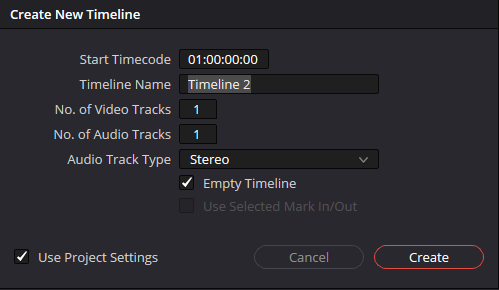
Find your clip in the newly created timeline in the bottom right of the
CutorEdit Panels: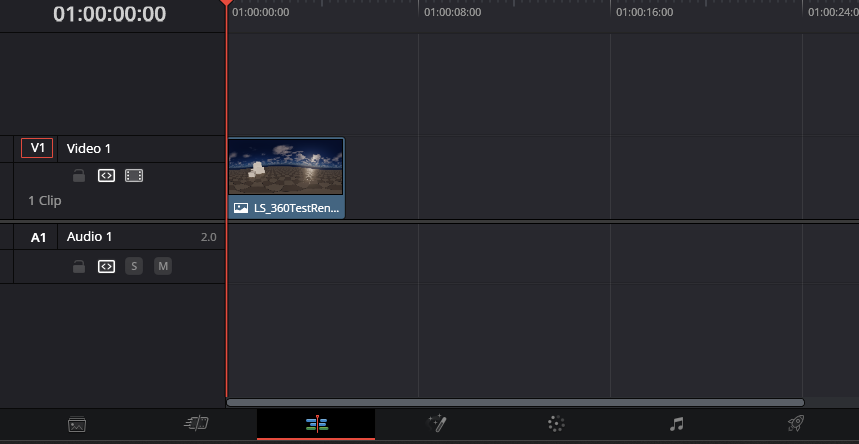
You may need to disable the
Alpha Channelon your clip. To do this right click on the clip and selectClip Attributes: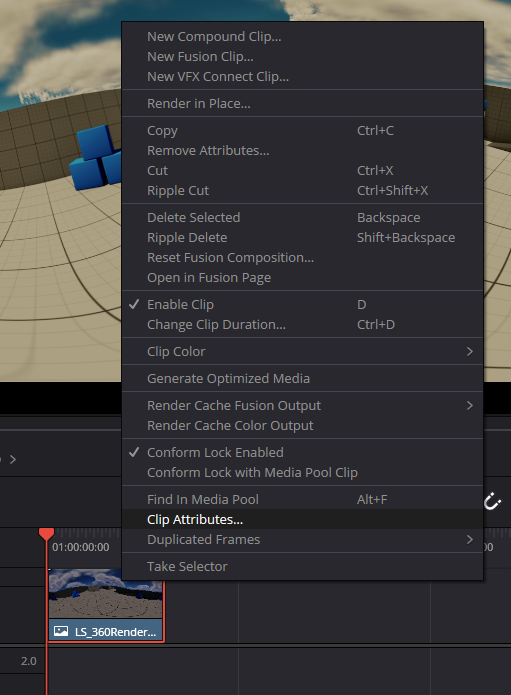
Set the
Alphamode toNoneand clickOK: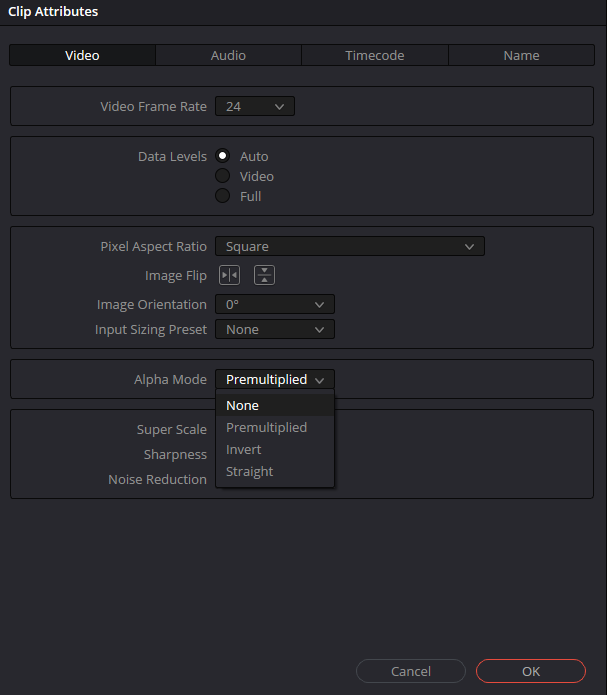
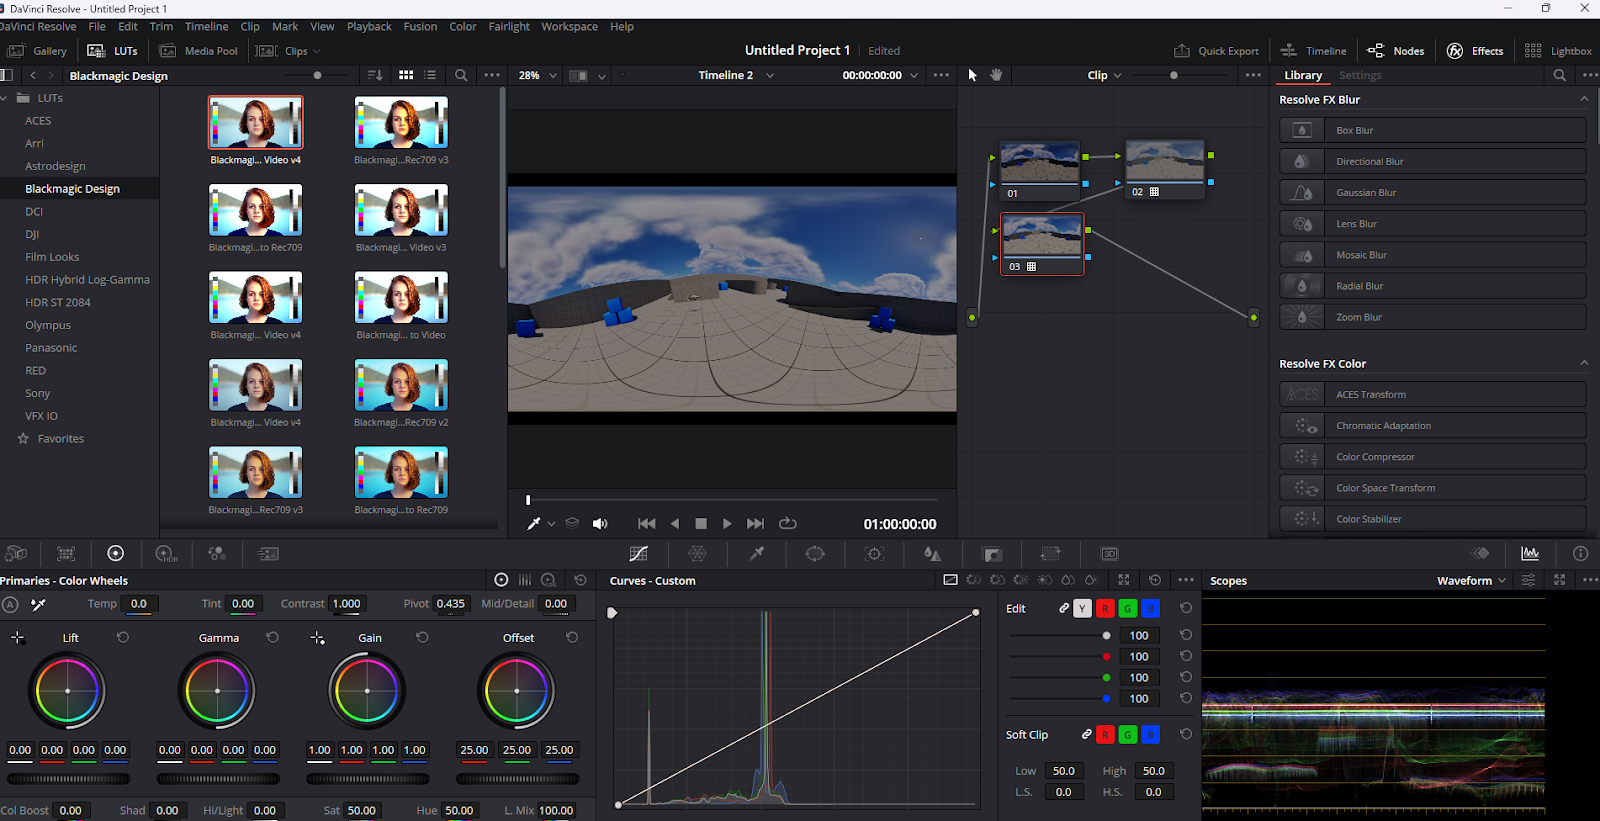
Go to the
Colortab and ensureNodesis selected in the top right.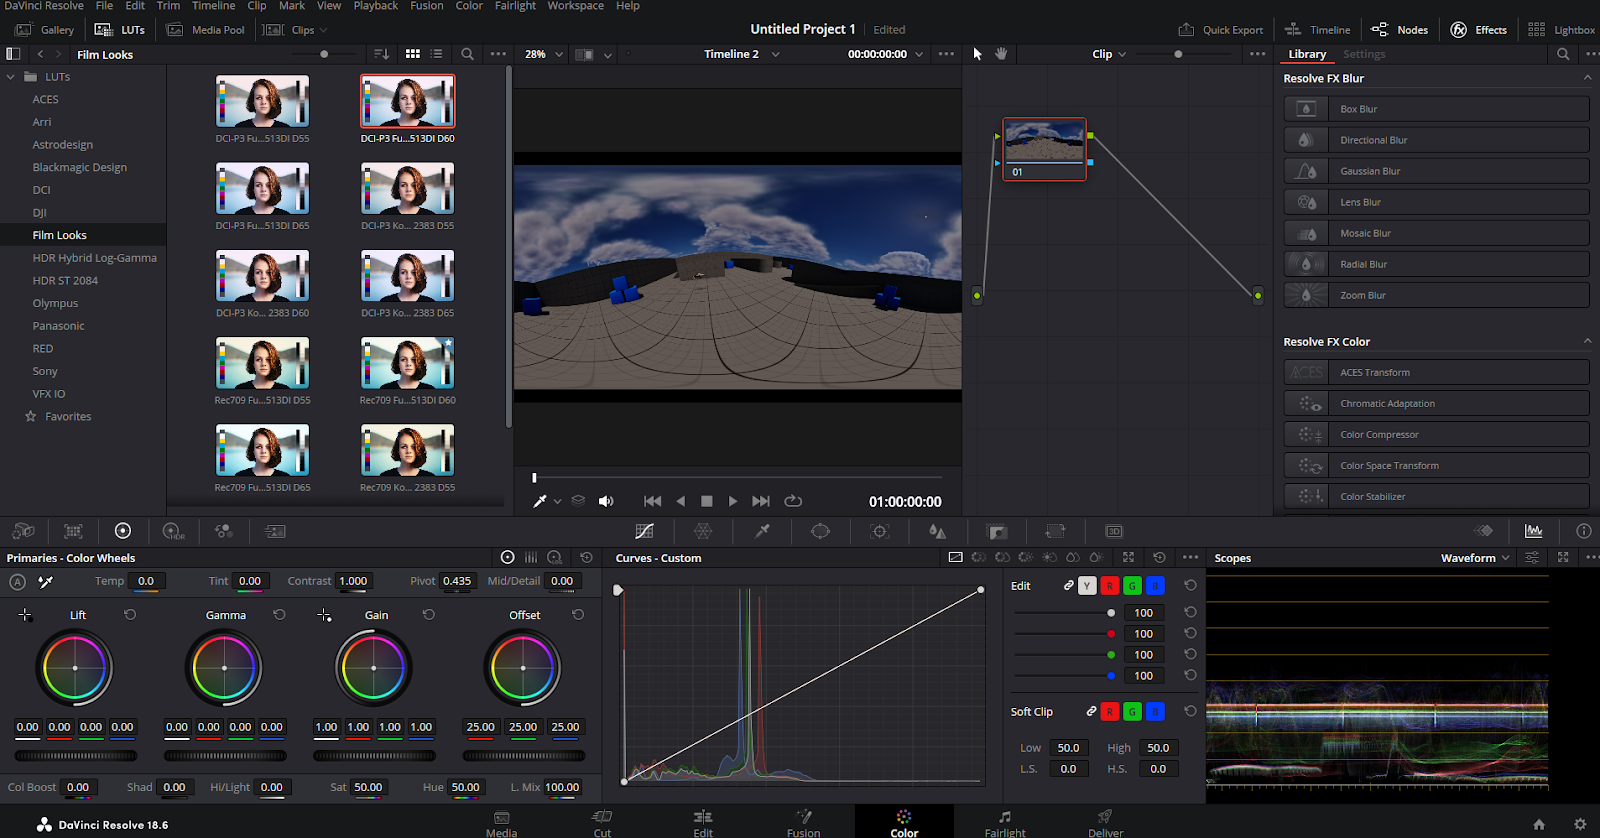
Select the node and use Alt+S to duplicate it:
To add the
sRGBtone curve and re-gain the image as it appears out of the standard UE viewport, add the conversion fromLineartosRGBfrom theVFX IOsection of theLUTSmenu: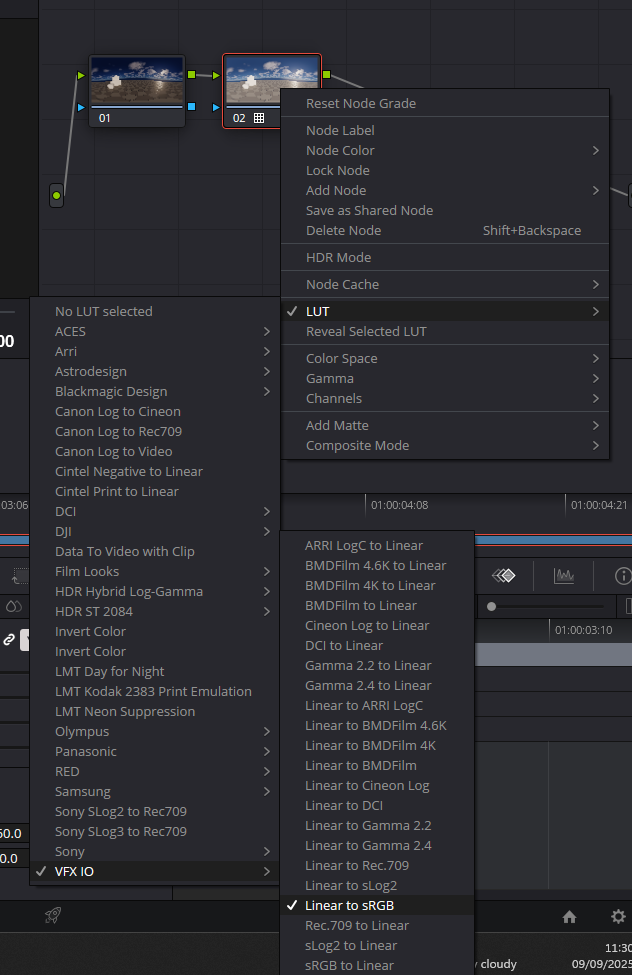
Converting the image to
sLog2can be useful for replicating aRAWoutput from a camera, this kind of output responds to additionalLUTsin the best way because of the uncompressed and flat look of the footage. Using aRAWimage as a basis can make color grading consistently a lot easier across multiple shots. To convert fromEXRtoRAWuse theVFX IO LineartosLOGconversion from theLUTsmenu: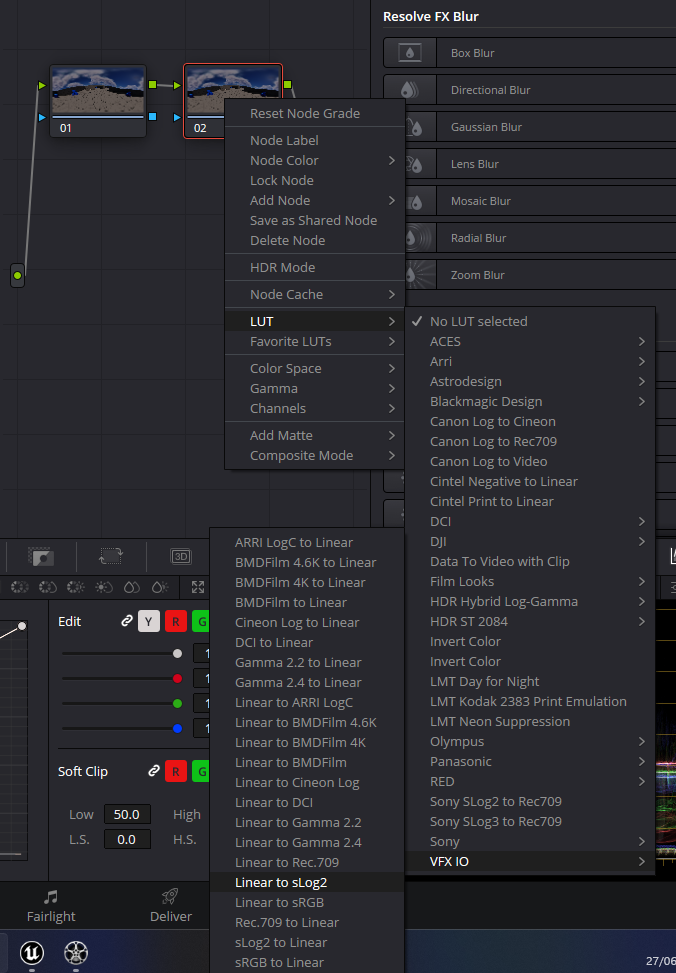
Press
Alt+Sagain to make another new node, this one will be where to add anyLUTsor color correction: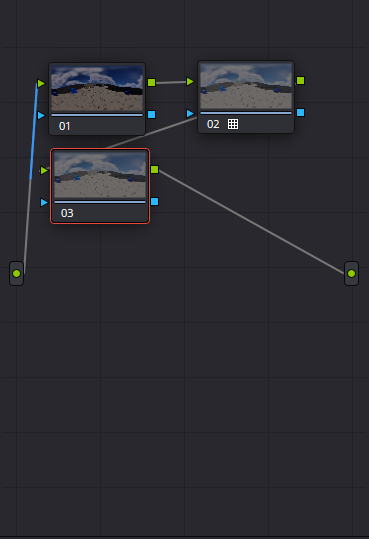
Selecting
LUTsin the top left corner will give you presetLUTsto choose from:
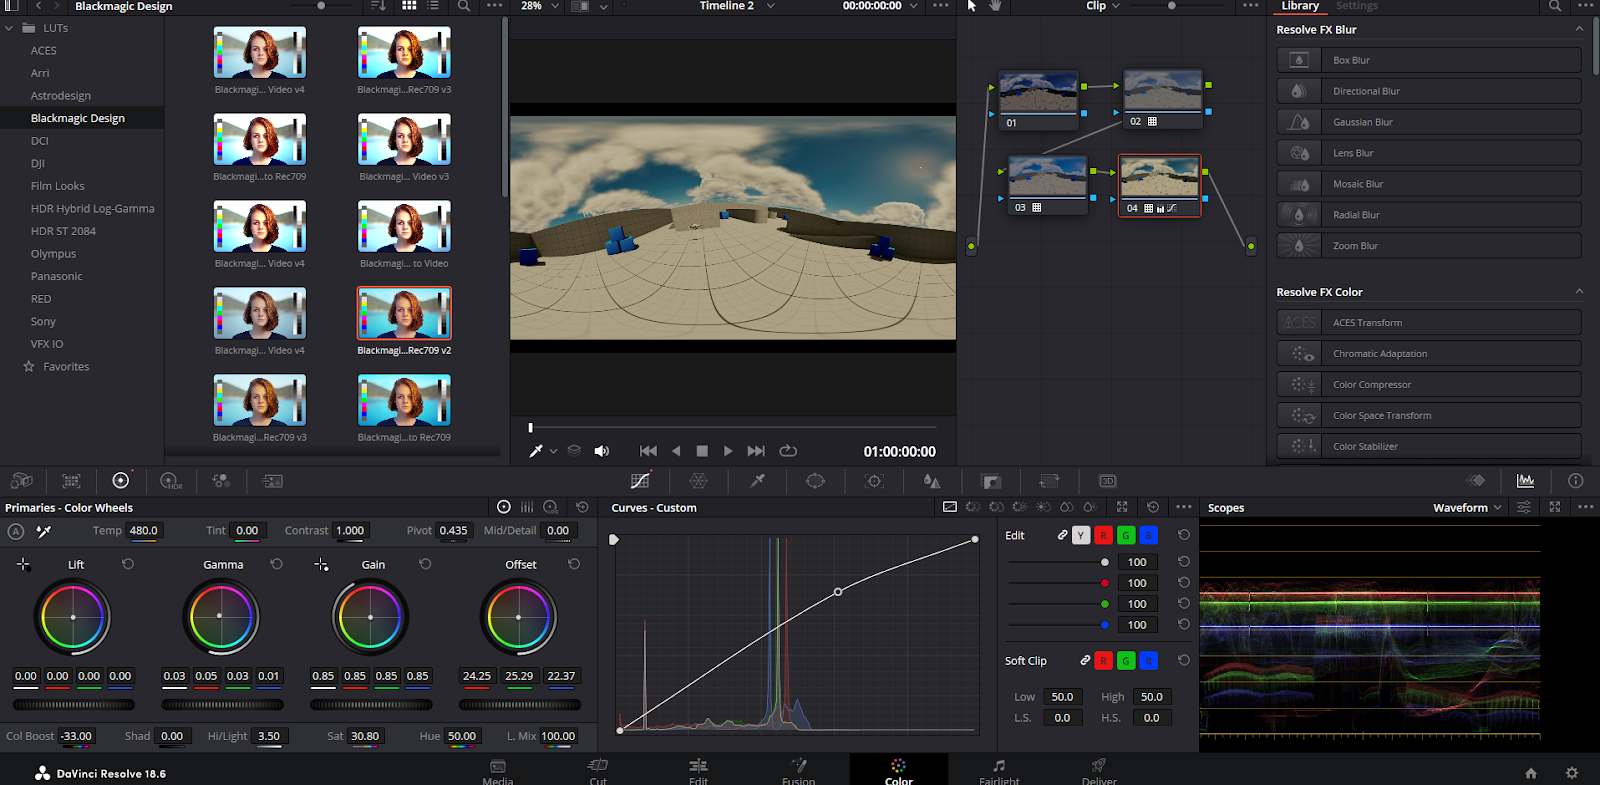
Hover over the LUT to preview it’s effect or drag it on to the last node in the list to apply it:
Compare multiple
LUTsbyDuplicatinganode, applying aLUTthen selecting anodeand pressingShift+DtoDisableonenodeat a time. This way you can see the effect eachnodeis having: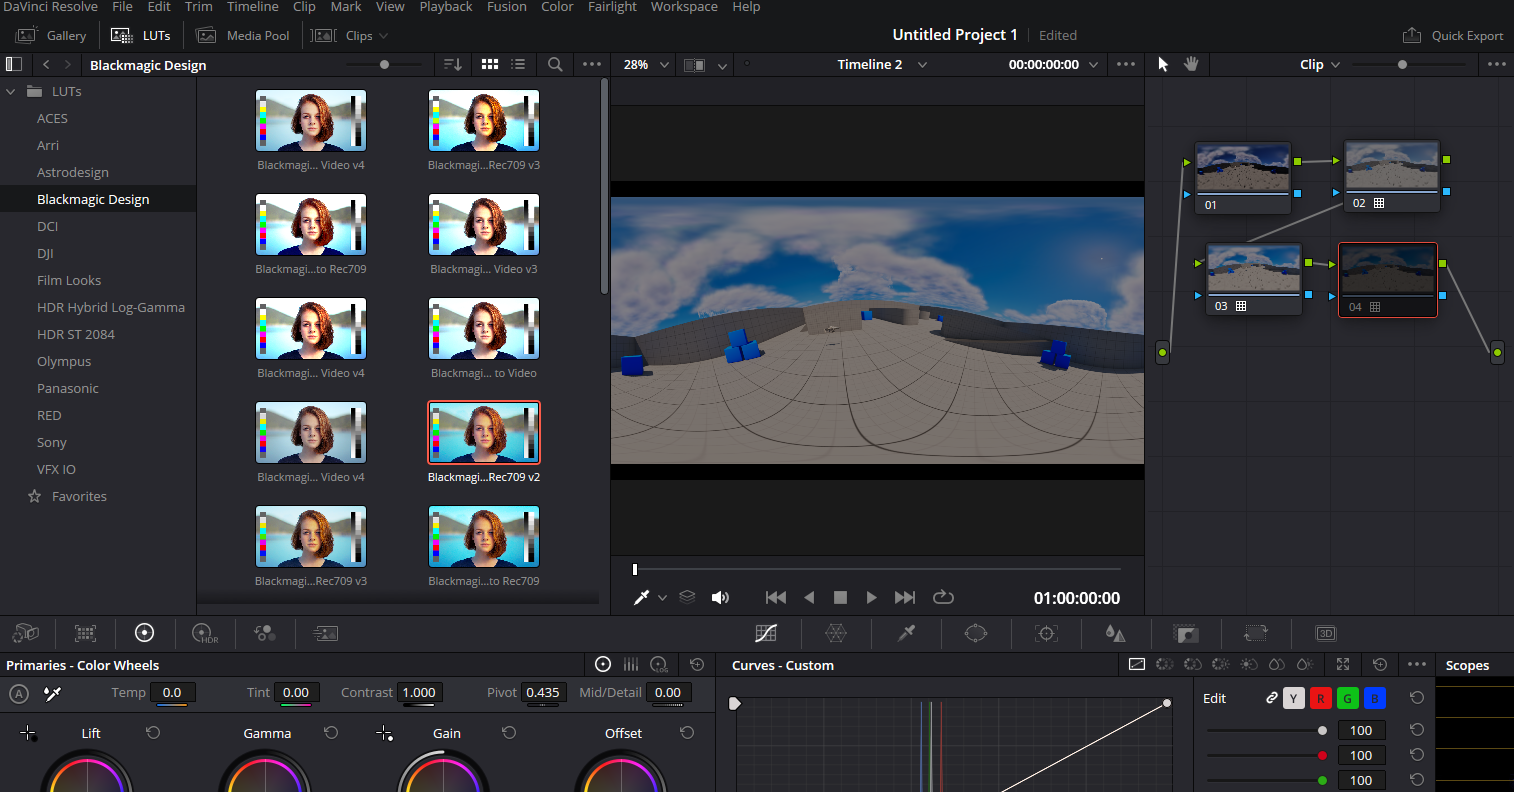
Use the Color Wheels and Curve Controls to fine tune a color grade:
Converting EXRs in Premier Pro
Open a new project or Bin in Premier Pro navigate to the Bin Panel, right click and select New Bin:
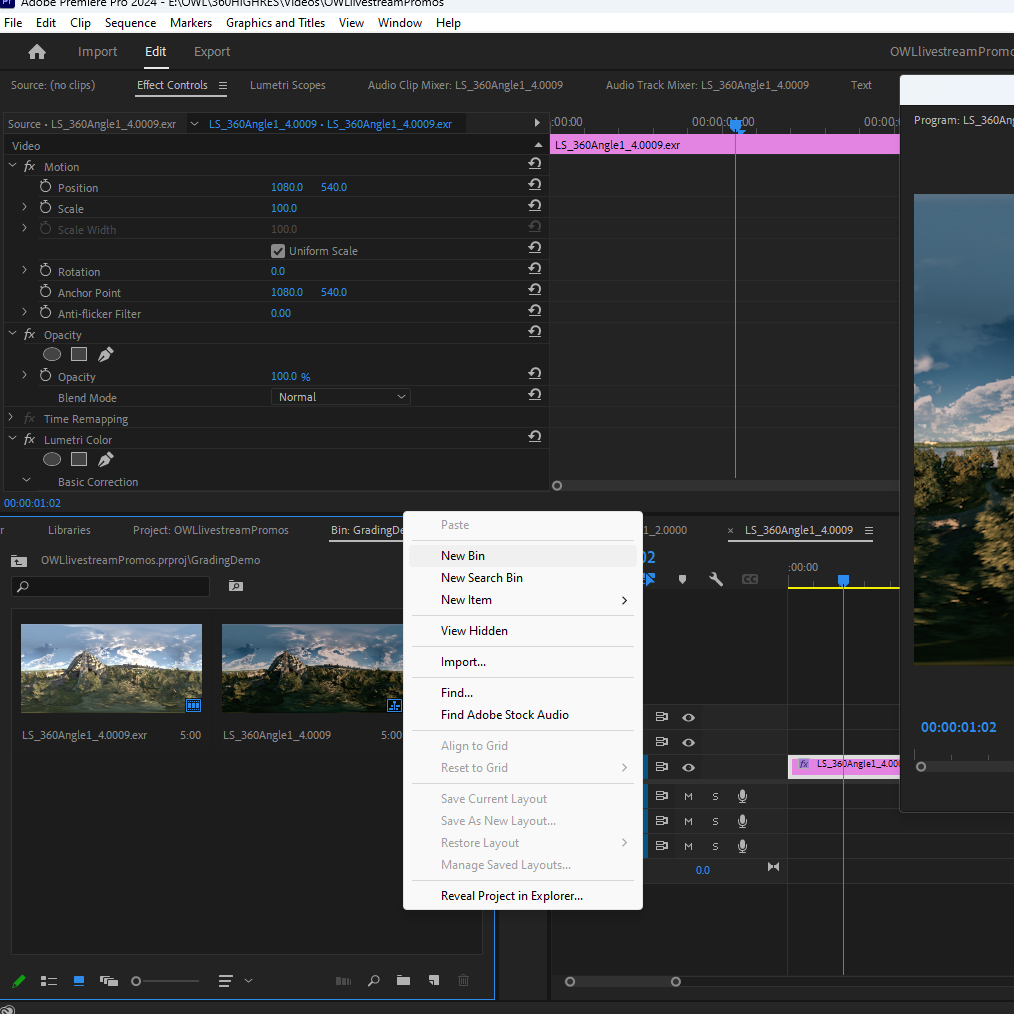
Double Click on the new Bin and drag your footage or still in to it:
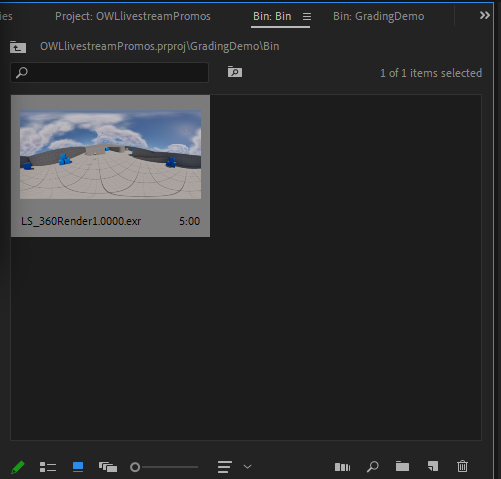
Right Click and select
New Sequence from Clipthen double click on the newly createdTimelineto open it: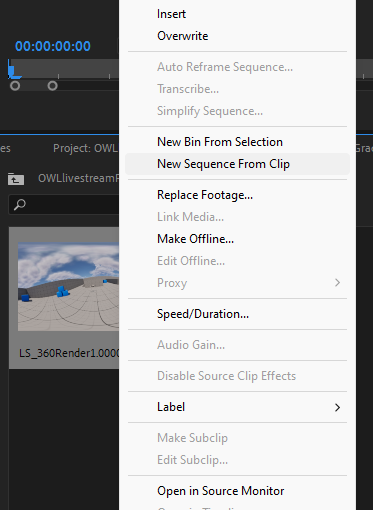
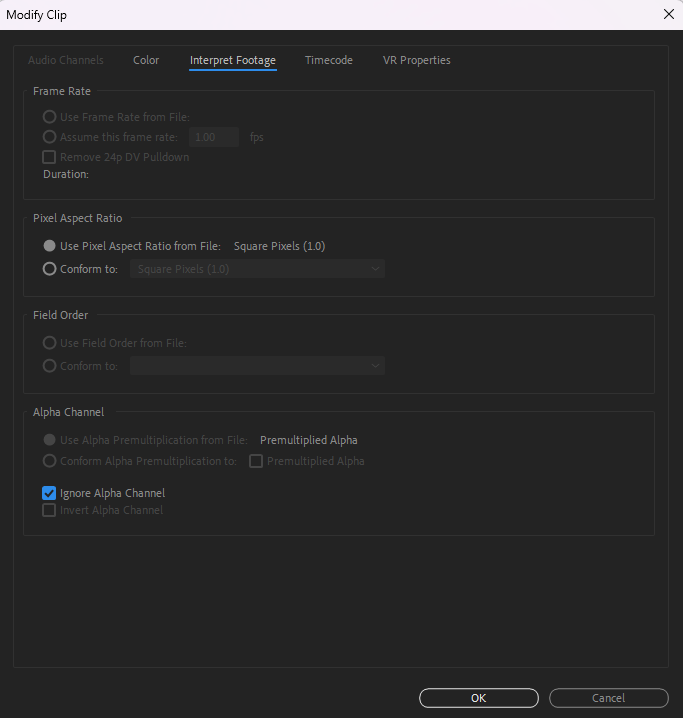
To disable the
Alpha Channelright click on the clip and selectModify > Interpret Footage>Ignore Alpha Channelcheckbox.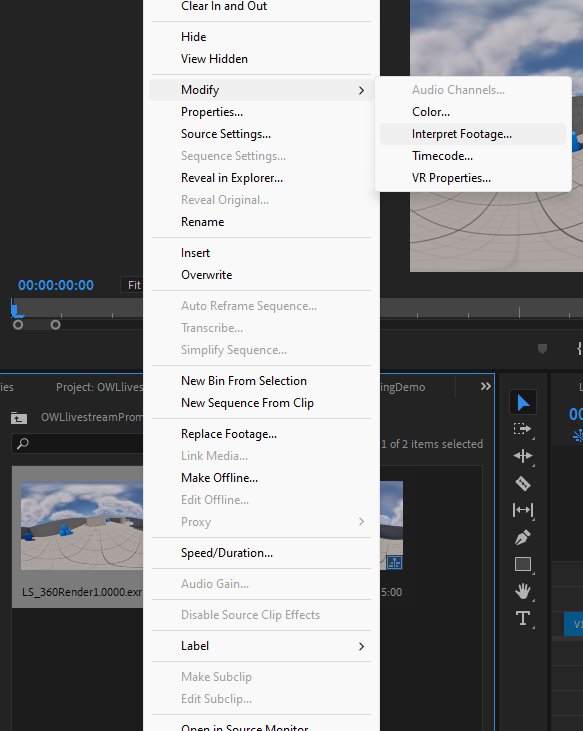
In the
Lumetri Color tab, setInput LUTtoNone, overrideColor SpacetoRec.709andColor SetuptoWide Gamut (No Tonemapping)with theOutput Color SpacetoRec.709. This will restore the colours to something comparable to the Unreal Viewport: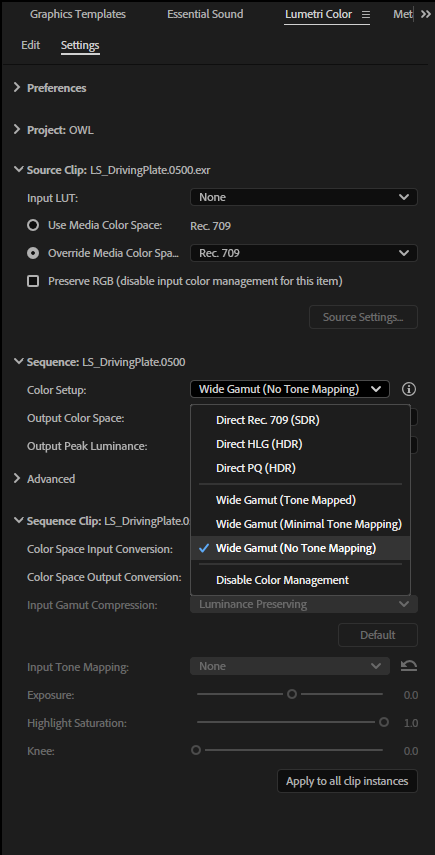
In the
Effects PanelunderLumetri Presetsyou can findcolor gradingpresets andLUTsto choose from: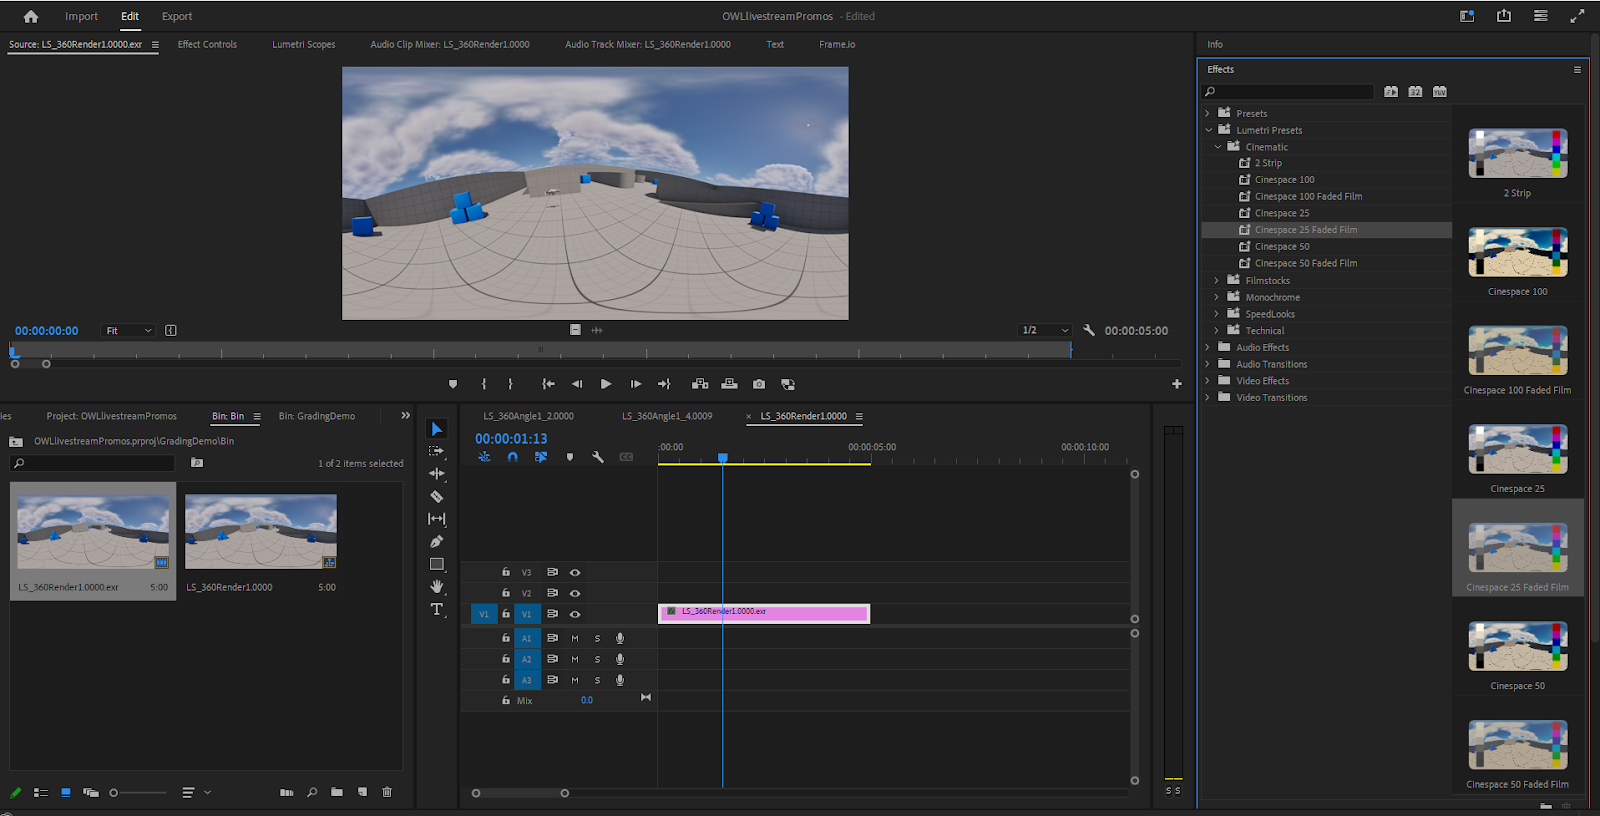
Drag a
LUTon to your clip in the timeline to apply it: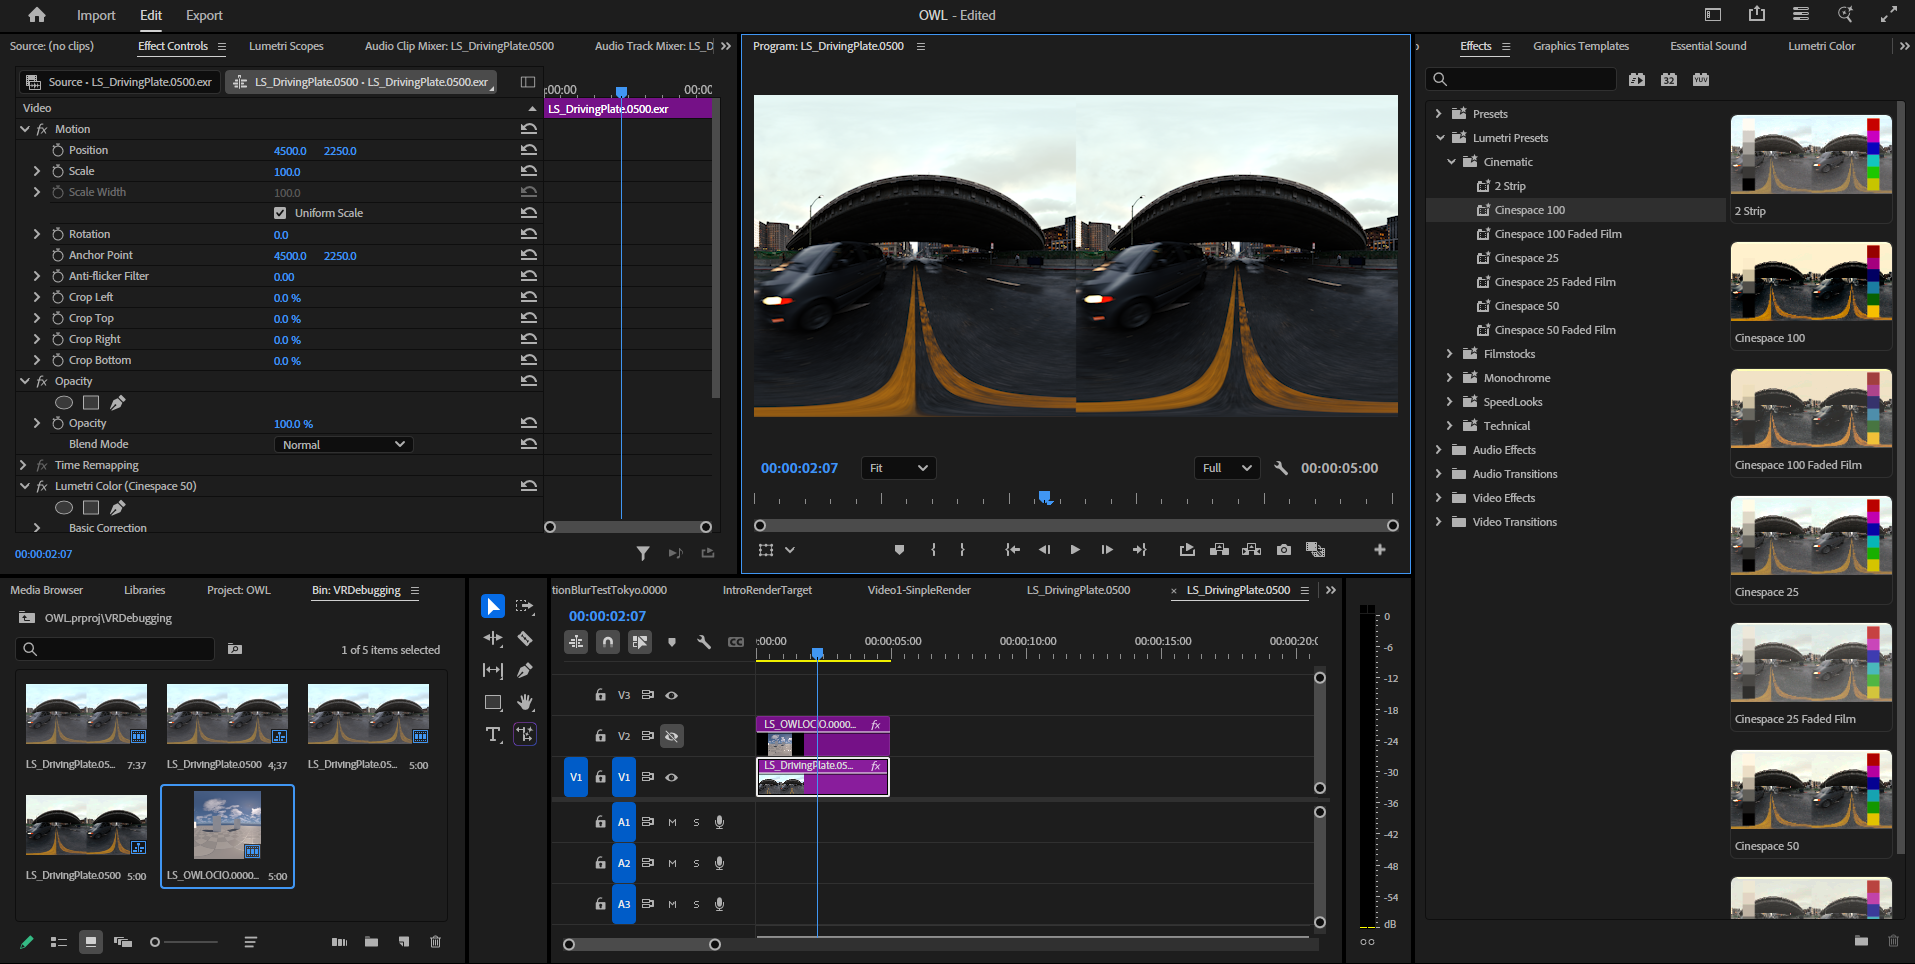
Use the
Effect Controlspanel to further adjust your color grade: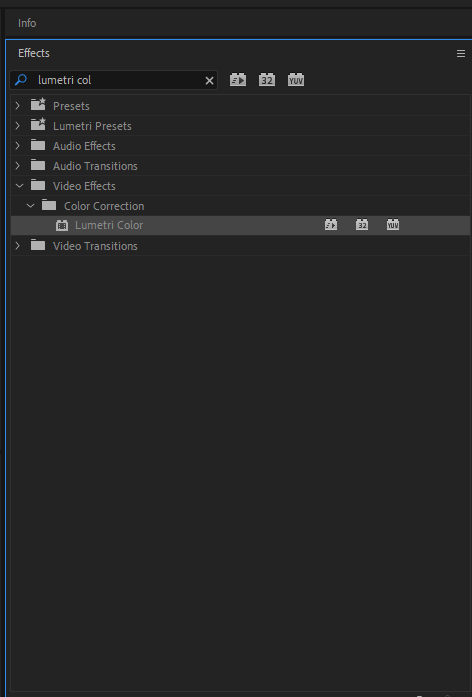
You can also use the
Lumetri Coloreffect to use theLumetricolor grading adjustments without a preset-existingLUTapplied.