Unreal has a limit of around 6kx6k per 'face' rendered in Movie Render Queue above which it will give a VRAM crash.
This means that for renders 12kx12k and above it is essential to use tiling.
In practice from around 8kx8k tiling is useful, especially in heavy scenes where VRAM allocation is high.
To add tiling to your render:
N.B. When you do tiled renders, you will only output final frames whenthe tiles for ALL your frames have been completed. For this reason, you may want to split your sequence into sections - see below for a guide.
- Ensure that your Output Settings (Frame Rate, File Directory) for your final render are all set. All the tiles will use these settings so they cannot be changed later on unless you want to generate a new set of tiles.
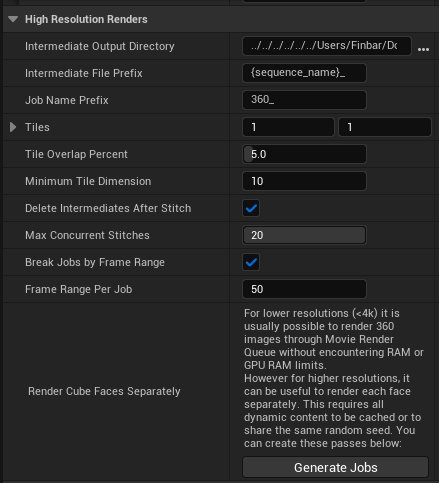
- Go to the High Resolution Renders section in the OWL Movie Render Queue settings:

- There will be two phases to the render:
- Generation of the intermediate files which contain the metadata for each of the tiles.
- A 'stitching' phase which joins together the tiles and creates a the final render.
- Normally you should stitch in Unreal using our stitch pass, but it is also possible to output tiles as .exr files for stitching in external software.
- When creating your render please set:
- Intermediate Output directory: This is the file path for where your intermediate files will be saved. These files will be large and should be saved on a hard drive. They will have the extension .OWLI and cannot be viewed as images.
-
Intermediate File prefix: You can change this if required for your filing.
- Job Name Prefix: You can change this if required for your filing.
- Tiles: This means the number of horizontal and vertical sections.
- If it is set to 1:1 that means you will render each of the 6 cube faces separately and then stitch.
- If it is set to 1:2 that means you will split each of the six faces into two vertical tiles.
- You can keep increasing the number of tiles as your render size increases. We recommend to keep each tile below 4Kx4K to ensure no VRAM crashes in Unreal.
- Tile Overlap Percent: This is a blend between tiles to soften the transition between them and remove visible seams. This should be kept at the default of 5 for most cases.
- Minimum Tile Dimension: This sets a minimum number of pixels for each tile. This is important if you are using cropping to reduce the size of cube-faces, if a tile is too small then certain post-process effects may not work correctly.
- Delete Intermediates After Stitch: This will delete the intermediate files mentioned above.
- If you are just doing a single render then you can select this to save file space.
- However, if you want to use the stitch phase to downscale your render or play around with different resolutions then you should have this unticked as you will use the intermediate files to do so.
- You can also save the tiles as .exr files if you want to use them for debugging or stitching in an external software.
- Debug Intermediate Output: Check the Write Intermediate Debug Files in the High Resolution Renders section before generating the separate jobs in order to output an EXR file and a .meta human-readable text file next to the Off World Intermediate files.
- Max Concurrent Stitches: This is an important setting for the final stitch phase as stitching multiple faces is RAM intensive.
- If you have good RAM (+64GB) and a powerful CPU then you can stitch many frames at once (+15 is possible and it will increase your speed.
- If you have a less powerful machine then please reduce this number.
- Break Jobs by Frame Range: This is highly recommended because it allows you to render a certain number of frames and then stitch them.
- The default is set to 50 but you can increase this if helpful.
- This means every 50 frames your tiles will be stitched together into final frames.
- The final frames will be added to your saved Renders folder.
- The intermediate stitching files will be deleted.
- This also prevents your storage filling up excessively with intermediate files, which happens if you only stitch your frames at the end of your full render.
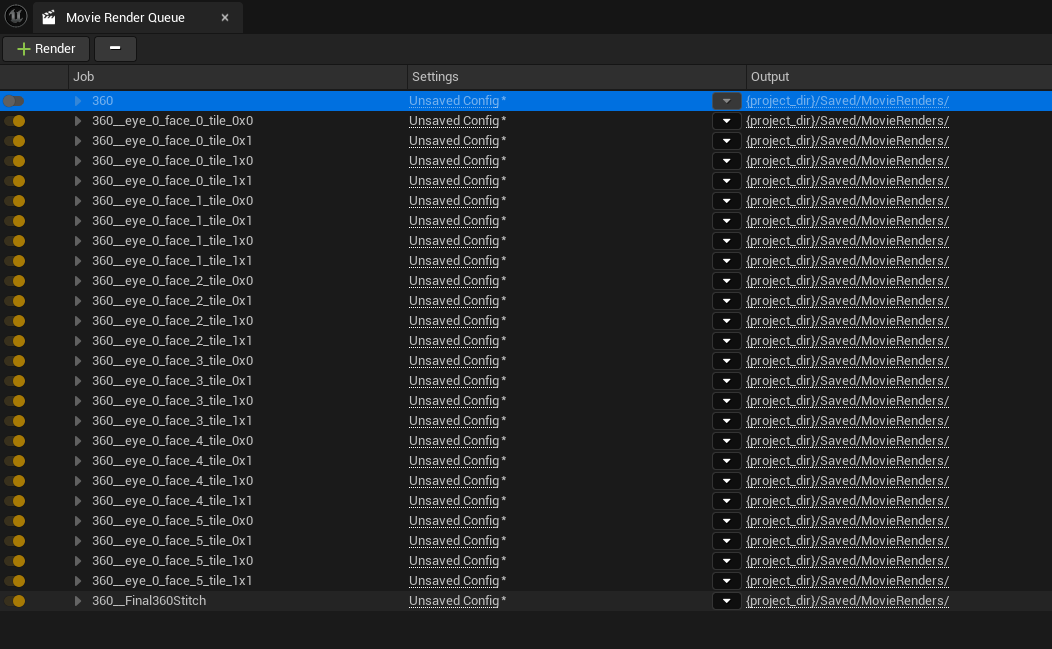
- When you click 'Generate Jobs' you will see all of your tiles appear in your Movie Render Queue output like this:

- You should save this queue as an asset in your content browser like this:
- Notice that the original render is disabled (because that would be a render without tiles and so is too high resolution for your machine.
- Each of the jobs represents the rendering of an individual tile.
- The final job 'FinalStitch' is the stitch phase which will create your final render.
- You should save this queue as an asset in your content browser like this:
- You shouldn't modify any of the tile jobs because that will stop the job working.
Rendering Specific Tiles
If your render gets interrupted, the final stitch phase will not be initiated but you don't need to restart the render from the beginning, you can start from the frame where the render stopped.
To do so, you need to check in your Intermediate File folder (see above) what was the last frame that you rendered:
- Go to your intermediate file folder (this is the repository you selected above in step 4.1 and find the last file rendered.
- The file name is formatted as follows: LS_02_SU_020_E_c_000.fm_000002.sv_00.e_0.f_0.t_0-0
LS (Level Sequence name), c(camera), fm (frame),sv(Scene view, any PP passes)e(eye),f(Face),t(Tile). - Check the eye, face and tile number to know which tile the job stopped at and then check the frame number of that tile.
- You can now reload saved queue from step 5.1 which will bring up all the tiles.
- You can delete or disable all the tiles above the one where the job stopped:
- Now open the config for the tile where the job stopped and go to Output in settings and in Custom Start Frame, start the render from the frame after the final one rendered:
- Custom End Frame can either be blank or should be the last frame in your sequence.
- Now you can Accept and go back to the main render page and start your render again.
- This will render any remaining tiles and also complete the stitch phase.