Render Virtual Reality Headset 180/ 360 Degree Content from Unreal Engine
How to get the best quality renders from Unreal Engine for 180/ 360 Degree Mono and Stereoscopic Virtual Reality content
Last updated About 2 months ago
Overview
The OWL 360 Camera and Movie Render Queue integration lets you render a wide range of different projections for Virtual Reality content.
This article covers various practical steps to think about when creating content for VR headsets to help creators make the best quality videos.
In general, we recommend previsualisation! You can live-render your content direct from the OWL 360 Camera to a headset via NDI and watch your complete sequence before running any renders. This will let you refine details to get your output just right.
Headset Playback
Live Previsualisation
The OWL 360 Camera/ Component is excellent for pre-visualisation because it color-matches your Movie Render Queue output, while also rendering in real-time.
So instead of waiting for hours/ days to see what your render will look like, you can preview it in real-time on a screen or headset to get your shots perfectly as you want them before initiating your final pixel high-resolution output.
This is particularly useful for thinking about audience details like the proximity of objects to the camera, scale of your scene to the viewer and the pace of the camera through your levels:
You can live-stream the
Render Targetof the camera through ourSpout/ NDI Sendersto a headset.This lets you run your sequences in Unreal and watch your full content in real-time.
If you are outputting VR content then you can use the VR.NDIUntethered app in Oculus or the VXIO app for Apple Vision Pro to receive a live NDI feed direct to the headset (with
stereoscopicsupport).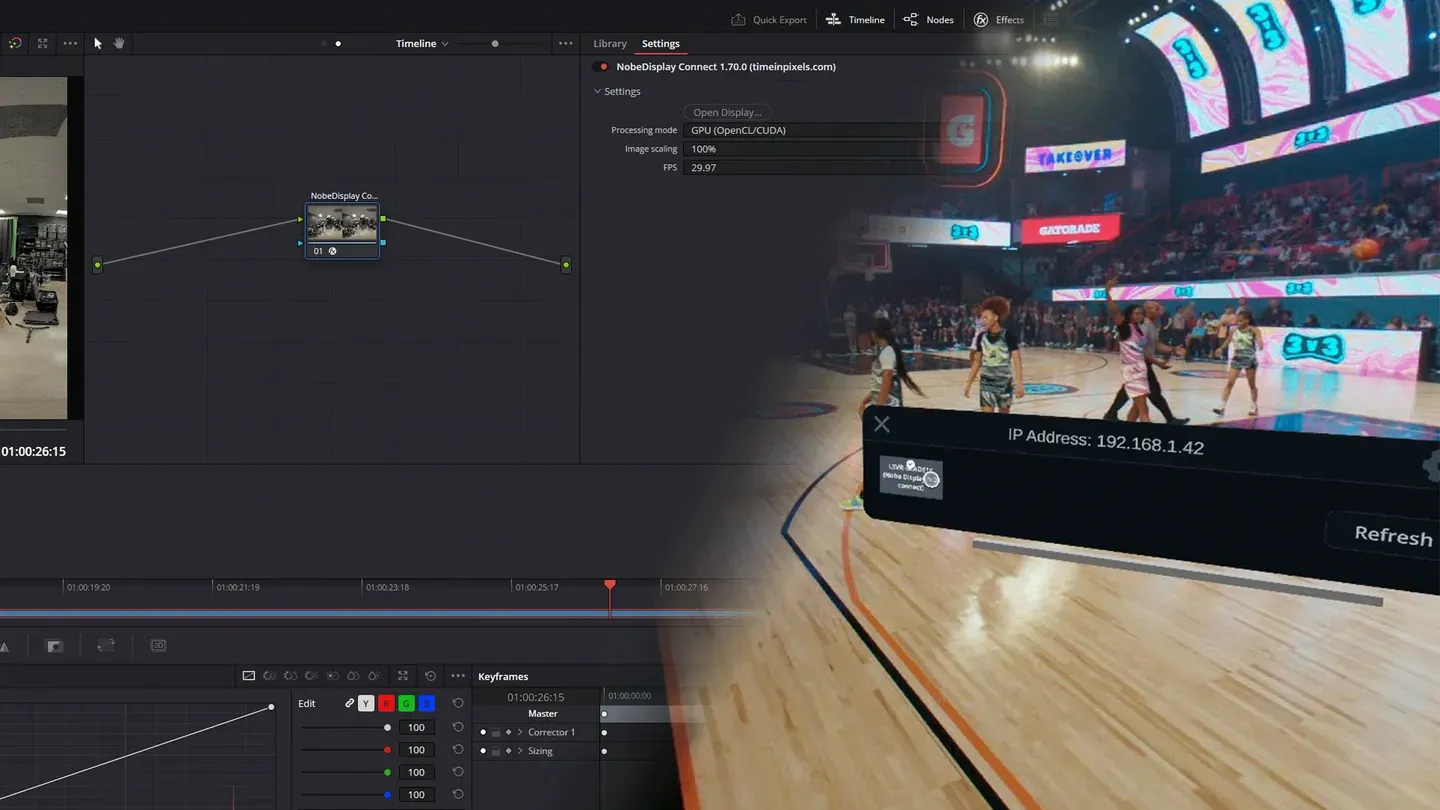
With
DLSSenabled, it should be possible to have4Kresolution live output at20-30FPSwhich is very effective for previs.
Video Playback
The most performant way to play back cinematic VR content is to load it on to the Headset’s internal hard drive via side loading or transferring the files over the network then using a video playback app such as 4XVR or
If using a free player such as 4XVR, Side Quest is a free app that allows for side loading of video content using a USB-C cable.
Virtual Desktop is a paid app that handles playback and allows for transfer of video files via a shared network drive so is a good all rounder for video file review.
Projection Options
Each projection format for VR has different benefits and compromises.
We recommend running some live-previz tests in different projections before deciding on the one that works best for your use case.
Monoscopic vs. Stereoscopic
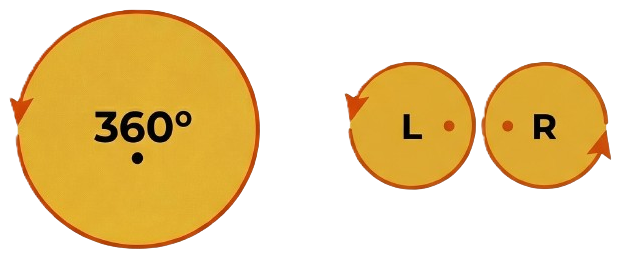
Monoscopicformats immerse the viewer in the space by surrounding them with an image;Stereoscopicformats provide more realism due to 3D depth that comes from each eye seeing the scene differently.
While it may seem that stereo is always better, there are a number of benefits to using a monoscopic projection:
Head Tilting: When viewing
stereoscopicvideo, if a user tilts their head then the horizontal offset the video no longer aligns with their eyes which can lead to eye strain and nausea.Focus Fatigue: A viewer will naturally want to focus on foreground objects and will rotate their eyes to do so. This creates a mismatch with the screen which can cause fatigue.
Image Quality: Many headsets are limited in their maximum resolution. For example, the maximum resolution that an Oculus headset can reliably playback at
60FPSis8192×4096 (8K).In a
monoscopicprojection, this is a standard equirectangular output.However in a
stereo 360projection, this is4096x2048per eye which is much less sharp and detailed.You can avoid this issue in PCVR headsets/ Vision Pro by sending a separate video file for each eye (see below).
Accessibilty:
Monoscopic 360is accessible not just on VR headsets but also on mobiles, tablets etc via ‘magic window’ playback and so has a much wide reach.Universal Scale: Rendered
stereoscopiccontent has a static IPD, which can be discomforting for people with wider or narrower eyes.Fast Motion: In fast moving content,
stereoscopicviewing can be disorientating, whereas monoscopic content can be rendered at higher FPS and is easier for the viewer to navigate and follow.Faster Rendering: Since you are only rendering a single output, render times can be half what it would take to render a stereoscopic output.
180 vs 360
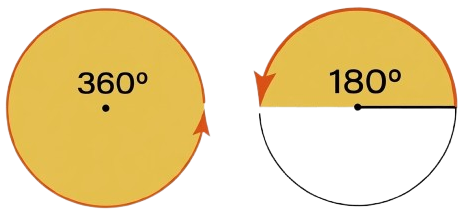
360 Degreecontent allows the viewer completely rotate their head, providing the sensation of full immersion into the world of the video.180 Degreecontent only shows the image in front of the viewer but can provide additional realism throughstereocontent.
When to use either format normally depends on what type of VR content you are making but the main benefits of 180 over 360 are:
Faster Rendering: If you are only rendering half of the screen space then you can cut your render times in half.
Directed Viewer Attention: Since the viewer can only look forward it’s much easier to retain their focus allowing the director to use conventional cinematic camera movements.
Higher Resolution Playback: On many headsets like the Quest 3
Equirectangular vs. Cubemap vs. Fisheye
The standard ubiquitous
projection typesused in VR content are variants of theEquirectangularprojection:180/360 Monoand180/360 Stereo.These are guaranteed to work in all VR players and are easy to work with in terms of color correction, post production and previsualistion.
Cubemapis an efficient format because it is able to store the same pixels asEquirectangularin a~30%smaller file size.This means it also requires less bitrate for the same quality playback.
The downside is that it isn’t accepted by all VR media players.
Fisheyeis the format normally used bymono/stereoreal-world VR cameras such as Insta360 or the Blackmagic URSA Immersive.If you want to composite real-world footage shot with those cameras with footage rendered from Unreal then you can use the
Fisheyelens settingvalues to match the Unreal render to your real camera and composite them together.Otherwise,
Fisheyeisn’t recommended as a render format for VR because it’s not accepted by all media players.
Our Stereoscopic 360 is an experimental projection type which offers correct steroscopy across the x-axis (on both sides and also behind the viewer). However, there can be seams when objects are close to the camera at the top and bottom of the image, which should be managed using the Face Blend Percent setting.
If you are using a cockpit of some sort, this can be designed to overlay these seams ensuring a perfect stereo effect and seamless content.
Work is currently being carried out to upgrade this projection to Omni-Directional Stereo which will solve this issue.
Content Type Tips
You should chose your projection format based on the type of content you are creating and the audience you want to be able to view it.
Cultural Heritage and Architecture
Stereo 360is best because it provides a realistic sense of proportionality and scale while the viewer can look in all directions to learn about the place.A slow walking tour is a very effective format for this content type.
Architectural Visualiation
Mono 360is best because the focus is normally on interior spaces where objects might be too close for stereo 360 and scale is less necessary.Mono 360has much higher device compatibility, maximising accessibility to the content.
Cinematic Storytelling
Stereo 180is best because you can retain the front-focus of the camera to direct the viewer through the narrative while also immersing them in the space.The stereo effect enhances realism and also allows for spatial tension to be generated by characters and objects changing their proximity to the viewer.
It’s also easier to watch because the user doesn’t have to turn their head all the way around, which also reduces the risk of nausea.
Hyper Realistic Simulations
Stereo 360is best for immersive training, such as safety training, phobia experiences or immersion learning experiences (e.g. walking with dinosaurs) so that the viewer is fully immersed into the space and has a sense of scale to the world around them.In these cases, it can be best to not move the camera at all or just to jump to different locations to avoid motion sickness.
Ambisonic audio is highly spatial audio is highly recommended for
stereo 360content to ensure that the audio doesn’t disassociate the viewer from the full immersive visuals.Stereo 180is best for focused training, such as medical training, where the viewer is only expected to be looking in one direction and needs a realistic sense of scale to understand the training correctly.
Entertainment Experiences
Stereo 180is best, allowing focus on the ‘talent’ (e.g a music act) and to face forward if there is a lot of camera movement (for example on VR rollercoasters).The viewer gets the realism and immersion from the 3D effect, making them feel closer to the video content but pixels aren’t wasted for backward facing content that detracts from the main experience.
High-Action Moving Content
Mono 180is normally preferred in this case because it can be delivered at high frame rates, to prevent nausea, and because the changes in perspective that would appear instereo 360are too likely to cause motion sickness.A vehicle is often used to anchor the viewer in this type of content, providing a stable horizon line and fixed point of reference while the camera moves around rapidly.
Some types of movement should still be avoided (see help below).
Content Creation Tips
Cinematic VR has some restrictions that are worth adhering to to prevent nauseating effects for the viewer, you can see more details about these in guides like this.
We recommend to use the 360 Camera previsualisation capabilities to test your content before your final render to save time and ensure you are happy with these elements.
Field-of-View
At any moment a viewer will be able to see only a portion of the rendered content.
The focus area for humans is about
50 degreeswide and tall, beyond that there is another40 degreesabove and below in peripheral vision (vertical FOV) and80 degreesside-to-side (horizontal FOV).Actors/ objects in this focus area will demand attention, reducing peripheral vision so be placed there consciously as the narrative requires.
Distance also affects the judgement of the viewer and any focal objects should be between
1-6maway from the viewer.This area (field-of-view and distance) is the sweet spot for maximising
stereoscopiceffect.If you want a ‘wide-angle’ effect shot where the audience absorbs the whole scene at once then you should limit any close objects/ actors and ensure they are not bunched into a specific part of your scene.
Focus
Normally,
depth-of-fieldshould be kept infinite in 180/ 360 content to avoid conflict with the lenses of the headset.In
stereo 180content, tt’s generally recommended to keep the subject in the centre of the frame to preserve the maximum stereo effect.You can use the
OWL 360 Camerato set a specificfocal distancewhich can be effective for highlighting talent or certain objects in the scene.You can change this distance if you fade out to a new shot position, but it should not be changed mid-shot as it will cause nausea.
Headsets like Oculus 3 and Vision Pro, use foveated rendering to track the eyes and blur the parts of the image that aren’t being looked at, which lets the viewer feel like they are focusing on specific parts of a scene even if the actual focus of the camera isn’t changing.
Distance
Don’t place objects too close to the camera unless it is desired/ needed for cinematic effect.
In general, close objects will create a sense of discomfort and difficulty viewing.
The ‘safe zone’ is considered to be at least 1 meter from the camera (by default this is
100Unrealworld units).In
stereoscopiccontent, non-background elements shouldn’t be more than 6 meters (600Unrealworld units) from the camera because beyond this the 3D effect will disappear.
Height
For standing, a lens height of between
1.57-1.68 metersis recommended.This is a little lower than the average height of an adult, lowering the height slightly is shown to give more of a sense of immersion.
For seated content (cars, rollercoasters etc.)
~1.2 metersshould be best.If you are using a flying object (drone, plane etc) then it’s best to anchor the viewer into a cockpit which provides a stationary reference point while the camera moves to prevent nausea and give a sense of scale.
Rotation
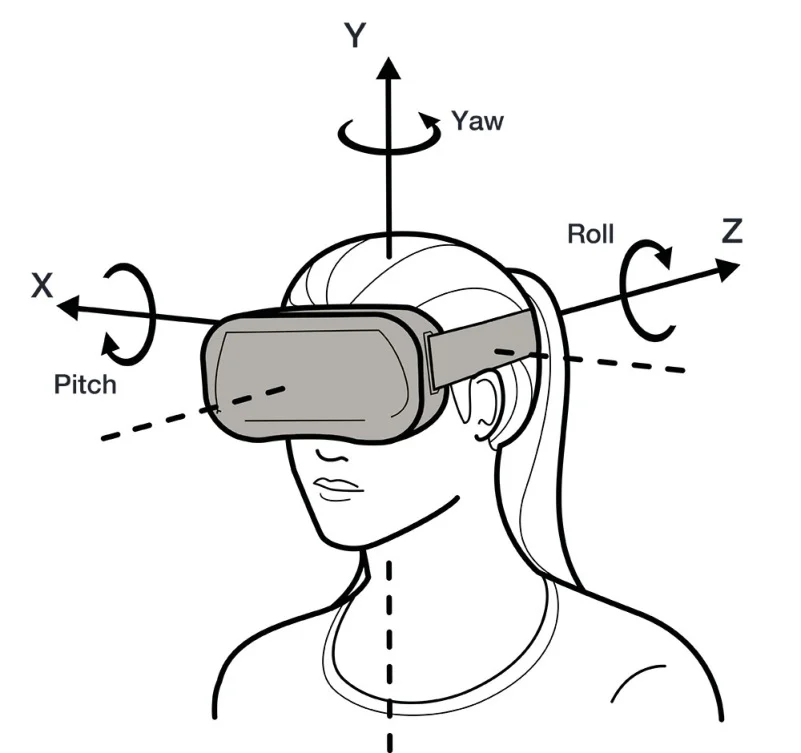
No matter what camera movement you have, it’s highly recommended to have a level horizon.
Any tilt can lead to nausea due to the mismatch between the image and the body of the viewer.
Due to the output already having three degrees of freedom, pitch, roll and yaw should be used very rarely:
Roll: This should never be used since it will cause nausea.
Pitch: This should normally be neutral so the viewer can move their head up and down naturally in the scene.
Yaw: This is normally only recommended when the view in anchored by a vehicle cockpit which provides a stable reference point.
Instead of turning the camera, visual queues should be used to guide the viewers attention, such as movement of light or subjects on the side of the scene.
If you want to change the viewers perspective then a blink edit (fade to black) with a snap rotation is best to avoid nausea.
Motion
Smooth, stable, forward motion is the most recommended, any other motion has the potential to cause nausea.
Acceleration should be constant and slow and used rarely, it is better to start and stop instantly without ease-in/ outs.
If moving as a human, a pace of
1-1.5 meters/ secondprovides a natural motion. Faster motion can be associated with vehicles and so is best combined with a cockpit.Sideways, backwards and vertical motion should be avoided unless an obvious part of the narrative/ content.
Using a visual reference such as a body or cockpit anchors both the content and the motion and so will provide the most stable and pleasurable viewing experience.
Export Settings
There are a number of settings you need to calibrate correctly to ensure that your content can be viewed perfectly on your target headsets.
In general, you want to render at the highest possible value that will work on the lowest quality headset you are making content for, since that ensures the best content experience for your viewer.
Super-Sampling
If you are using
Temporal Super Resolution (TSR)as youranti-aliasingalgorithm in Unreal, which is recommended for content that usesLumenGlobal Illumination, then you can increase the effective sharpness and detail of your render by using super-sampling.You use a
Console Variableto set a higherscreen percentageso that theTSRalgorithm has more pixels to choose from than you need for your resolution.This stops any smudging in pixels where the algorithm might not have enough color information and so provides a much cleaner image, even at lower resolutions.
This is highly recommended for VR renders, since the maximum potential resolution is always limited by the capacity of the headset.
This method will help the renders look like a higher resolution than they are and also stop the encoding compression algorithms from eliminating visual detail.
PC Connected: Varjo, Pimax
PC connected headsets can use higher bitrate since they rely on a more powerful GPU but are restricted by the NVENC decoder’s limit of 8192×8192.
To increase the per eye resolution of stereo content, you can render and encode each eye separately and send them to the player as two video files marked with L, R (see guide below).
This is only possible for PC GPU decoding, it will not work for standalone headsets.
Apple Vision Pro (M5)
The M5 upgrade can decode 8K video for each eye, which is the highest performance of a standalone headset.
Don’t separate each eye into a separate video file, just use the MV-HEVC codec which optimises the content for dual eye decoding.
Quest 3, Pico 5, Vision Pro M1
The settings below are at the edge of capacity for the standalone headsets so should be tested fully before releasing content to your audience.
Settings Explained
Resolution and Frame Rate
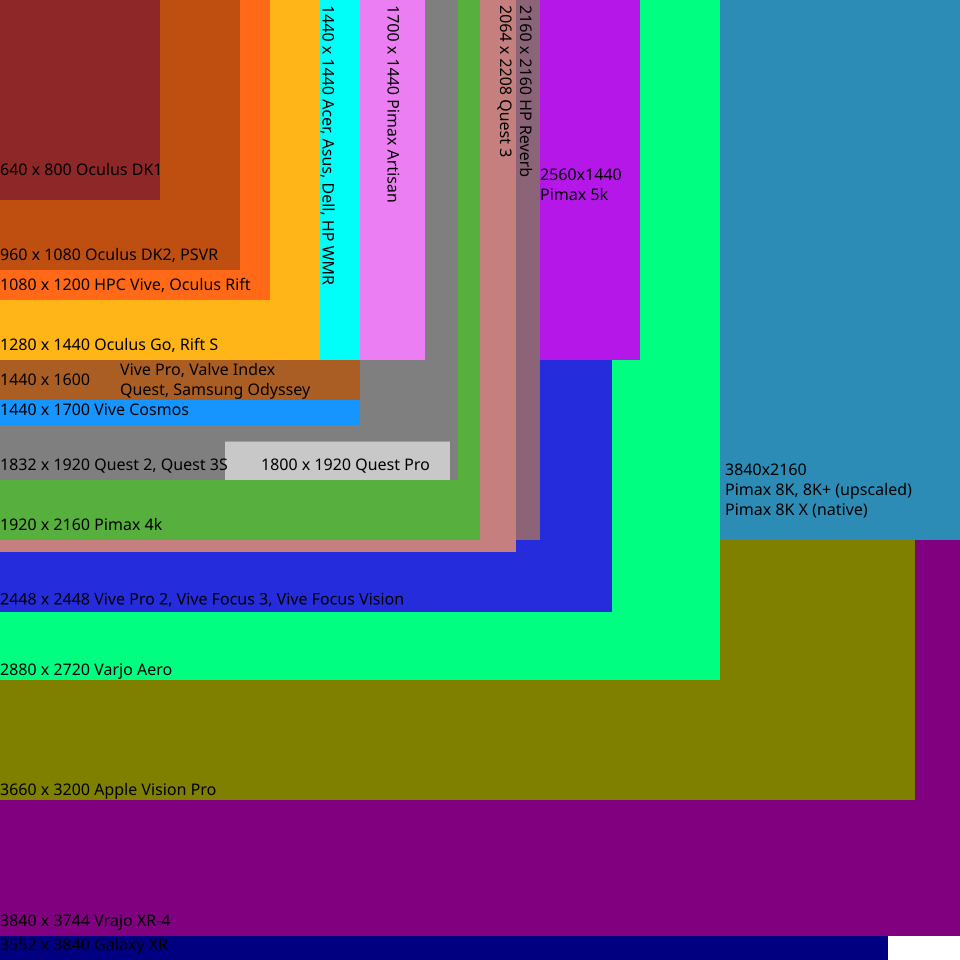
To play your content, the headset needs to decode the pixels and it will have a maximum number that it is able to decode to offer smooth playback (no dropped frames).
If you exceed this number then your content will stutter because the headset is not able to process the pixels fast enough.
Resolution and frame rate go hand-in-hand because they determine the total pixels that have to be decoded per second.
Codec
The AV1 codec is generally the best option for encoding because it is compatible with nearly all headsets and about 40% more efficient than h.265 meaning you can use a lower bitrate but achieve the same image quality.
Apple’s MV-HEVC codec is optimised for the Vision Pro, but also compatible with the Samsung Galaxy XR. It includes horizontal disparity metadata to dynamically adjust the 3D depth based on the user’s IPD distance.
You can use DaVinci, Premier Pro or the latest version of FFMPEG to encode video using these codecs.
Bitrate
The bitrate defines the amount of data that the encoder is allowed to use per second which affects the level of detail in your final content.
A higher bitrate won’t always result in a higher quality video if the encoder is able to process pixels with less data.
For this reason, it’s best to encode using a Variable Bitrate (VBR) with a maximum value which allows the encoder to use more or less bits depending on the complexity of the pixels in each set of frames, which results in the best image quality and the lowest file size.
The maximum bitrate value that each headset can decode varies massively, with the Vision Pro series 2 able to process ~350Mbps compared to the Quest 3 which can only do ~150Mbps.
We recommend to follow the suggested values below to ensure the best quality output.
Color Profile
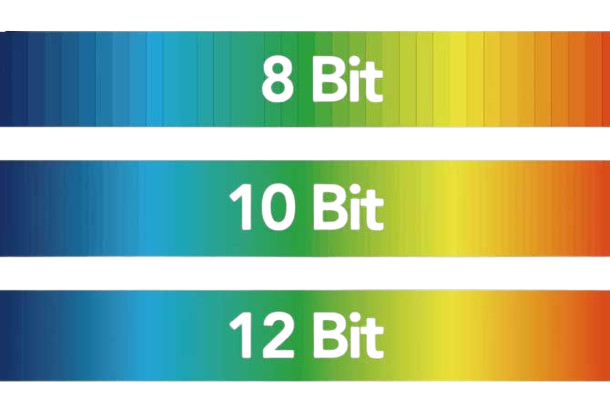
Most headsets are able to playback 10bit color so ideally you should render in 16 or 32 bit color in Unreal so you have the required pixels for that color format.
When you encode your output to video you can select 10bit color as explained below.
Encoding Frames to Video
Importing footage for Premier Pro
In Premier pro, right click in a project’s
Binand selectImport, select this first image in animage sequence, ensureImage Sequenceis ticked and clickImport.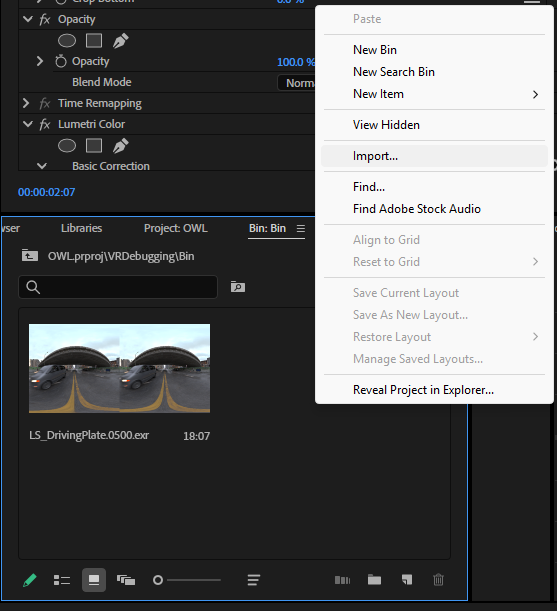
Check the
Frame Rateis correct usingModify > Interpret Footage: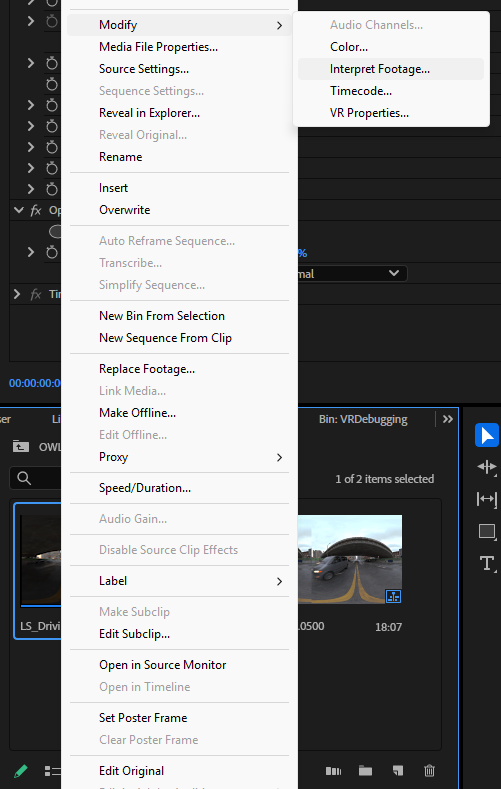
Select an
Assumed Frame Rateof whatever you have rendered at in Unreal.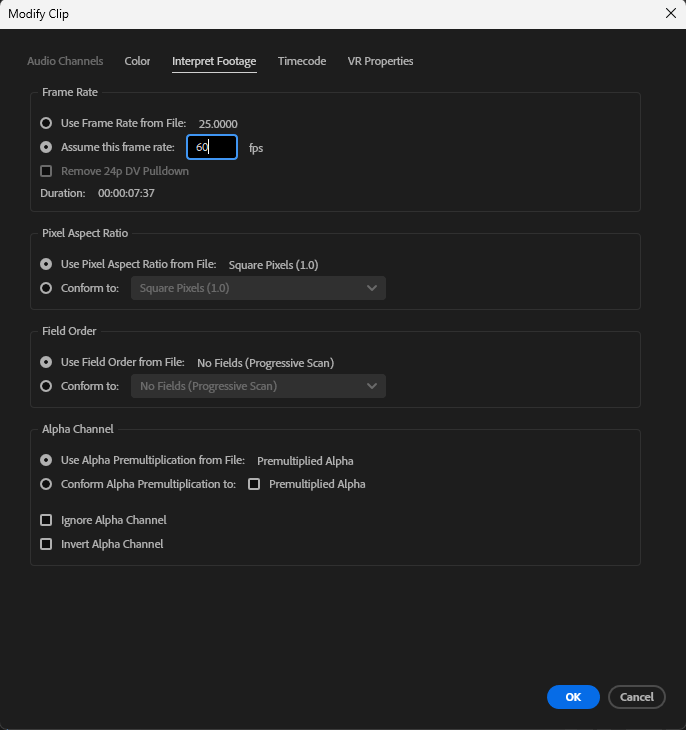
Right click on the
sequenceand selectNew Sequence from Clip.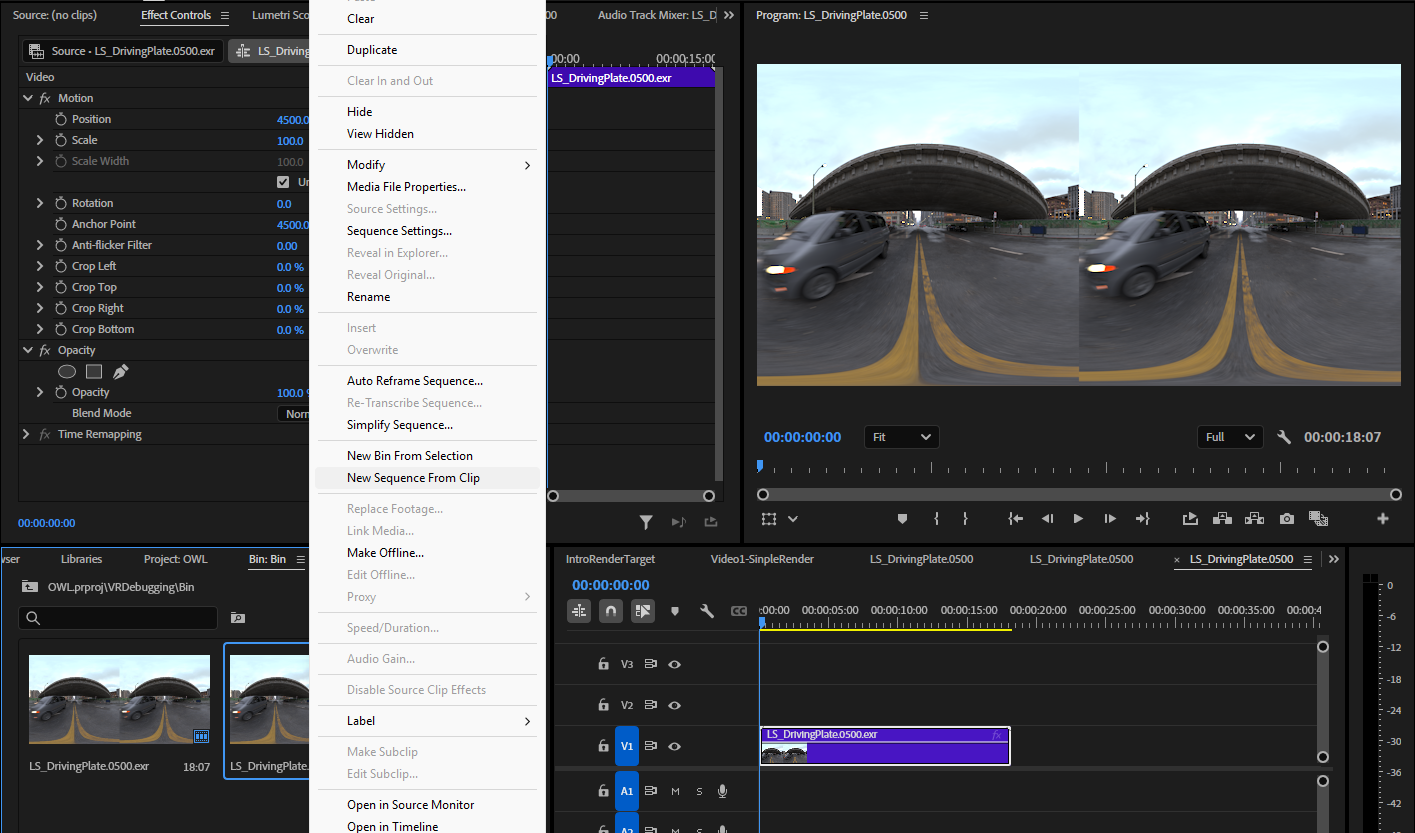
Use
File > Export Mediato bring up the Export Tab. For example, you can follow the steps below for Quest 3:Create a new preset and ensure it is set to
Custom. Set the format toHEVC(H.265).This is an essential codec for VR headsets because it has superior playback at high bitrates.AV1is also a suitable codec for high resolution playback: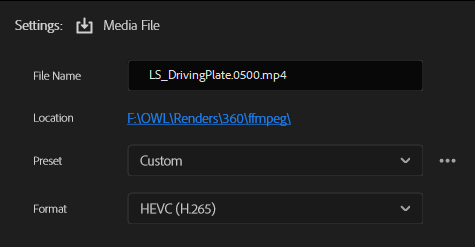
Set the resolution to somewhere below
8192×4320, set the frame rate to60 fps: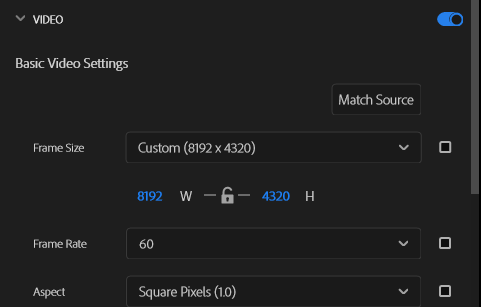
Set the Encoding settings to
Hardware Encodingfor the fastest rendering,Main 10 Profilefor 10 bit color on HDR displays andLevel 6.1as a performance constraint for 8k video: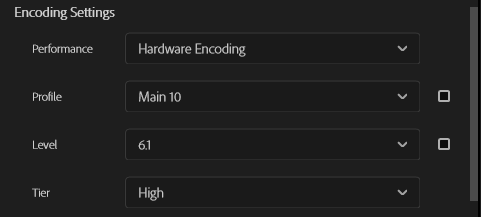
Set the
Target Bitrateto 100 mbps.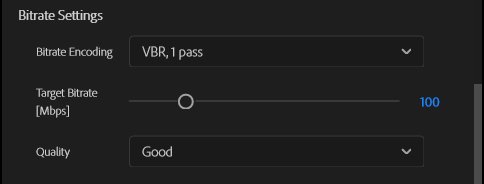
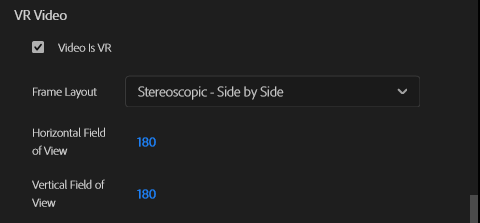
Set the VR Metadata to match your 360 format. Stereoscopic Side by Side with a 180 Horizontal and Vertical field of View is suitable for VR 180 format.